As we know Microsoft Azure Cloud platform works seamlessly with Azure Active Directory (AAD).
The following products are three of many cloud-based Microsoft products.
As demonstrated below each of them has its own RBAC. But only AAD manages the identities and the Azure Subscription & Azure DevOps and also the other products which can use ADD use the AAD’s identities.
We see that the users/identities are managed via AAD and products which can connect to ADD can profit from centralized identity management. AAD supports the single common digital identity. It means a user/identity must not have a separate identity to work with different services or products.
Note To keep this post simple I considered a user as an identity.
Identity is actually more than a user. It can be an identity of a user, or an identity of a service.
Identity protection in AAD
When having a single identity which is a great idea for identity management especially when you are talking about it at an enterprise scale, the security and protection of the identity are getting more important. An identity breach can cause unexpected and unimaginable consequences. Such as provisioning expensive resources on subscription, deleting a Repo, or a Project in DevOps.
For such breaches/compromises, there are different solutions. The easiest and quickest one is activating Multi-Factor Authentication (MFA) for the whole AAD. It means all the users that are managed with ADD must sign in with MFA.
How to activate MFA? watch the answer in this video.
Note I recommend having a comprehensive concept for activating MFA in huge projects or at an enterprise scale.
It doesn’t matter which cloud provider you are using never forget identity security and protection.
After activating MFA in this way the user has to log in to all the services, which are connected to this AAD, with MFA. MFA means using not only the username and password method but also a second authentication factor to identify who the user is.
When a policy is set on an organization/ top node all descendants of that node inherit this policy by default. If you set a policy at the root organization node/ root account, then the configuration of restrictions defined by that policy will be passed down through all descendant folders, projects, services, and resources.
My opinion
AWS Advantage: In some scenarios is necessary to have only one VPC for the whole organization and the projects must use this VPC but from different Accounts. It’s possible in AWS because we have cross-account shared services.
In Azure and GCP we cannot share a VPC or a VNet between two Subscriptions or Projects.
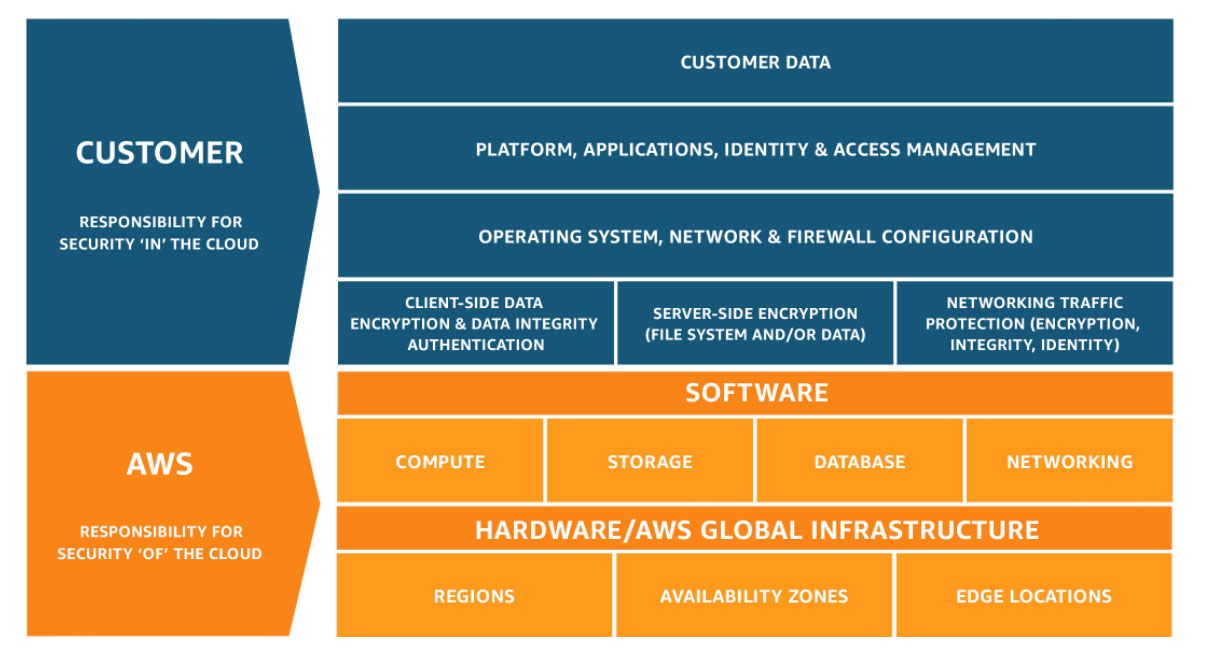
Configure the access to the resources e.g. servers
Responsible for operating system hardening of the servers
Ensure the disk volume has been encrypted
Determine the identity and access permissions of specific resources
ooo
Who should take care of security?
In companies where they up and run services/application on the cloud, the responsible teams have to have enough knowledge about the security on the cloud.
Developers and Enterprise architect
Ensure cloud services they use are designed and deployed with security.
DevOps and SRE Teams
Ensure security introduced into the infrastructure build pipeline and the environments remain secure post-production.
InfoSec Team
Secure systems
In which step of the project the security have to be applied?
Scenario: Suppose you are a developer for a board game company. A product line produced by your company has recently become popular. The volume of requests from your retail partners to your inventory API is growing quickly: much faster than the rate that your inventory actually changes. You’d like your API to respond to requests rapidly without incurring load on your API. You use Azure API Management to host your API. You’re considering using an API Management policy to cache compiled responses to requests.
Api management for changing the behaviore of the api without changing the code
it exposes apis of a company for the api customers
it is used for api inventory
<policies>
    <inbound>
        <base />
 # it means first the policy of the higher level is applied
        <check-header name="Authorization" failed-check-httpcode="401" failed-check-error-message="Not authorized" ignore-case="false">
        </check-header>
    </inbound>
    <backend>
        <base />
    </backend>
    <outbound>
        <base />
        <json-to-xml apply="always" consider-accept-header="false" parse-date="false" />
    </outbound>
    <on-error>
        <base />
    </on-error>
</policies>
policies for
restricting access e.g. Check Http Header, Limit call rate by subscription, Limit call rate by key, Restrict caller Ips, Policies for Authentication, Cross domain policies, Transformation policies
Cross domain policies
Cross domain requests are considered a security threat and denied by browsers and APIs
Cross-Origin Resource Sharing (CORS), use the CORS policy
Some AJAX code, which runs on the browser, uses JSON with padding to make cross-domain calls securely. Use the JSONP policy to permit clients to use this technique
Caching policies
better performance for caching the compiled responses
Advanced policies
apply a policy only when the response passes a specific test, use the Control flow policy
Use the Forward request policy to forward a request to a backend server
To control what happens when an action fails, use the Retry policy
The Send one-way request policy can send a request to a URL without waiting for a response
If you want to store a value for use in a later calculation or test, use the Set variable policy to persist a value in a named variable
we can use vary-by tags/attributes in cache-lookup-value policy.
vary-by-query-parameter (tag): if all users have to see same price/result for a specific product, then we have to set vary-by-query-parameter to partnumber. APIM groups the requests based on partnumber.
vary-by-developer (attribute): becase vary-by-developer=”false”, APIM understands that different subscriptions key doesn’t alter the response. if this attribute is true, APIM serves a response from the cache only if it was originally requested with the same subscription key.
If a header can make a significant difference to a response, use the <vary-by-header> tag
you want to avoid the cache being cleared when the API Management service is updated.
you want to have greater control over the cache configuration than the internal cache allows
You want to cache more data than can be store in the internal cache.
if you use apim with consumption pricing tier, then you have to use external cache. because this pricing tier follows the serverless designprincipal and we should use it with serverless web apis, and it has no internal cache.
API keys / subscriptions (query string / header parameter)
The default header name is Ocp-Apim-Subscription-Key, and the default query string is subscription-key.
client certificate
Scenario: Suppose you work for a meteorological company, which has an API that customers use to access weather data for forecasts and research. There is proprietary information in this data, and you would like to ensure that only paying customers have access. You want to use Azure API Management to properly secure this API from unauthorized use.
Scenario: Businesses are extending their operations as a digital platform by creating new channels, finding new customers, and driving deeper engagement with existing ones. APIM provides the core competencies to ensure a successful API program through developer engagement, business insights, analytics, security, and protection. You can use APIM to take any backend and launch a full-fledged API program based on it.
Use Subscription key to secure access to an API
Azure api management service helps to expose the apis
developers musr subscrib the api / product (these are two different scope)
used to secure the api / product with a subscription key / API key
preventing denial of service attacks (DoS) by using throttling
or using advanced security policies like JSON Web Token (JWT) validation
Enabling independent software vendor (ISV) partner ecosystems by offering fast partner onboarding through the developer portal
we can define who can access api through the api gateway (only customers who have subscribed to your service can access the API and use your forecast data, by issuing subscription keys)
# how you can pass a key in the request header using curl
curl --header "Ocp-Apim-Subscription-Key: <key string>" https://<apim gateway>.azure-api.net/api/path

# example curl command that passes a key in the URL as a query string
curl https://<apim gateway>.azure-api.net/api/path?subscription-key=<key string>

# If the key is not passed in the header, or as a query string in the URL, you'll get a 401 Access Denied response from the API gateway.

# call without subscription key
curl -X GET https://[Name Of Gateway].azure-api.net/api/Weather/53/-1
# output
{ "statusCode": 401, "message": "Access denied due to missing subscription key. Make sure to include subscription key when making requests to an API." }

# call with subscription key as header
curl -X GET https://[Name Of Gateway].azure-api.net/api/Weather/53/-1 \
  -H 'Ocp-Apim-Subscription-Key: [Subscription Key]'

# output : {"mainOutlook":{"temperature":32,"humidity":34},"wind":{"speed":11,"direction":239.0},"date":"2019-05-16T00:00:00+00:00","latitude":53.0,"longitude":-1.0}
Use client certificates to secure access to an API
used to provide TLS mutual authentication between the client and the API gateway
allow only requests with certificates containing a specific thumbprint (through inbound policies)
TLS client authentication, the API Management gateway can inspect the certificate contained within the client request for the following properties
Property
Reason
Certificate Authority (CA)
Only allow certificates signed by a particular CA
Thumbprint
Allow certificates containing a specified thumbprint
Subject
Only allow certificates with a specified subject
Expiration Date
Only allow certificates that have not expired
two common ways to verify a certificate
Check who issued the certificate. If the issuer was a certificate authority that you trust, you can use the certificate. You can configure the trusted certificate authorities in the Azure portal to automate this process.
If the certificate is issued by the partner, verify that it came from them. For example, if they deliver the certificate in person, you can be sure of its authenticity. These are known as self-signed certificates.
apim consumption tier
this tier is for serverless APIs e.g. azure functions
in this tier for using client certificate must explicitly enable it APIM Instance > custom domains > Request Client Certificate: Yes
check thumbnail of a client certificate in policies
# Every client certificate includes a thumbprint, which is a hash, calculated from other certificate properties

<choose>
    <when condition="@(context.Request.Certificate == null || context.Request.Certificate.Thumbprint != "desired-thumbprint")" >
        <return-response>
            <set-status code="403" reason="Invalid client certificate" />
        </return-response>
    </when>
</choose>
Check the thumbprint against certificates uploaded to API Management
n the previous example, only one thumbprint would work so only one certificate would be validated. Usually, each customer or partner company would pass a different certificate with a different thumbprint. To support this scenario, obtain the certificates from your partners and use the Client certificates page in the Azure portal to upload them to the API Management resource. Then add this code to your policy:
Create Self-Signed Certificate [Source] and use in APIM
# create a private key and certificate
pwd='Pa$$w0rd'
pfxFilePath='selfsigncert.pfx'
openssl req -x509 -sha256 -nodes -days 365 -newkey rsa:2048 -keyout privateKey.key -out selfsigncert.crt -subj /CN=localhost

# convert the certificate to PEM format
openssl pkcs12 -export -out $pfxFilePath -inkey privateKey.key -in selfsigncert.crt -password pass:$pwd
openssl pkcs12 -in selfsigncert.pfx -out selfsigncert.pem -nodes

# When you are prompted for a password, type Pa$$w0rd and then press Enter.

# Get the thumbprint for the certificate
Fingerprint="$(openssl x509 -in selfsigncert.pem -noout -fingerprint)"
Fingerprint="${Fingerprint//:}"
echo ${Fingerprint#*=}

# output is hexadecimal string without any accompanying text and no colons
curl -X GET https://[api-gateway-name].azure-api.net/api/Weather/53/-1 \
  -H 'Ocp-Apim-Subscription-Key: [Subscription Key]'

# output : return a 403 Client certificate error, and no data will be returned.
Expose multiple Azure Function apps as a consistent API by using APIM
Combine multiple Azure Functions apps into a unified interface by importing them into a single Azure API Management instance.
Scenario: Suppose you work for an online store with a successful and busy web site. Your developers have written the business logic for the site as microservices in the form of Azure Functions. Now, you want to enable partners to interact with your online store from their own code by creating a web API that they can call over HTTP. You want to find an easy way to assemble your functions into a single API.
In your online store, you have implemented each part of the application as a microservice – one for the product details, one for order details, and so on. A separate team manages each microservice and each team uses continuous development and delivery to update and deploy their code on a regular basis. You want to find a way to assemble these microservices into a single product and then manage that product centrally.
use Azure Functions and Azure API Management to build complete APIs with a microservices architecture
Microservices has become a popular approach to the architecture of distributed applications
we can develop distributed systems with serverless architecture e.g. azure function
Azure Batch: Azure Batch is an Azure service that enables you to run large-scale parallel and high-performance computing (HPC) applications efficiently in the cloud.
High-performance computing (HPC)
MPI: Message Passing Interface
Workflow: Business processes modeled in software are often called workflows.
Design-first approach: include user interfaces in which you can draw out the workflow
Azure compute: is an on-demand computing service for running cloud-based applications
List the created virtual machines in your subscription
open-port
Open a specific network port for inbound traffic
restart
Restart a virtual machine
show
Get the details for a virtual machine
start
Start a stopped virtual machine
stop
Stop a running virtual machine
update
Update a property of a virtual machine
# Create a Linux virtual machine
az vm create \
  --resource-group [sandbox resource group name] \
  --location westus \
  --name SampleVM \
  --image UbuntuLTS \
  --admin-username azureuser \
  --generate-ssh-keys \
  --verbose # Azure CLI tool waits while the VM is being created.
    # Or
  --no-wait # option to tell the Azure CLI tool to return immediately and have Azure continue creating the VM in the background.

# output
{
  "fqdns": "",
  "id": "/subscriptions/<subscription-id>/resourceGroups/Learn-2568d0d0-efe3-4d04-a08f-df7f009f822a/providers/Microsoft.Compute/virtualMachines/SampleVM",
  "location": "westus",
  "macAddress": "00-0D-3A-58-F8-45",
  "powerState": "VM running",
  "privateIpAddress": "10.0.0.4",
  "publicIpAddress": "40.83.165.85",
  "resourceGroup": "2568d0d0-efe3-4d04-a08f-df7f009f822a",
  "zones": ""
}

  # generate-ssh-keys flag: This parameter is used for Linux distributions and creates
  # a pair of security keys so we can use the ssh tool to access the virtual machine remotely.
  # The two files are placed into the .ssh folder on your machine and in the VM. If you already
  # have an SSH key named id_rsa in the target folder, then it will be used rather than having a new key generated.

# Connecting to the VM with SSH
ssh azureuser@<public-ip-address>

# for exit
logout

# Listing images
az vm image list --output table

# Getting all images
az vm image list --sku WordPress --output table --all # t is helpful to filter the list with the --publisher, --sku or –-offer options.

# Location-specific images
az vm image list --location eastus --output table
Pre-defined VM sizes
Azure defines a set of pre-defined VM sizes for Linux and Windows to choose from based on the expected usage.
Type
Sizes
Description
General purpose
Dsv3, Dv3, DSv2, Dv2, DS, D, Av2, A0-7
Balanced CPU-to-memory. Ideal for dev/test and small to medium applications and data solutions.
Compute optimized
Fs, F
High CPU-to-memory. Good for medium-traffic applications, network appliances, and batch processes.
Memory optimized
Esv3, Ev3, M, GS, G, DSv2, DS, Dv2, D
High memory-to-core. Great for relational databases, medium to large caches, and in-memory analytics.
Storage optimized
Ls
High disk throughput and IO. Ideal for big data, SQL, and NoSQL databases.
GPU optimized
NV, NC
Specialized VMs targeted for heavy graphic rendering and video editing.
High performance
H, A8-11
Our most powerful CPU VMs with optional high-throughput network interfaces (RDMA).
# get a list of the available sizes
az vm list-sizes --location eastus --output table

# output
MaxDataDiskCount    MemoryInMb  Name                      NumberOfCores    OsDiskSizeInMb    ResourceDiskSizeInMb
------------------  ------------  ----------------------  ---------------  ----------------  ----------------------
                 2          2048  Standard_B1ms                         1           1047552                    4096
                 2          1024  Standard_B1s                          1           1047552                    2048
                 4          8192  Standard_B2ms                         2           1047552                   16384
                 4          4096  Standard_B2s                          2           1047552                    8192
                 8         16384  Standard_B4ms                         4           1047552                   32768
                16         32768  Standard_B8ms                         8           1047552                   65536
                 4          3584  Standard_DS1_v2 (default)             1           1047552                    7168
                 8          7168  Standard_DS2_v2                       2           1047552                   14336
                16         14336  Standard_DS3_v2                       4           1047552                   28672
                32         28672  Standard_DS4_v2                       8           1047552                   57344
                64         57344  Standard_DS5_v2                      16           1047552                  114688
        ....
                64       3891200  Standard_M128-32ms                  128           1047552                 4096000
                64       3891200  Standard_M128-64ms                  128           1047552                 4096000
                64       3891200  Standard_M128ms                     128           1047552                 4096000
                64       2048000  Standard_M128s                      128           1047552                 4096000
                64       1024000  Standard_M64                         64           1047552                 8192000
                64       1792000  Standard_M64m                        64           1047552                 8192000
                64       2048000  Standard_M128                       128           1047552                16384000
                64       3891200  Standard_M128m                      128           1047552                16384000

# Specify a size during VM creation
az vm create \
    --resource-group learn-5d4bcefe-17c2-4db6-aba8-3f25d2c54844 \
    --name SampleVM2 \
    --image UbuntuLTS \
    --admin-username azureuser \
    --generate-ssh-keys \
    --verbose \
    --size "Standard_DS5_v2"

# Get available VM Size
# Before a resize is requested, we must check to see if the desired size is available in the cluster our VM is part of.
az vm list-vm-resize-options \
    --resource-group learn-5d4bcefe-17c2-4db6-aba8-3f25d2c54844 \
    --name SampleVM \
    --output table

# Resize an existing VM
az vm resize \
    --resource-group learn-5d4bcefe-17c2-4db6-aba8-3f25d2c54844 \
    --name SampleVM \
    --size Standard_D2s_v3
This will return a list of all the possible size configurations available in the resource group. If the size we want isn’t available in our cluster, but is available in the region, we can deallocate the VM. This command will stop the running VM and remove it from the current cluster without losing any resources. Then we can resize it, which will re-create the VM in a new cluster where the size configuration is available.
# List VMs
az vm list

# Output types
az vm list --output table|json|jsonc|tsv

# Getting the IP address
az vm list-ip-addresses -n SampleVM -o table
# output
VirtualMachine    PublicIPAddresses    PrivateIPAddresses
----------------  -------------------  --------------------
SampleVM          168.61.54.62         10.0.0.4

# Getting VM details
az vm show --resource-group learn-5d4bcefe-17c2-4db6-aba8-3f25d2c54844 --name SampleVM
# we could change to a table format, but that omits almost all of the interesting data. Instead, we can turn to a built-in query language for JSON called JMESPath.
# https://jmespath.org/


# Adding filters to queries with JMESPath
{
  "people": [
    {
      "name": "Fred",
      "age": 28
    },
    {
      "name": "Barney",
      "age": 25
    },
    {
      "name": "Wilma",
      "age": 27
    }
  ]
}

# poeple is an array
people[1]
# output
{
    "name": "Barney",
    "age": 25
}


people[?age > '25']
# output
[
  {
    "name": "Fred",
    "age": 28
  },
  {
    "name": "Wilma",
    "age": 27
  }
]

people[?age > '25'].[name]
# output
[
  [
    "Fred"
  ],
  [
    "Wilma"
  ]
]

# Filtering our Azure CLI queries
az vm show \
    --resource-group learn-5d4bcefe-17c2-4db6-aba8-3f25d2c54844 \
    --name SampleVM \
    --query "osProfile.adminUsername"

az vm show \
    --resource-group learn-5d4bcefe-17c2-4db6-aba8-3f25d2c54844 \
    --name SampleVM \
    --query hardwareProfile.vmSize

az vm show \
    --resource-group learn-5d4bcefe-17c2-4db6-aba8-3f25d2c54844 \
    --name SampleVM \
    --query "networkProfile.networkInterfaces[].id"

az vm show \
    --resource-group learn-5d4bcefe-17c2-4db6-aba8-3f25d2c54844 \
    --name SampleVM \
    --query "networkProfile.networkInterfaces[].id" -o tsv

# Stopping a VM
az vm stop \
    --name SampleVM \
    --resource-group learn-5d4bcefe-17c2-4db6-aba8-3f25d2c54844

# We can verify it has stopped by attempting to ping the public IP address, using ssh, or through the vm get-instance-view command.
az vm get-instance-view \
    --name SampleVM \
    --resource-group learn-5d4bcefe-17c2-4db6-aba8-3f25d2c54844 \
    --query "instanceView.statuses[?starts_with(code, 'PowerState/')].displayStatus" -o tsv

# Starting a VM
az vm start \
    --name SampleVM \
    --resource-group learn-5d4bcefe-17c2-4db6-aba8-3f25d2c54844

# Restarting a VM
az vm start \
    --name SampleVM \
    --resource-group learn-5d4bcefe-17c2-4db6-aba8-3f25d2c54844
    --no-wait

# Install NGINX web server
# 1.
z vm list-ip-addresses --name SampleVM --output table

# 2.
ssh azureuser@<PublicIPAddress>

# 3.
sudo apt-get -y update && sudo apt-get -y install nginx

# 4.
exit

# Retrieve our default page
# Either
curl -m 10 <PublicIPAddress>
# Or
# in browser try the public ip address

# This command will fail because the Linux virtual machine doesn't expose
# port 80 (http) through the network security group that secures the network
# connectivity to the virtual machine. We can change this with the Azure CLI command vm open-port.

# open oprt
az vm open-port \
    --port 80 \
    --resource-group learn-5d4bcefe-17c2-4db6-aba8-3f25d2c54844 \
    --name SampleVM

# output of curl command
<!DOCTYPE html>
<html>
<head>
<title>Welcome to nginx!</title>
<style>
body {
    width: 35em;
    margin: 0 auto;
    font-family: Tahoma, Verdana, Arial, sans-serif;
}
</style>
</head>
<body>
<h1>Welcome to nginx!</h1>
<p>If you see this page, the nginx web server is successfully installed and
working. Further configuration is required.</p>

<p>For online documentation and support please refer to
<a href="http://nginx.org/">nginx.org</a>.<br/>
Commercial support is available at
<a href="http://nginx.com/">nginx.com</a>.</p>

<p><em>Thank you for using nginx.</em></p>
</body>
</html>
An availability set is a logical grouping of two or more VMs
keep your application available during planned or unplanned maintenance.
A planned maintenance event is when the underlying Azure fabric that hosts VMs is updated by Microsoft.
to patch security vulnerabilities,
improve performance,
and add or update features
When the VM is part of an availability set, the Azure fabric updates are sequenced so not all of the associated VMs are rebooted at the same time.
VMs are put into different update domains.
Update domains indicate groups of VMs and underlying physical hardware that can be rebooted at the same time.
Update domains are a logical part of each data center and are implemented with software and logic.
Unplanned maintenance events involve a hardware failure in the data center,
such as a server power outage
or disk failure
VMs that are part of an availability set automatically switch to a working physical server so the VM continues to run.
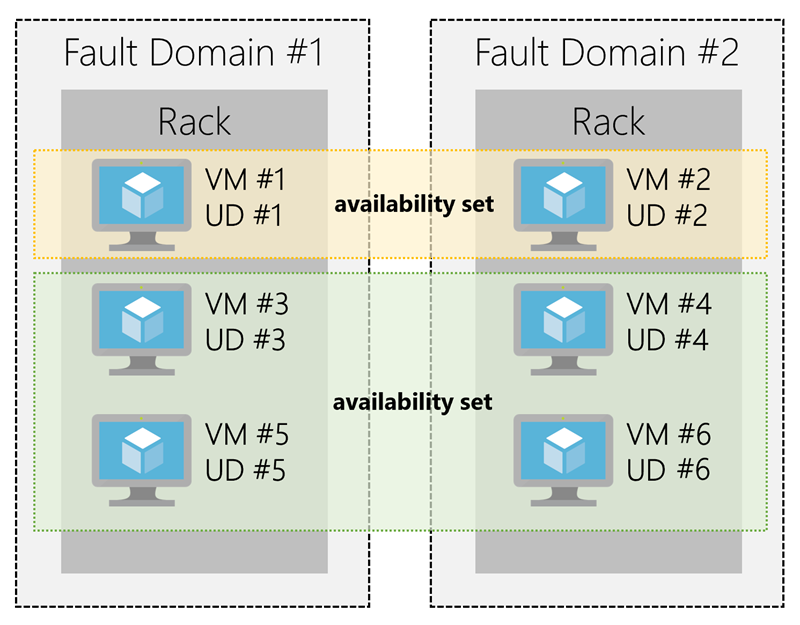
The group of virtual machines that share common hardware are in the same fault domain.
A fault domain is essentially a rack of servers.
It provides the physical separation of your workload across different power, cooling, and network hardware that support the physical servers in the data center server racks.
With an availability set, you get:
Up to three fault domains that each have a server rack with dedicated power and network resources
Five logical update domains which then can be increased to a maximum of 20
Your VMs are then sequentially placed across the fault and update domains. The following diagram shows an example where you have six VMs in two availability sets distributed across the two fault domains and five update domains.
Scenario: Imagine that you work for a domestic shipping company. Your customers use one of the company’s websites to manage and check the status of their shipments. This website is deployed to virtual machines and hosted on-premises. You’ve noticed that increased usage on the site is straining the virtual machines’ resources. However, you can’t adjust to load fluctuations without manually intervening and creating or deallocating virtual machines.
Scale set is for scalable applications ( automatically adjust to changes in load while minimizing costs with virtual machine scale sets)
adjust your virtual machine resources to match demands
keep the virtual machine configuration consistent to ensure application stabilit
VMs in this type of scale set all have the same configuration and run the same applications
for scenarios that include compute workloads, big-data workloads, and container workloads
to deploy and manage many load-balanced, identical VMs
it scales up and down automatically
it can even resize the vm
A scale set uses a load balancer to distribute requests across the VM instances
It uses a health probe to determine the availability of each instance (The health probe pings the instance)
keep in mind that you’re limited to running 1,000 VMs on a single scale set
support both Linux and Windows VMs
are designed for cost-effectiveness
scaling options
horizontal: adding or removing several VMs, by using rules, The rules are based on metrics.
vertical: adding resources such as memory, CPU power, or disk space to VMs, increasing the size of the VMs in the scale set, by using rules.
How to scale
Scheduled scaling: You can proactively schedule the scale set to deploy one or N number of additional instances to accommodate a spike in traffic and then scale back down when the spike ends.
Autoscaling: If the workload is variable and can’t always be scheduled, you can use metric-based threshold scaling. Autoscaling horizontally scales out based on node usage. It then scales back in when the resources return to a baseline.
Reducing costs by using low-priority
allows you to use Azure compute resources at cost savings of up to 80 percent.
A low-priority scale set provisions VMs through this underused compute capability.
these VMs, keep in mind that they’re temporary. Availability depends on size, region, time of day, and so on. These VMs have no SLA.
When Azure needs the computing power again, you’ll receive a notification about the VM that will be removed from your scale set
you can use Azure Scheduled Events to react to the notification within the VM.
low-priority scale set, you specify two kinds of removal
Delete: The entire VM is removed, including all of the underlying disks.
Deallocate: The VM is stopped. The processing and memory resources are deallocated. Disks are left intact and data is kept. You’re charged for the disk space while the VM isn’t running.
if the workload increases in complexity rather than in volume, and this complexity demands more of your resources, you might prefer to scale vertically.
# create custom data to config scale set
code cloud-init.yaml

# custom data
#cloud-config
package_upgrade: true
packages:
  - nginx
write_files:
  - owner: www-data:www-data
  - path: /var/www/html/index.html
    content: |
        Hello world from Virtual Machine Scale Set !
runcmd:
  - service nginx restart

# create resource group
az group create \
  --location westus \
  --name scalesetrg

# create scale set
az vmss create \
  --resource-group scalesetrg \
  --name webServerScaleSet \
  --image UbuntuLTS \
  --upgrade-policy-mode automatic \
  --custom-data cloud-init.yaml \
  --admin-username azureuser \
  --generate-ssh-keys

# More about scaling : https://docs.microsoft.com/en-us/learn/modules/build-app-with-scale-sets/4-configure-virtual-machine-scale-set
By default, the new virtual machine scale set has two instances and a load balancer.
Thecustom-data flag specifies that the VM configuration should use the settings in the cloud-init.yaml file after the VM has been created. You can use a cloud-init file to install additional packages, configure security, and write to files when the machine is first installed.
Configure vm scale set
# add a health probe to the load balancer
az network lb probe create \
  --lb-name webServerScaleSetLB \
  --resource-group scalesetrg \
  --name webServerHealth \
  --port 80 \
  --protocol Http \
  --path /

The health probe pings the root of the website through port 80. If the website doesn't respond, the server is considered unavailable. The load balancer won't route traffic to the server.

# configure the load balancer to route HTTP traffic to the instances in the scale set
az network lb rule create \
  --resource-group scalesetrg \
  --name webServerLoadBalancerRuleWeb \
  --lb-name webServerScaleSetLB \
  --probe-name webServerHealth \
  --backend-pool-name webServerScaleSetLBBEPool \
  --backend-port 80 \
  --frontend-ip-name loadBalancerFrontEnd \
  --frontend-port 80 \
  --protocol tcp

# change the number of instances in a virtual machine scale set
az vmss scale \
    --name MyVMScaleSet \
    --resource-group MyResourceGroup \
    --new-capacity 6
a mechanism that updates your application consistently, across all instances in the scale set
Azure custom script extension downloads and runs a script on an Azure VM. It can automate the same tasks on all the VMs in a scale set.
create a configuration file that defines the files to get and the commands to run. This file is in JSON format.
# custom script configuration that downloads an application from a repository in GitHub and installs it on a host instance by running a script named custom_application_v1.sh
# yourConfigV1.json
{
  "fileUris": ["https://raw.githubusercontent.com/yourrepo/master/custom_application_v1.sh"],
  "commandToExecute": "./custom_application_v1.sh"
}


# To deploy this configuration on the scale set, you use a custom script extension
az vmss extension set \
  --publisher Microsoft.Azure.Extensions \
  --version 2.0 \
  --name CustomScript \
  --resource-group myResourceGroup \
  --vmss-name yourScaleSet \
  --settings @yourConfigV1.json

# view the current upgrade policy for the scale set
az vmss show \
    --name webServerScaleSet \
    --resource-group scalesetrg \
    --query upgradePolicy.mode

# apply the update script
az vmss extension set \
    --publisher Microsoft.Azure.Extensions \
    --version 2.0 \
    --name CustomScript \
    --vmss-name webServerScaleSet \
    --resource-group scalesetrg \
    --settings "{\"commandToExecute\": \"echo This is the updated app installed on the Virtual Machine Scale Set ! > /var/www/html/index.html\"}"

# retrieve the IP address
az network public-ip show \
    --name webServerScaleSetLBPublicIP \
    --resource-group scalesetrg \
    --output tsv \
    --query ipAddress
Managed disk supports creating a managed Custome image
We can create image from custom VHD in a storage account or directly from generalized VM (via sysprepped VM command)
This process capture a single image
this image contains all managed disks associated with a VM, including both OS, and Data.
Image vs. Snapshot
Image
Snapshot
With managed disks, you can take an image of a generalized VM that has been deallocated.
It’s copy of disk in a specific point of time.
This image includes all managed disks attached to this VM.
it applies only to one disk.
This image can be used to create a Vm.
Sanpshot doesn’t have awareness of any disk except the one it contains.
If a VM has only one OS disk, we can take a snapshot of the disk or take image of VM and create a VM from either snapshot or the image.
Deploy VM from VHD
a vm can have some configurations like installed software -> we can create a new Virtual Hard Disk (VHD) from this vm.
VHD
is like physical hard disk
A VHD can also hold databases and other user-defined folders, files, and data
A virtual machine can contain multiple VHDs
Typically, a virtual machine has an operating system VHD on which the operating system is installed.
It also has one or more data VHDs that contain the applications and other user-specific data used by the virtual machine.
VHD advantages
high availability
physical security
Durability
scalability
cost and performance
VM image
vm image is an original image without preconfigured items
VHD contains configurations
vm image and vhds can be created via Microsoft Hyper-V -> then upload to cloud
Generalized image
it’s customized vm image
and then some server-specific information must be remove and create a general image
The host name of your virtual machine.
The username and credentials that you provided when you installed the operating system on the virtual machine.
Log files.
Security identifiers for various operating system services.
The process of resetting this data is called generalization, and the result is a generalized image.
For Windows, use the Microsoft System Preparation (Sysprep) tool. For Linux, use the Windows Azure Linux Agent (waagent) tool.
specialized virtual image
use a specialized virtual image as a backup of your system at a particular point in time. If you need to recover after a catastrophic failure, or you need to roll back the virtual machine, you can restore your virtual machine from this image.
use a generalized image to build pre-configured virtual machines (VMs)
To generalize a Windows VM, follow these steps:
Sign in to the Windows virtual machine.
Open a command prompt as an administrator.
Browse to the directory \windows\system32\sysprep.
Run sysprep.exe.
In the System Preparation Tool dialog box, select the following settings, and then select OK.TABLE 1PropertyValueSystem Cleanup ActionEnter System Out-of-Box Experience (OOBE)GeneralizeSelectShutdown OptionsShutdown
Running Sysprep is a destructive process, and you can’t easily reverse its effects. Back up your virtual machine first.
When you create a virtual machine image in this way, the original virtual machine becomes unusable. You can’t restart it. Instead, you must create a new virtual machine from the image, as described later in this unit.
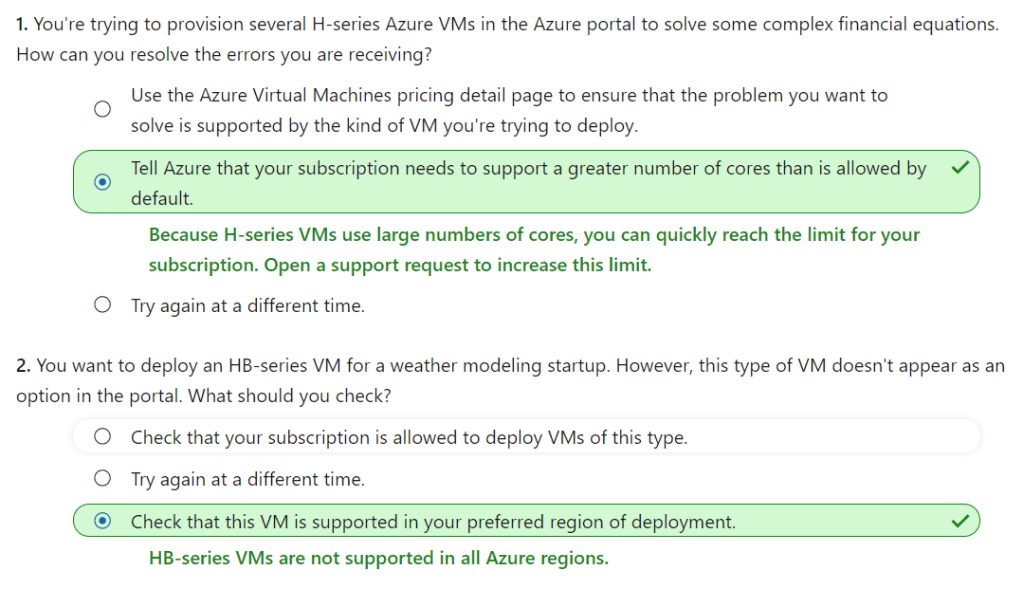
Scenario: Suppose you work for an engineering organization that has an application that creates 3D models of the facilities they design. Your organization also has another system that stores a large amount of project-related statistical data. They want to use Azure to modernize the aging high-performance compute platforms that support these applications. Your organization needs to understand the solutions available on Azure, and how they fit into their plans.
Azure HPC choices
Azure batch
Azure VM HPC Instances
Microsoft HPC Pack
they are for specialized tasks
In genetic sciences, gene sequencing.
In oil and gas exploration, reservoir simulations.
In finance, market modeling.
In engineering, physical system modeling.
In meteorology, weather modeling.
Azure batch
for working with large-scale parallel and computationally intensive tasks
batch is managed service
The Batch scheduling and management service is free
batch components
batch account
pools pf vms / notes
batch job
tasks / units of work
batch can associate with storage for input/ourput
the scheduling and management engine determines the optimal plan for allocating and scheduling tasks across the specified compute capacity
ND -> optimized for AI and deep learning workloads for are fast at running single-precision floating point operations, which are used by AI frameworks including Microsoft Cognitive Toolkit, TensorFlow, and Caffe.
have full control of the management and scheduling of your clusters of VMs
HPC Pack has the flexibility to deploy to on-premises and the cloud.
HPC Pack offers a series of installers for Windows that allows you to configure your own control and management plane, and highly flexible deployments of on-premises and cloud nodes.
Deployment of HPC Pack requires Windows Server 2012 or later, and takes careful consideration to implement.
Prerequisites:
You need SQL Server and an Active Directory controlle, and a topology
specify the count of heads/controller nodes and workers
pre-provision Azure nodes as part of the cluster
The size of the main machines that make up the control plane (head and control nodes, SQL Server, and Active Directory domain controller) will depend on the projected cluster size
install HPC PAck -> the you have job scheduler for both HPC and parallel jobs
scheduler appears in the Microsoft Message Passing Interface
HPC Pack is highly integrated with Windows
can see all the application, networking, and operating system events from the compute nodes in the cluster in a single, debugger view.
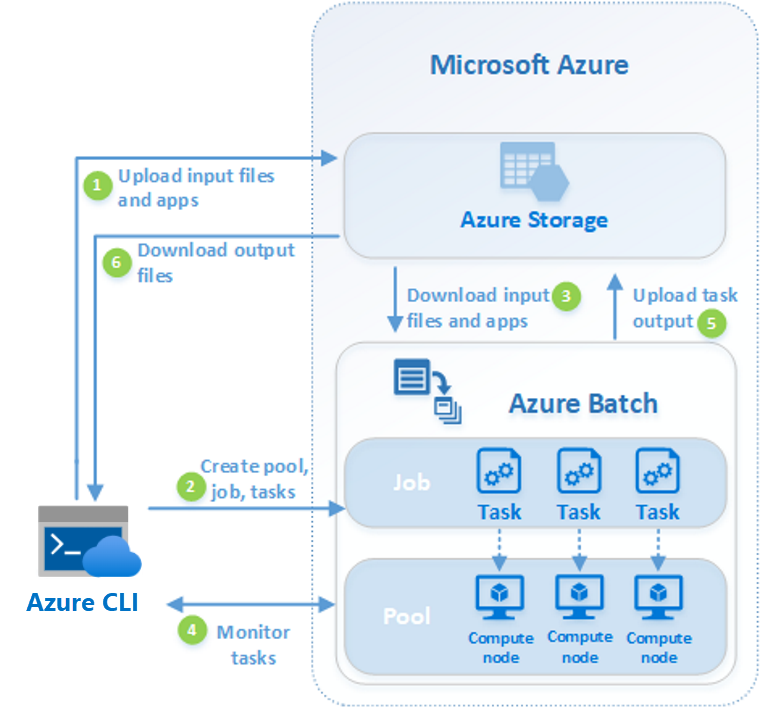
Scenario: Imagine you’re a software developer at a non-profit organization whose mission is to give every human on the planet access to clean water. To reach this goal, every citizen is asked to take a picture of their water purification meter and text it to you. Each day, you have to scan pictures from over 500,000 households, and record each reading against the sender phone number. The data is used to detect water quality trends and to dispatch the mobile water quality team to investigate the worst cases across each region. Time is of the essence, but processing each image with Optical Character Recognition (OCR) is time-intensive. With Azure Batch, you can scale out the amount of compute needed to handle this task on a daily basis, saving your non-profit the expense of fixed resources.
Azure Batch is an Azure service that enables you to run large-scale parallel and high-performance computing (HPC) applications efficiently in the cloud.
no need to manage infrastructure
Azure Batch to execute large-scale, high-intensity computation jobs
for running parallel tasks
flexible and scalable compute solution, such as Azure Batch, to provide the computational power
for compute-intensive tasks
heavy workloads can be broken down into separate subtasks and run in parallel
components
azure batch account
batch account is container for all batch resources
# create a job for monitoring
az batch job create \
 --id myjob2 \
 --pool-id mypool

# create tasks of the job
for i in {1..10}
do
   az batch task create \
    --task-id mytask$i \
    --job-id myjob2 \
    --command-line "/bin/bash -c 'echo \$(printenv | grep \AZ_BATCH_TASK_ID) processed by; echo \$(printenv | grep \AZ_BATCH_NODE_ID)'"
done

# check status
az batch task show \
 --job-id myjob2 \
 --task-id mytask1

# list tasks output
az batch task file list \
 --job-id myjob2 \
 --task-id mytask5 \
 --output table

# create a folder for output and change to this folder
mkdir taskoutputs && cd taskoutputs

# download tasks output
for i in {1..10}
do
az batch task file download \
    --job-id myjob2 \
    --task-id mytask$i \
    --file-path stdout.txt \
    --destination ./stdout$i.txt
done

# show content
cat stdout1.txt && cat stdout2.txt

# delte job
az batch job delete --job-id myjob2 -y
Automate business processes
Modern businesses run on multiple applications and services
send the right data to the rigth task impact the efficiency
azure features to build and implement workflows that integrate multiple systems
Logic Apps
Microsoft Power Automate
WebJobs
Azure Functions
similarities of them
They can all accept inputs. An input is a piece of data or a file that is supplied to the workflow.
They can all run actions. An action is a simple operation that the workflow executes and may often modify data or cause another action to be performed.
They can all include conditions. A condition is a test, often run against an input, that may decide which action to execute next.
They can all produce outputs. An output is a piece of data or a file that is created by the workflow.
In addition, workflows created with these technologies can either start based on a schedule or they can be triggered by some external event.
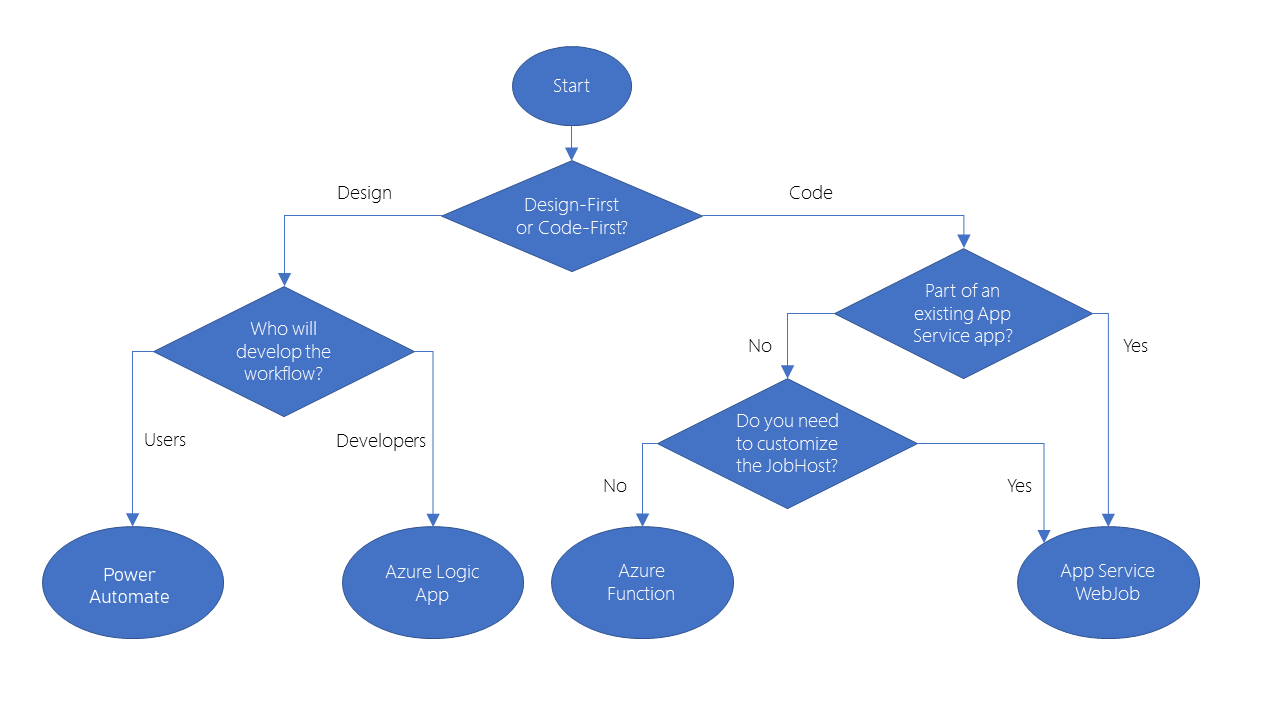
They have design-first approach
Logic app
Power automate
They have code-first technology
webjob
Azure functions
Logic Apps
to automate, orchestrate, and integrate disparate components of a distributed application.
Visual designer / Json Code Editor
over 200 connectors to external services
If you have an unusual or unique system that you want to call from a Logic Apps, you can create your own connector if your system exposes a REST API.
Microsoft Power Automate
create workflows even when you have no development or IT Pro experience
The WebJobs SDK only supports C# and the NuGet package manager.
Azure Functions
small pieces of code
pay for the time when the code runs
Azure automatically scales the function
has available template
Microsoft Power Automate supported flows
Automated: A flow that is started by a trigger from some event. For example, the event could be the arrival of a new tweet or a new file being uploaded.
Button: Use a button flow to run a repetitive task with a single click from your mobile device.
Scheduled: A flow that executes on a regular basis such as once a week, on a specific date, or after 10 hours.
Business process: A flow that models a business process such as the stock ordering process or the complaints procedure.
Azure function available templates
HTTPTrigger. Use this template when you want the code to execute in response to a request sent through the HTTP protocol.
TimerTrigger. Use this template when you want the code to execute according to a schedule.
BlobTrigger. Use this template when you want the code to execute when a new blob is added to an Azure Storage account.
CosmosDBTrigger. Use this template when you want the code to execute in response to new or updated documents in a NoSQL database.
WebJobs for these reasons
You want the code to be a part of an existing App Service application and to be managed as part of that application, for example in the same Azure DevOps environment.
You need close control over the object that listens for events that trigger the code. This object in question is the JobHost class, and you have more flexibility to modify its behavior in WebJobs
design-first comparison
Microsoft Power Automate
Logic Apps
Intended users
Office workers and business analysts
Developers and IT pros
Intended scenarios
Self-service workflow creation
Advanced integration projects
Design tools
GUI only. Browser and mobile app
Browser and Visual Studio designer. Code editing is possible
Application Lifecycle Management
Power Automate includes testing and production environments
Logic Apps source code can be included in Azure DevOps and source code management systems
We should ask this questions ourselves by architecting a solution by designing its monitoring solution
how would you diagnose issues with an application
how would you understand it’s health
what are it’s choke points
how would you identify them and what would you do when something breaks
Like the firefighting maneuver that must be executed half-yearly or yearly in each company, we have to use “chaos engineering” technique to intentionally cause breakage in the environments in a controlled manner to test monitoring, alerts, react of the architecture and resiliency of our solution.
Decide for the right resource and architecture for youe product
Choose the appropriate architecture based on your requirements
Know which compute options is right for your workload
Identify the right storage solution that meets your needs
Decide how you’re going to manage all your resources
Expose the API/Service Products for external customers (exposes an OpenAPI endpoint)
Includes a secure API gateway
In case of Premium tier includes an Azure Traffic Manager
Throtteling the requests to prevent resource exhaustion
Set policies
Set Cache
Key concepts
Secure and isolate access to azure resources by using Network Security Group and Application Security Group
This section is only “what should we know about NSG and ASG”. To see the configuration refer to “Configure NSG and ASG“.
By using Network Security Group (NSG) can be specified which computer can be connected to application server [Source]. – Network Security Group: is to secure network traffic for virtual machines – Virtual Network Service Endpoint: is for controlling network traffic to and from azure services e.g. storage, database – Application Security Group:
Network security group
filter network traffic to or from azure resources
contains security rules that are configured to allow or deny inbound and outbound traffic.
can be used to filter traffic between virtual machines or subnets, both within a vnet and from the internet.
The allowed IP addresses can be configured in NSG as well.
NSG rules are applied to connection between on-prem to vnet or vnet to vnet.
NSG of a subnet is applied to all NIC in this subnet
NSG of subnet and NIC are evaluated separately
NSG on subnet instead of NIC reduces administration and management effort.
Each subnet and NIC can habe only one NSG
NSG supports TCP, UDP, ICMP, and operates at layer 4 of the OSI model.
Vnet and NSG must be in the same region
Network security group security rules
NSG contains one or more rules
Rules are allow or deny
Rule properites
Name
Priority 100..4096
Source [Any, IP Addresses|Service Tag|Application Security Group]
Source Port range
Protocol [Any|TCP|UDP|ICMP]
Destination [Any, IP Addresses|Service Tag|Application Security Group]
Destination Port range
Action [Allow|Deny]
Rules are evaluated by priority using 5-tuple information (Source, SourcePort, Destination, DestinationPort, Protocol)
The rule with lower priority will takeplace e.g. 200 (Allow 3389 RDP) and 150 (Deny 3389 RDP). 150 will takeplace.
With NSG, connections are stateful. It means, return traffic is automatically allowed for the same TCP/UDP session e.g. inbound rule allows traffic on port 80 also allows the vm to response the request. A corresponding outbound rule is not needed.
Add Inbound rule pane
Service tag can allow or deny traffic to a spesific azure service either globally or per region. Therefore you don’t need to know the IP address and port os the service because azure does it for you.
Microosft create the service tags (you cannot create your own)
Some examples of the tags are:
VirtualNetwork – This tag represents all virtual network addresses anywhere in Azure, and in your on-premises network if you’re using hybrid connectivity.
AzureLoadBalancer – This tag denotes Azure’s infrastructure load balancer. The tag translates to the virtual IP address of the host (168.63.129.16) where Azure health probes originate.
Internet – This tag represents anything outside the virtual network address that is publicly reachable, including resources that have public IP addresses. One such resource is the Web Apps feature of Azure App Service.
AzureTrafficManager – This tag represents the IP address for Azure Traffic Manager.
Storage – This tag represents the IP address space for Azure Storage. You can specify whether traffic is allowed or denied. You can also specify if access is allowed only to a specific region, but you can’t select individual storage accounts.
SQL – This tag represents the address for Azure SQL Database, Azure Database for MySQL, Azure Database for PostgreSQL, and Azure SQL Data Warehouse services. You can specify whether traffic is allowed or denied, and you can limit to a specific region.
AppService – This tag represents address prefixes for Azure App Service.
service Tag
Scenario: We have a WebServer in Subnet1 and SQL Server in Subnet2. NSG must only allow 1433 for SQL.
Scenario: Suppose your company wants to restrict access to resources in your datacenter, spread across several network address ranges. With augmented rules, you can add all these ranges into a single rule, reducing the administrative overhead and complexity in your network security groups.
Network security group default rules
default rules connot be deleted or changed but can be overriden
NSG Overview
Application Security Group (ASG)
Scenario: your company has a number of front-end servers in a virtual network. The web servers must be accessible over ports 80 and 8080. Database servers must be accessible over port 1433. You assign the network interfaces for the web servers to one application security group, and the network interfaces for the database servers to another application security group. You then create two inbound rules in your network security group. One rule allows HTTP traffic to all servers in the web server application security group. The other rule allows SQL traffic to all servers in the database server application security group.
Application security group let you configure network security for resources used by specific application.
It’s for grouping Vms logically, no matter what ip address is or in which subnet assigned
Using ASG within NSG to apply a security rule to a group of resources, after that should only the resources be added to ASG.
ASG let us to group network interfaces together and the ASG can be used as Source or Destination in NSG.
Secure and isolate access to azure resources by using Service Enpoints
Scenario: The agency has created an API to make recent and historical census data available. They want to prevent any unnecessary back-end information from being exposed that could be used in malicious attacks. They would also like to prevent abuse of the APIs in the form of a large volume of requests and need a mechanism to throttle requests if they exceed an allowed amount. They are serving their APIs on the Azure API Management service and would like to implement policies to address these concerns.
add a policy to remove the X-Powered-By header from responses via adding a policy to outbound
Converts a request or response body from JSON to XML.
Convert XML to JSON
Converts a request or response body from XML to JSON.
Find and replace string in body
Finds a request or response substring and replaces it with a different substring.
Mask URLs in content
Rewrites links in the response body so that they point to the equivalent link through the gateway. by adding <redirect-content-urls /> in outbount section, all backend urls are replaced with apim endpoint url.
Set backend service
Changes the backend service for an incoming request.
Set body
Sets the message body for incoming and outgoing requests.
Set HTTP header
Assigns a value to an existing response or request header, or adds a new response or request header.
Set query string parameter
Adds, replaces the value of, or deletes a request query string parameter.
Rewrite URL
Converts a request URL from its public form to the form expected by the web service.
Transform XML using an XSLT
Applies an XSL transformation to the XML in the request or response body.
Throttling policies
Throttling
Detail
Throttle API requests
a few users over-use an API to the extent that you incur extra costs or that responsiveness to other uses is reduced. You can use throttling to limit access to API endpoints by putting limits on the number of times an API can be called within a specified period of time <rate-limit calls=”3″ renewal-period=”15″ /> and user receives 429 error when that limit was reached
#  applies to all API operations
<rate-limit calls="3" renewal-period="15" />

# target a particular API operation
<rate-limit calls="number" renewal-period="seconds">
    <api name="API name" id="API id" calls="number" renewal-period="seconds" />
        <operation name="operation name" id="operation id" calls="number" renewal-period="seconds" />
    </api>
</rate-limit>

#it applies the limit to a specified request key, often the client IP address. It gives every client equal bandwidth for calling the API
<rate-limit-by-key calls="number"
                   renewal-period="seconds"
                   increment-condition="condition"
                   counter-key="key value" />

# limit rate limit by a requests IP Address
<rate-limit-by-key calls="10"
              renewal-period="60"
              increment-condition="@(context.Response.StatusCode == 200)"
              counter-key="@(context.Request.IpAddress)"/>
# When you choose to throttle by key, you will need to decide on specific requirements for rate limiting. For example, the table below lists three common ways of specifying the counter-key:
Value	                          Detail
context.Request.IpAddress	  Rates limited by client IP address
context.Subscription.Id	          Rates limited by subscription ID
context.Request.Headers.GetValue("My-Custom-Header-Value")	Rates limited by a specified client request header value
Note: The <rate-limit-by-key> policy is not available when your API Management gateway is in the Consumption tier. You can use <rate-limit>instead.
Traffic Manager: provides DNS load balancing to your application, so you improve your ability to distribute your application around the world. Use Traffic Manager to improve the performance and availability of your application.
Application Gateway vs. Traffic Manager: The traffic manager only directs the clients to the IP address of the service that they want to go to and the Traffic Manager cannot see the traffic. But Gateway sees the traffic.
Load balancing the web service with the application gateway
Improve application resilience by distributing the load across multiple servers and using path-based routing to direct web traffic.
Application gateway works based on Layer 7
Scenario: you work for the motor vehicle department of a governmental organization. The department runs several public websites that enable drivers to register their vehicles and renew their driver’s licenses online. The vehicle registration website has been running on a single server and has suffered multiple outages because of server failures.
Link to a sample code – Terraform implementation of Azure Application Gateway – Terraform implementation of Azure Application Gateway’ Backend pool with VM – Terraform implementation of Azure Application Gateway’s HTTPS with Keyvault as Ceritficate Store
Load balancing with Azure Load Balancer
Azure load balancer for resilient applications against failure and for easily scaling
Azure load balancer works in layer 4
LB spreads/distributes requests to multiple VMs and services (user gets service even when a VM is failed) automatically
LB provides high availability
LB uses a Hash-based distribution algorithm (5-tuple)
5-tuple hash map traffic to available services (Source IP, Source Port, Destination IP, Destination Port, Protocol Type)
supports an inbound, and outbound scenario
Low latency, high throughput, scale up to millions of flows for all TCP and UDP applications
Isn’t a physical instance but only an object for configuring infrastructure
For high availability, we can use LB with availability set (protect for hardware failure) and availability zones (for data center failure)
Scenario: You work for a healthcare organization that’s launching a new portal application in which patients can schedule appointments. The application has a patient portal and web application front end and a business-tier database. The database is used by the front end to retrieve and save patient information. The new portal needs to be available around the clock to handle failures. The portal must adjust to fluctuations in load by adding and removing resources to match the load. The organization needs a solution that distributes work to virtual machines across the system as virtual machines are added. The solution should detect failures and reroute jobs to virtual machines as needed. Improved resiliency and scalability help ensure that patients can schedule appointments from any location [Source].
Link to a sample code to deploy simple Nginx web servers with Availability Set and Public Load Balancer.
Load Balancer SKU
Basic Load Balancer
Port forwarding
Automatic reconfiguration
Health Probe
Outbound connections through source network address translation (SNAT)
Diagnostics through Azure log analytics for public-facing load balancers
Can be used only with availability set
Standard Load Balancer
Supports all the basic LB features
Https health probe
Availability zone
Diagnostics through Azure monitor, for multidimensional metrics
High availability (HA) ports
outbound rules
guaranteed SLA (99,99% for two or more VMs)
Load Balancer Types
Internal LB
distributes the load from internal Azure resources to other Azure resources
no traffic from the internet is allowed
External/Public LB
Distributes client traffic across multiple VMS.
Permits traffic from the internet (browser, module app, other resources)
public LB maps the public IP and port of incoming traffic to the private IP address and port number of the VM in the back-end pool.
Distribute traffic by applying the load-balancing rule
Distribution modes
Lb distributes traffic equally among vms
distribution modes are for creating different behavior
When you create the load balancer endpoint, you must specify the distribution mode in the load balancer rule
Prerequisites for load balancer rule
must have at least one backend
must have at least one health probe
Five tuple hash
default of LB
As the source port is included in the hash and can be changed for each session, the client might be directed to a different VM for each session.
source IP affinity / Session Affinity / Client IP affinity
this distribution is known as session affinity/client IP affinity
to map traffic to the server, the 2-tuple hash is used (Source IP, Destination IP) or the 3-tuple (Source IP, Destination IP, Protocol)
Hash ensures that requests from specific clients are always sent to the same VM.
Scenario: Remote Desktop Protocol is incompatible with 5-tuple hash
Scenario: for uploading media files this distribution must be used because for uploading a file the same TCP session is used to monitor the progress and a separate UDP session uploads the file.
Scenario: The requirement of the presentation tier is to use in-memory sessions to store the logged user’s profile as the user interacts with the portal. In this scenario, the load balancer must provide source IP affinity to maintain a user’s session. The profile is stored only on the virtual machine that the client first connects to because that IP address is directed to the same server.
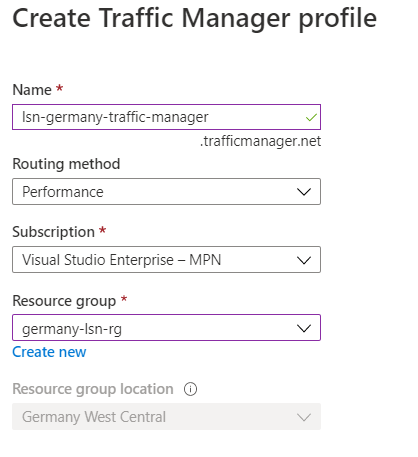
Enhance service availability and data locality with Traffic Manager
Scenario: a company that provides a global music streaming web application. You want your customers, wherever they are in the world, to experience near-zero downtime. The application needs to be responsive. You know that poor performance might drive your customers to your competitors. You’d also like to have customized experiences for customers who are in specific regions for user interface, legal, and operational reasons. Your customers require 24×7 availability of your company’s streaming music application. Cloud services in one region might become unavailable because of technical issues, such as planned maintenance or scheduled security updates. In these scenarios, your company wants to have a failover endpoint so your customers can continue to access its services.
traffic manager is a DNS-based traffic load balancer
Traffic Manager distributes traffic to different regions for high availability, resilience, and responsiveness
it resolves the DNS name of the service as an IP address (directs to the service endpoint based on the rules of the traffic routing method)
it’s a proxy or gateway
it doesn’t see the traffic that a client sends to a server
it only gives the client the IP address of where they need to go
it’s created only Global.
The location cannot be specified because it’s Global
Traffic Manager Profile’s routing methods
each profile has only one routing method
Weighted routing
distribute traffic across a set of endpoints, either evently or based on different weights
weights between 1 to 1000
for each DNS query received, the traffic manager randomly chooses an available endpoint
probability of choosing an endpoint is based on the weights assigned to endpoints
with endpoints in different geographic locations, the best performance endpoint for the user is sent
it uses an internet latency table, which actively track network latencies to the endpoints
Geographic routing
based on where the DNS query originated, the specific endpoint of the region is sent to the user
it’s good for geo-fence content e.g. it’s good for countries with specific terms and conditions for regional compliance
Multivalue routing
to obtain multiple healthy endpoints in a single DNS query
caller can make client-side retries if endpoint is unresponsive
it can increase availability of service and reduce latency associated with a new DNS query
Subnet routing
maps a set of user ip addresses to specific endpoints e.g. can be used for testing an app before release (internal test), or to block users from specific ISPs.
Priority routing
traffic manager profile contains a prioritized list of services
Traffic Manager Profile’s endpoints
endpoint is the destination location that is returned to the client
Types are
Azure endpoints: for services hosted in azure
Azure App Service
public ip resources that are associated with load balancers, or vms
External endpoints
for ip v4/v6
FQDNs
services hosted outside azure either on-prem or other cloud
Nested endpoints: are used to combine Traffic Manager profiles to create more flexible traffic-routing schemes to support the needs of larger, more complex deployments.
Endpoints Types/Targets
Each traffic manager profile can have serveral endpoints with different types