Configure the access to the resources e.g. servers
Responsible for operating system hardening of the servers
Ensure the disk volume has been encrypted
Determine the identity and access permissions of specific resources
ooo
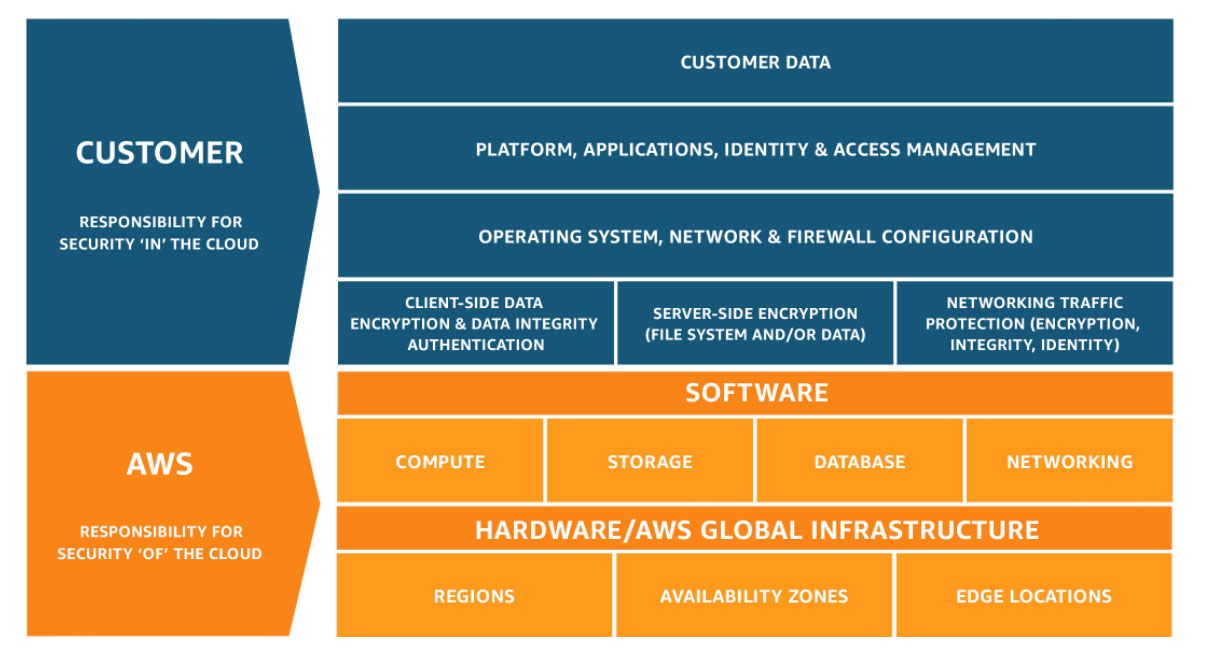
Who should take care of security?
In companies where they up and run services/application on the cloud, the responsible teams have to have enough knowledge about the security on the cloud.
Developers and Enterprise architect
Ensure cloud services they use are designed and deployed with security.
DevOps and SRE Teams
Ensure security introduced into the infrastructure build pipeline and the environments remain secure post-production.
InfoSec Team
Secure systems
In which step of the project the security have to be applied?
The onboarding posts go through the important points, that an Azure Cloud Solution Architect has to know to get started for certificate preparation. The prepration for the certificate has the following steps:
Get familier with Azure services
Know the keywords
Get familier with the key concept of each Azure service
Scenario: Imagine you work for an escalator company that has invested in IoT technology to monitor its product in the field. You oversee the processing of temperature sensor data from the drive gears of the escalators. You monitor the temperature data and add a data flag to indicate when the gears are too hot. In downstream systems, this data helps determine when maintenance is required.
Your company receives sensor data from several locations and from different escalator models. The data arrives in different formats, including batch file uploads, scheduled database pulls, messages on a queue, and incoming data from an event hub. You want to develop a reusable service that can process your temperature data from all these sources. [Source]
Azure function has three components like all the function that we develop:
Input/s: which is done by a json configuration without developing a code.
Logic: the part that you have to develop with the language you like.
Output/s: which is done by a json configuration without developing a code.
Azure function
Can be considered as the Function as a Service (FaaS)
Function can be a microservice (But don’t user Azure Function for long run workloads)
Auto scale infrastructure (scale out or down) based on load
Automatic provisioning by cloud provider
Use the language of your choice.
Less administrative tasks and more focus business logic
Important characteristics of serverless solutions
Avoid over-allocation of infrastructure (you pay only when the function is running)
Stateless logic (as the work around the states can be stored in associated storage services)
Event driven (they run only in response to an event e.g. receive an HTTP request, message being added to a queue,… No need to develop a code for listening or watching the queue). Refer to Azure function triggers to see a list of supported services.
Drawbacks of serverless solutions
Execution time: Function has a timeout of 5 minutes and configurable to 10 minutes. With Azure Durable Functions we can solve the timeout problem.
Execution frequency: if the function is used/ executed continuously, it’s prudent to host this service on a VM unless it will get expensive/costly.
Function APP
It’s for logically group the functions and resources.
Service Plan ( Azure function is a serverless service but doesn’t mean, that it doesn’t have a server, where it have to be hosted and run. Azure function has a server, where it’s hosted and run but Cloud provider will provision the resources for you)
Service Plan Types
Consumption Service Plan
Timeout 5-10 min
Automatic scaling
Bills you when function is running
App Service Plan (Not serverless anymore)
Avoid timeout periods + continuously run
Azure function uses a storage account as well for logging function execution
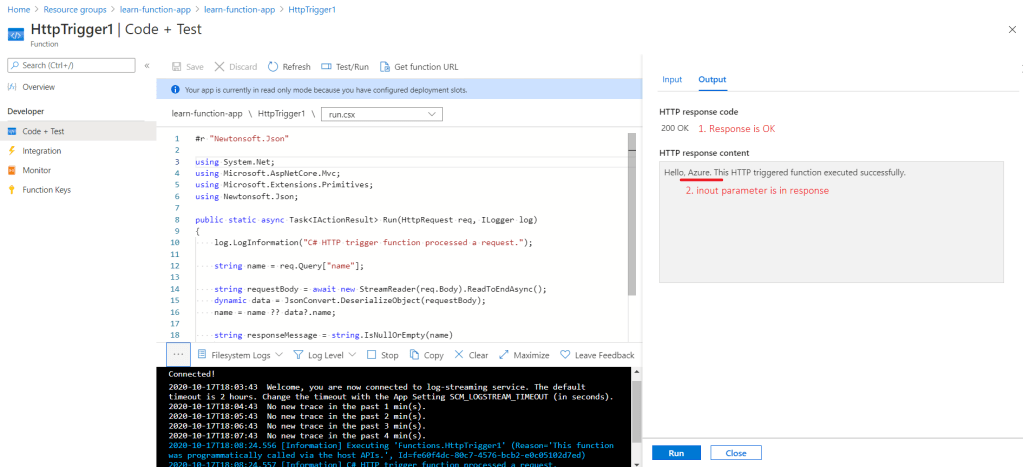
Azure function can be tested as well, refer to screenshot below. To have automated test use the deployment slots and deployment center. They are explained in next sections.
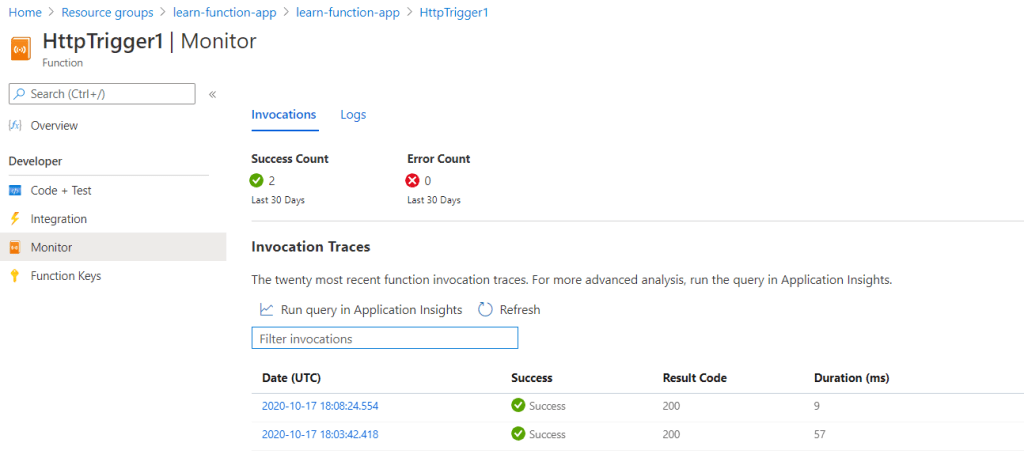
Use the Monitor option in the screenshot below to check the executions.
Azure function triggers
Blob storage
Microsoft graph events
Azure cosmos db
Queue storage
Evnt grid
Service bus
Http
Timer
Azure function binding
Azure function has to have input and output bindings.
Scenario: Let’s say we want to write a new row to Azure Table storage whenever a new message appears in Azure Queue storage. This scenario can be implemented using an Azure Queue storage trigger and an Azure Table storage output binding.
This sample code is a microservice architecture with “database per service” design pattern. When a new product is added, a message is pushed to the storage queue for each image of the product. By pushing the message/s to the queue, the function is getting run, gets the original image/s from a storage container, generates the thumbnail and saves it to another container.
By Creating a function app some resources are creating by default.
The following figures demonstrate testing an azure function.
Scenario: For example, in the shoe-company scenario we want to monitor social media reaction to our new product. We’ll build a logic app to integrate Twitter, Azure Cognitive Services, SQL Server, and Outlook email.
Azure Logic Apps
Make diverse services work together
Provide pre-built components that can connect to hundreds of services
Steps of designing a logic app
Plan the business process (step based)
Identify the type of each step
Logic apps operations
Trigger -> respond to external events. Triggers are for lunching the logic app.
Action -> process or store data
Control action -> make decision based on data
Example:
detect tweets about the product -> Trigger
analyze the sentiment -> Action
If logic -> Control
store a link to positive tweets -> Action
email customer service for negative tweets -> Action
Polling trigger: periodically checks an external service for new data e.g. check RSS feed for new posts. For polling trigger we have to set frequency (second, minute, hour) & interval e.g. frequency = minutes & interval = 5 means the pooling trigger runs each 5 minutes.
Polling triggers force you to make a choice between how much they cost and how quickly they respond to new data. There is often a delay between when new data becomes available and when it is detected by the app. The following illustration shows the issue.
In the worst case, the potential delay for detecting new data is equal to the polling interval. So why not use a smaller interval? To check for new data, the Logic Apps execution engine needs to run your app, which means you incur a cost. In general, the shorter the interval, the higher the cost but the quicker you respond to new data. The best polling interval for your logic app depends on your business process and its tolerance for delay.
Polling triggers are perfect for the “route and process data” scenarios.
Push trigger
notifies immediately when data is available e.g. the trigger that detects when a message is added to an Azure Service Bus queue is a push trigger.
Push triggers are implemented using webhooks.
The Logic Apps infrastructure generates a callback URL for you and registers it with the external service by first creation and each later updates
Logic Apps de-registers the callback for you as needed e.g. if you disable or delete your app.
The nice thing about push triggers is that they don’t incur any costs polling for data when none is available
If push triggers respond more quickly and cost less than polling triggers, then why not use them all the time? The reason is that not every connector offers a push trigger.
Sometimes the trigger author chose not to implement push and sometimes the external service didn’t support push
When a solution consists of several different services/programs, this solution is a distributed solution. In distributed solutions the components have to communicate with each other via messages.
Even on the same server or in the same data center, loosely coupled architectures require mechanisms for components to communicate. Reliable messaging is often a critical problem.
As the cloud solution architect you have to
understand each individual communication that the components of the application exchange
understand whether the communication sends message or event
then you can decide to choose an event-based or message-based architecture
Each communication can use different technologies
In the both event-based and message-based, there’s a sender and receiver. But the difference is the content of what they send.
Message
Contains raw data
This data is produced by sender
This data is consumed by receiver
It contains data/payload itself not just the reference to that data
Sender expect that the destination component process this data in a certain way
E.g. mobile app expect that the web API save the sent data to a storage.
Available technologies
Azure Queue Storage
Azure Service Bus
Message Queue
Topics
Event
Light weight notification that indicates something has happend
Doesn’t contain raw data
May reference where the data lives
Sender has no expectations of receiver
E.g. Web API inform the Web App or mobile App about a new file.
Available technologies
Azure Event Grid
Azure Event Hubs
Azure queue technologies
The section explains more about Azure Queue Storage, Azure Service Bus Queue, and Azure Service Bus Topic and when which technology can be used in the solution.
Azure queue storage
This service is integrated in Azure storage account
Can contains millions of messages
The queue limitation is by the capacity of the storage account
Azure service bus queue
It’s a message broker system intended for enterprise applications
For higher security requirements
have different data contracts
utilize multiple communication protocols
include both cloud and on-prem services
In message queues of the Azure queue storage and the Azure service bus queu, each queue has a sender and a subscriber. Subscriber takes the message and process is as the sender expects.
Both of these services are based on the idea of a “queue” which holds sent messages until the target is ready to receive them.
Azure service bus topics
It’s like queues
Can have multiple subscriber
Each subscriber receives its own copy of the message
Topics use queues
By post to a topic, the message is copied and dropped into the queue for each subscription.
The queue means that the message copy will stay around to be processed by each subscription branch even if the component processing that subscription is too busy to keep up.
Benefits of quese
Increased reliability
For exchanging messages (at times of high demand, messages can simply wait until a destination component is ready to process them)
Message delivery guarantees
There are different message delivery garanties
At-Least-Once delivery
each message is guaranteed to be delivered to at least one of the components that retrieve messages from the queue
Example: in certain circumstances, it is possible that the same message may be delivered more than once. For example, if there are two instances of a web app retrieving messages from a queue, ordinarily each message goes to only one of those instances. However, if one instance takes a long time to process the message, and a time-out expires, the message may be sent to the other instance as well. Your web app code should be designed with this possibility in mind.
At-Most-Once delivery
each message is not guaranteed to be delivered, and there is a very small chance that it may not arrive.
unlike At-Least-Once delivery, there is no chance that the message will be delivered twice. This is sometimes referred to as “automatic duplicate detection”.
First-In-First-Out (FIFo) delivery
If your distributed application requires that messages are processed in precisely the correct order, you must choose a queue system that includes a FIFO guarantee.
Transactional support
It’s useful for e.g. e-commerce systems. By clicking the buy button, a series of messages are sending off to different destinations e.g. order details system, total sum and payment details system, generate invoice system. If the credit card details message delivery fails, then so will the order details message.
How to decide for a queue technique
Queue Storage
Need audit trail of all messages
Queue exceed 80 GB
Track processing progress inside queue
It’s for simple solutions
Service bus queue
Need At-Most-Once delivery
Need FIFO guarantee
Need group messages into transactions
Want to receive messages without polling queue
Need Role-based access model to the queue
Need to handle messages larger than 64K but less than 256 KB
Queue Size not grow larger than 80 GB
Need batches of messages
Service bus topic
If you need multiple reciever to handle each message
Azure event technologies
Scenario: Suppose you have a music-sharing application with a Web API that runs in Azure. When a user uploads a new song, you need to notify all the mobile apps installed on user devices around the world who are interested in that genre [Source]. The Event Grid is the pefect solution for this scenario.
Many applications use the publish-subscribe model to notify distributed components that something happend.
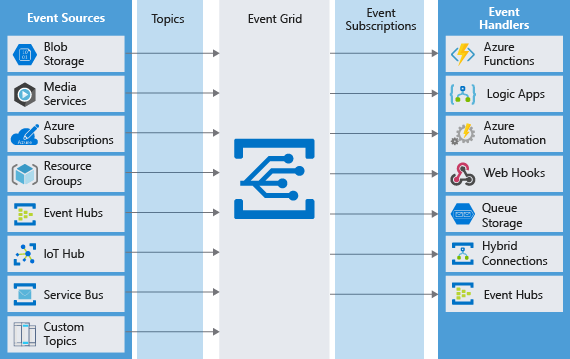
Event grid
It’s a one-to-many relationship
Fully-managed event routing service running on top of Azure Service Fabric.
Event Grid distributes events from different sources,
Scenario: When the caller and called application are not in the same origin the CORS Policy doesn’t allow the called application / backend to response the caller application.
It’s strongly recommended to specify the allow origin in your backend. In the following video I explain how we can do it.
Scenario: Assume you developed an online shopping. When a new product is added to the shop. A message is sent to a storage queue. You want to develop a Azure function that’s triggered when a message is pushed to the storage queue and create a thumbnail image for the newly added project from the product’s image.
coming soon ooo
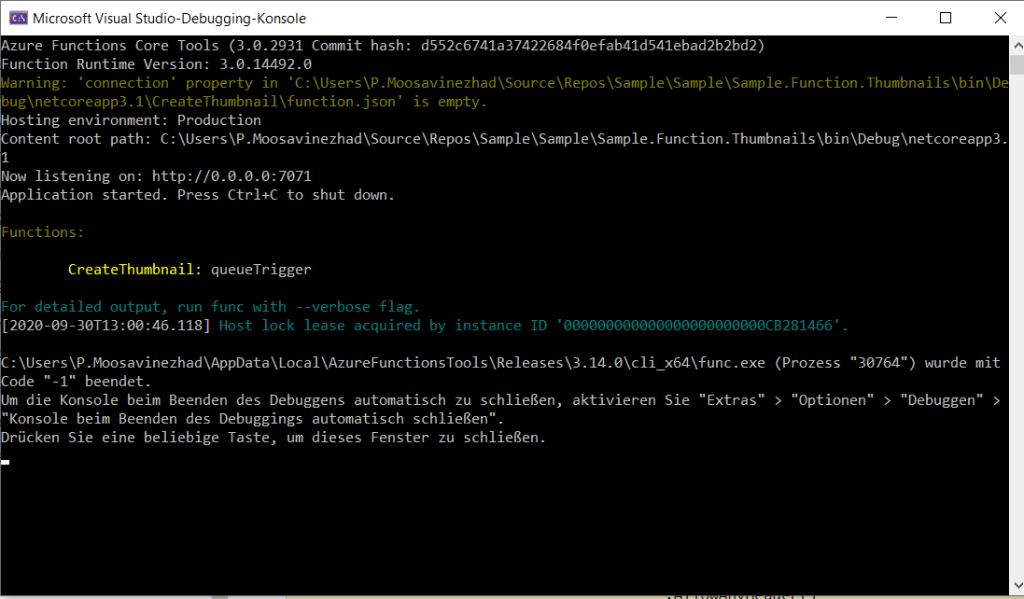
About Azure Function Console in Visual Studio
When you develop an Azure Function App and you want to test and run it on your local machine always a console opens as follows. You can follow the progress of your function via this console if you use the Ilogger framework.
# For example
log.LogInformation($"C# Queue trigger function processed:{queueMessage.ImageName}");
But this consol stays open after stop the debugging. Therefore you can use the Tool > Option > Select Close console after stop debugging automatically.
To grant access to a subscription, identify the appropriate role to assign to an employee
Scenario: Requirement of the presentation tier is to use in-memory sessions to store the logged user’s profile as the user interacts with the portal. In this scenario, the load balancer must provide source IP affinity to maintain a user’s session. The profile is stored only on the virtual machine that the client first connects to because that IP address is directed to the same server.
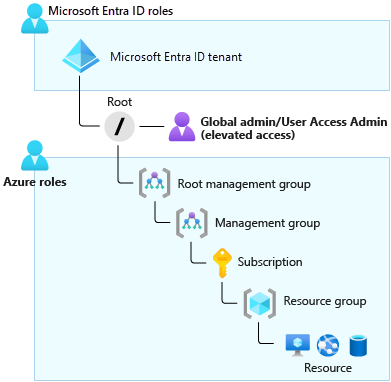
Azure RBAC roles vs. Azure AD Roles
RBAC roles
AD roles
apply to Azure resources
apply to Azure AD resources (particularly users, groups, and domains)
scope covers management groups, subscriptions, resource groups, and resources
has only one scope, the directory
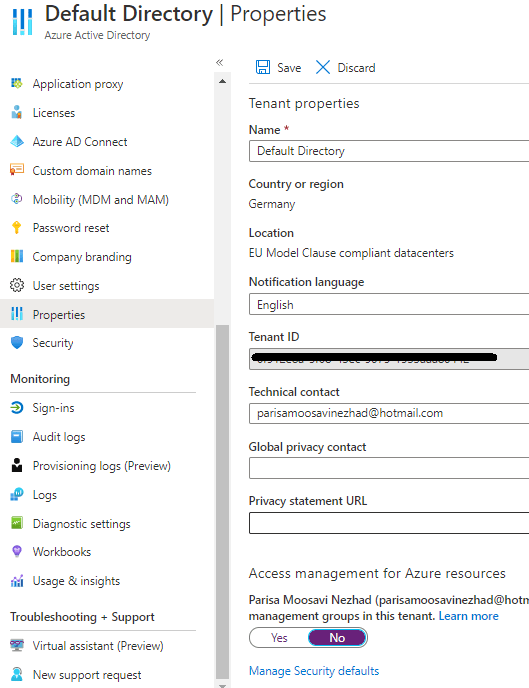
This greater access grants them the Azure RBAC User Access Administrator role for all subscriptions of their directory
An Azure AD Global Administrator can elevate their access to manage all Azure subscriptions and management groups
–
Through the User Access Administrator role, the Global Administrator can give other users access to Azure resources.
By default, a Global Administrator doesn’t have access to Azure resources
The Global Administrator for Azure Active Directory (Azure AD) can temporarily elevate their permissions to the Azure role-based access control (RBAC) role of User Access Administrator, is assigned at the scope of root (This action grants the Azure RBAC permissions that are needed to manage Azure resources)
Global administrator (AD role) + User Access Administrator (RBAC role) -> can view all resources in, and assign access to, any subscription or management group in that Azure AD organization
As Global Administrator, you might need to elevate your permissions to:
Regain lost access to an Azure subscription or management group.
Grant another user or yourself access to an Azure subscription or management group.
View all Azure subscriptions or management groups in an organization.
Grant an automation app access to all Azure subscriptions or management groups.
Assign a user administrative access to an Azure subscription
To assign a user administrative access to a subscription, you must have Microsoft.Authorization/roleAssignments/write and Microsoft.Authorization/roleAssignments/delete permissions at the subscription scope. Users with the subscription Owner or User Access Administrator role have these permissions.
# Assign the role by using Azure PowerShell
New-AzRoleAssignment `
    -SignInName rbacuser@example.com `
    -RoleDefinitionName "Owner" `
    -Scope "/subscriptions/<subscriptionID>"

# Assign the role by using the Azure CLI
az role assignment create \
    --assignee rbacuser@example.com \
    --role "Owner" \
    --subscription <subscription_name_or_id>
Containerized web application : A web app so that it can be deployed as a Docker image and run from an Azure Container Instance
Azure Container instance
Using Azure container for containerized web application
Rapid deployment is key to business agility
Containerization saves time and reduces costs.
Multiple apps can run in their isolated containers on the same hardware.
Scenario: Suppose you work for an online clothing retailer that is planning the development of a handful of internal apps but hasn’t yet decided how to host them. You’re looking for maximum compatibility, and the apps may be hosted on-prem, in Azure or another cloud provider. Some of the apps might share IaaS infrastructure. In these cases, the company requires the apps isolated from each other. Apps can share the hardware resources, but an app shouldn’t be able to interfere with the files, memory space, or other resources used by other apps. The company values the efficiency of its resources and wants something with a compelling app development story. Docker seems an ideal solution to these requirements. With Docker, you can quickly build and deploy an app and run it in its tailored environment, either locally or in the cloud.
To build a customized docker image for your aplication refer to Docker, container, Kubernetes post. In this post we focus on work with Azure Container Registry.
Azure Container Instance loads and runs Docker images on demand.
The Azure Container Instance service can retrieve the image from a registry such as Docker Hub or Azure Container Registry.
Azure Container Registry
it has a unique url
these registries are private
need authentication to push/pull image
pull and push only with docker CLI or azure CLI
has replication feature in premium SKU (geo-replicated image)
Standard SKU doesn’t support Replications
After change SKU to premium then geo-replication can be used
#-----------------------------------------------------------
# Deploy a Docker image to an Azure Container Instance
#-----------------------------------------------------------

az login

az account list

az account set --subscription="subscription-id"

az account list-locations --output table

az group create --name mygroup --location westeurope

# Different SKUs provide varying levels of scalability and storage.
az acr create --name parisaregistry --resource-group mygroup --sku [standard|Premium] --admin-enabled true
# output -> "loginServer": "parisaregistry.azurecr.io"

# for a username and password.
az acr credential show --name parisaregistry

# specify the URL of the login server for the registry.
docker login parisaregistry.azurecr.io --password ":)" --username ":O" # or using--password-stdin

# you must create an alias for the image that specifies the repository and tag to be created in the Docker registry
# The repository name must be of the form *<login_server>/<image_name>:<tag/>.
docker tag myapp:v1 myregistry.azurecr.io/myapp:v1 # myregistry.azurecr.io/myapp:v1 is the alias for myapp:v1

# Upload the image to the registry in Azure Container Registry.
docker push myregistry.azurecr.io/myapp:v1


# Verify that the image has been uploaded
az acr repository list --name myregistry


az acr repository show --repository myapp --name myregistry
# Dockerfile with azure container registry tasks

FROM    node:9-alpine
ADD     https://raw.githubusercontent.com/Azure-Samples/acr-build-helloworld-node/master/package.json /
ADD     https://raw.githubusercontent.com/Azure-Samples/acr-build-helloworld-node/master/server.js /
RUN     npm install
EXPOSE  80
CMD     ["node", "server.js"]
After creating the docker file run the following codes
az acr build --registry $ACR_NAME --image helloacrtasks:v1 .

# Verify the image
az acr repository list --name $ACR_NAME --output table

# Enable the registry admin account
az acr update -n $ACR_NAME --admin-enabled true

az acr credential show --name $ACR_NAME

# Deploy a container with Azure CLI
az container create \
    --resource-group learn-deploy-acr-rg \
    --name acr-tasks \
    --image $ACR_NAME.azurecr.io/helloacrtasks:v1 \
    --registry-login-server $ACR_NAME.azurecr.io \
    --ip-address Public \
    --location <location> \
    --registry-username [username] \
    --registry-password [password]

az container show --resource-group  learn-deploy-acr-rg --name acr-tasks --query ipAddress.ip --output table

# place a container registry in each region where images are run
# This strategy will allow for network-close operations, enabling fast, reliable image layer transfers.
# Geo-replication enables an Azure container registry to function as a single registry, serving several regions with multi-master regional registries.
# A geo-replicated registry provides the following benefits:
#       Single registry/image/tag names can be used across multiple regions
#       Network-close registry access from regional deployments
#       No additional egress fees, as images are pulled from a local, replicated registry in the same region as your container host
#       Single management of a registry across multiple regions

az acr replication create --registry $ACR_NAME --location japaneast

az acr replication list --registry $ACR_NAME --output table
Azure Container Registry doesn’t support unauthenticated access and require authentication for all operations. Registries support two types of identities:
Azure Active Directory identities, including both user and service principals. Access to a registry with an Azure Active Directory identity is role-based, and identities can be assigned one of three roles: reader (pull access only), contributor (push and pull access), or owner (pull, push, and assign roles to other users).
The admin account included with each registry. The admin account is disabled by default.
The admin account provides a quick option to try a new registry. You enable the account and use its username and password in workflows and apps that need access. Once you’ve confirmed the registry works as expected, you should disable the admin account and use Azure Active Directory identities exclusively to ensure the security of your registry.
Azure Container Instance (ACI)
Azure Container Instance service can load an image from Azure Container Registry and run it in Azure
instance will have an ip address to be accessible
dns name can be used for a friendly label
image url can be azure container registry or docker hub
runs a container in Azure without managing virtual machines and without a higher-level service
Fast startup: Launch containers in seconds.
Per second billing: Incur costs only while the container is running.
Hypervisor-level security: Isolate your application as completely as it would be in a VM.
Custom sizes: Specify exact values for CPU cores and memory.
Persistent storage: Mount Azure Files shares directly to a container to retrieve and persist state.
Linux and Windows: Schedule both Windows and Linux containers using the same API.
The ease and speed of deploying containers in Azure Container Instances makes it a great fit for executing run-once tasks like image rendering or building and testing applications.
provide a DNS name to expose your container to the Internet (dns must be unique)
For scenarios where you need full container orchestration, including service discovery across multiple containers, automatic scaling, and coordinated application upgrades, we recommend Azure Kubernetes Service (AKS).
Create an Azure Container Instance (ACI)
#--------------------------------------------------------------
# Using Azure Container Instance to run a docker image
#--------------------------------------------------------------

# use to generate random dns name
DNS_NAME_LABEL=aci-demo-$RANDOM

# use these image for quick start/ or demo
--image microsoft/aci-helloworld         # -> basic Node.js web application on docker hub
--image microsoft/aci-wordcount:latest   # -> This container runs a Python script that analyzes the text of Shakespeare's Hamlet, writes the 10 most common words to standard output, and then exits

# create a container instance and start the image running
# for a user friendly url -> --dns-name-label mydnsname
az container create --resource-group mygroup --name ecommerceapiproducts --image parisaregistry.azurecr.io/ecommerceapiproducts:latest --os-type Windows --dns-name-label ecommerceapiproducts  --registry-username ":)" --registry-password ":O"

az container create --resource-group mygroup --name myproducts1 --image parisaregistry.azurecr.io/ecommerceapiproducts:latest --os-type Windows  --registry-login-server parisaregistry.azurecr.io --registry-username ":)" --registry-password ":O" --dns-name-label myproducts --ports 9000 --environment-variables 'PORT'='9000'
ACI restart-policies
Azure Container Instances has three restart-policy options [Source]:
Restart policy in Azure Container Instance
Description
Always in ACI
Containers in the container group are always restarted. This policy makes sense for long-running tasks such as a web server. This is the default setting applied when no restart policy is specified at container creation.
Never in ACI
Containers in the container group are never restarted. The containers run one time only.
OnFailure in ACI
Containers in the container group are restarted only when the process executed in the container fails (when it terminates with a nonzero exit code). The containers are run at least once. This policy works well for containers that run short-lived tasks.
Azure Container Instances starts the container and then stops it when its process (a script, in this case) exits. When Azure Container Instances stops a container whose restart policy is Never or OnFailure, the container’s status is set to Terminated.
az container create \
  --resource-group learn-deploy-aci-rg \
  --name mycontainer-restart-demo \
  --image microsoft/aci-wordcount:latest \
  --restart-policy OnFailure \
  --location eastus

az container show \
  --resource-group learn-deploy-aci-rg \
  --name mycontainer-restart-demo \
  --query containers[0].instanceView.currentState.state

az container logs \
  --resource-group learn-deploy-aci-rg \
  --name mycontainer-restart-demo
ACI check log, state, events
az container delete --resource-group mygroup --name myproducts1

az container logs --resource-group mygroup --name myproducts1

az container attach --resource-group mygroup --name myproducts1

# find the fully qualified domain name of the instance by querying the IP address of the instance or Azure UI > Azure Container Instance > Overview: FQND
az container show --resource-group mygroup --name myproducts --query ipAddress.fqdn

# another variant
--query "{FQDN:ipAddress.fqdn,ProvisioningState:provisioningState}" \
--out table

# get the status of the container
--query containers[0].instanceView.currentState.state

# Execute a command in your container
az container exec \
  --resource-group learn-deploy-aci-rg \
  --name mycontainer \
  --exec-command /bin/sh

# Monitor CPU and memory usage on your container
CONTAINER_ID=$(az container show \
  --resource-group learn-deploy-aci-rg \
  --name mycontainer \
  --query id \
  --output tsv)

az monitor metrics list \
  --resource $CONTAINER_ID \
  --metric CPUUsage \
  --output table

az monitor metrics list \
  --resource $CONTAINER_ID \
  --metric MemoryUsage \
  --output table
By default, Azure Container Instances are stateless.
If the container crashes or stops, all of its state is lost.
To persist state beyond the lifetime of the container, you must mount a volume from an external store.
mount an Azure file share to an Azure container instance so you can store data and access it later
STORAGE_ACCOUNT_NAME=mystorageaccount$RANDOM

az storage account create \
  --resource-group learn-deploy-aci-rg \
  --name $STORAGE_ACCOUNT_NAME \
  --sku Standard_LRS \
  --location eastus

# AZURE_STORAGE_CONNECTION_STRING is a special environment variable that's understood by the Azure CLI.
# The export part makes this variable accessible to other CLI commands you'll run shortly.
export AZURE_STORAGE_CONNECTION_STRING=$(az storage account show-connection-string \
  --resource-group learn-deploy-aci-rg \
  --name $STORAGE_ACCOUNT_NAME \
  --output tsv)

# create a file share
az storage share create --name aci-share-demo

# To mount an Azure file share as a volume in Azure Container Instances, you need these three values:
# The storage account name
# The share name
# The storage account access key
STORAGE_KEY=$(az storage account keys list \
  --resource-group learn-deploy-aci-rg \
  --account-name $STORAGE_ACCOUNT_NAME \
  --query "[0].value" \
  --output tsv)

# check the value
echo $STORAGE_KEY

# Deploy a container and mount the file share (mount /aci/logs/ to your file share)
az container create \
  --resource-group learn-deploy-aci-rg \
  --name aci-demo-files \
  --image microsoft/aci-hellofiles \
  --location eastus \
  --ports 80 \
  --ip-address Public \
  --azure-file-volume-account-name $STORAGE_ACCOUNT_NAME \
  --azure-file-volume-account-key $STORAGE_KEY \
  --azure-file-volume-share-name aci-share-demo \
  --azure-file-volume-mount-path /aci/logs/

# check the storage
az storage file list -s aci-share-demo -o table

az storage file download -s aci-share-demo -p <filename>
The task of automating, managing, and interacting with a large number of containers is known as orchestration.
Azure Kubernetes Service (AKS) is a complete orchestration service for containers with distributed architectures with multiple containers.
You can move existing applications to containers and run them within AKS.
You can control access via integration with Azure Active Directory (Azure AD) and access Service Level Agreement (SLA)–backed Azure services, such as Azure Database for MySQL for any data needs, via Open Service Broker for Azure (OSBA).
Azure takes care of the infrastructure to run and scale your applications.
prerequisite is a staging deployment slot to push code to azure app service
easily add deployment slots to an App Service web app (for creating a staging)
swap the staging deployment slot with the production slot
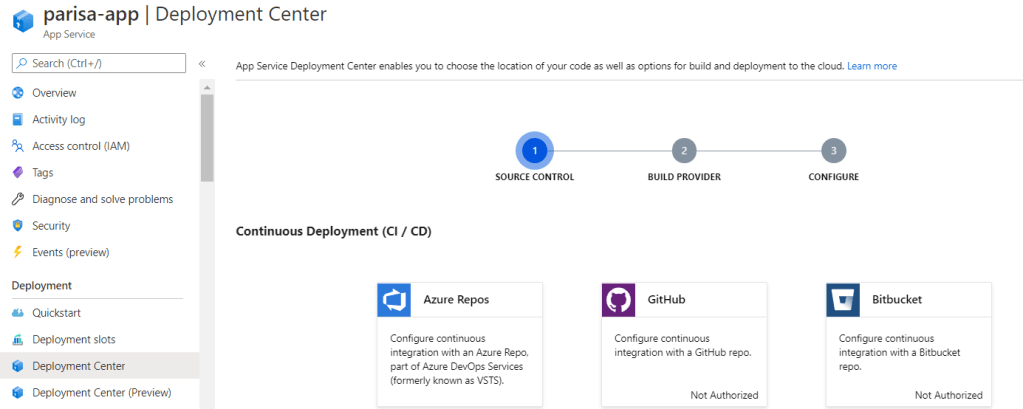
Azure portal provides out-of-the-box continuous integration and deployment with Azure DevOps, GitHub, Bitbucket, FTP, or a local Git repository on your development machine
Mode : Free doesn’t support deployment slot
Seployment slopts are listed under “Deployment slots” menu
Continuous integration/deployment support
Connect your web app with any of the above sources and App Service will do the rest for you by automatically syncing your code and any future changes on the code into the web app
with Azure DevOps, you can define your own build and release process that compiles your source code, runs the tests, builds a release, and finally deploys the release into your web app every time you commit the code
out-of-the-box continuous integration and deployment
Automated deployment
Automated deployment, or continuous integration, is a process used to push out new features and bug fixes in a fast and repetitive pattern with minimal impact on end users.
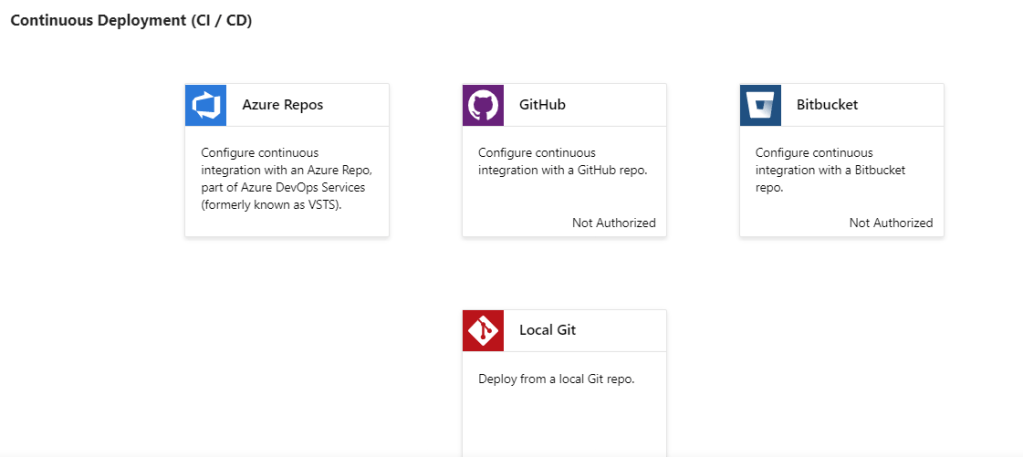
Azure supports automated deployment directly from several sources. The following options are available:
Azure DevOps: You can push your code to Azure DevOps (previously known as Visual Studio Team Services), build your code in the cloud, run the tests, generate a release from the code, and finally, push your code to an Azure Web App.
GitHub: Azure supports automated deployment directly from GitHub. When you connect your GitHub repository to Azure for automated deployment, any changes you push to your production branch on GitHub will be automatically deployed for you.
Bitbucket: With its similarities to GitHub, you can configure an automated deployment with Bitbucket.
OneDrive: Microsoft’s cloud-based storage. You must have a Microsoft Account linked to a OneDrive account to deploy to Azure.
Dropbox: Azure supports deployment from Dropbox, which is a popular cloud-based storage system that is similar to OneDrive.
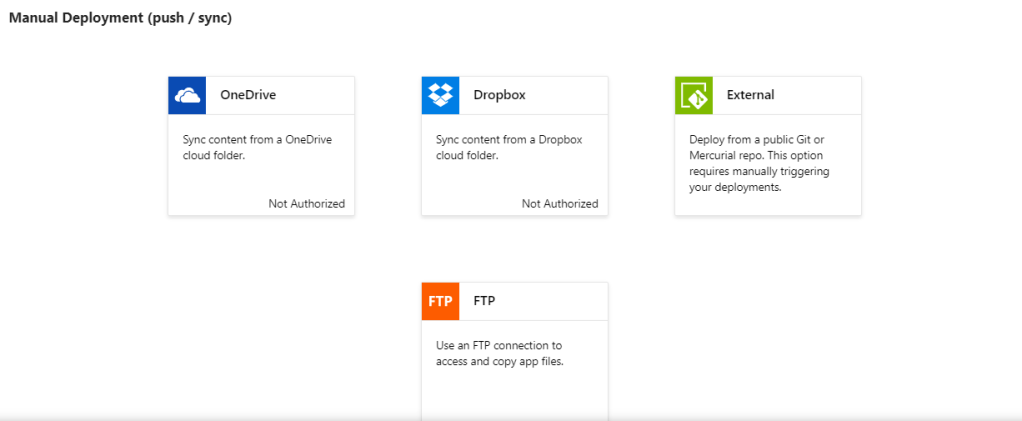
Manual deployment
There are a few options that you can use to manually push your code to Azure:
Git: App Service web apps feature a Git URL that you can add as a remote repository. Pushing to the remote repository will deploy your app.
az webapp up: webapp up is a feature of the az command-line interface that packages your app and deploys it. Unlike other deployment methods, az webapp up can create a new App Service web app for you if you haven’t already created one.
Zipdeploy: Use az webapp deployment source config-zip to send a ZIP of your application files to App Service. Zipdeploy can also be accessed via basic HTTP utilities such as curl.
Visual Studio: Visual Studio features an App Service deployment wizard that can walk you through the deployment process.
FTP/S: FTP or FTPS is a traditional way of pushing your code to many hosting environments, including App Service.
# using SDK version 3.1.102.
wget -q -O - https://dot.net/v1/dotnet-install.sh | bash -s -- --version 3.1.102
export PATH="~/.dotnet:$PATH"
echo "export PATH=~/.dotnet:\$PATH" >> ~/.bashrc

# create a new ASP.NET Core MVC application
dotnet new mvc --name BestBikeApp

# build and run the application to verify it is complete.
cd BestBikeApp
dotnet run
# output
info: Microsoft.Hosting.Lifetime[0]
      Now listening on: https://localhost:5001
info: Microsoft.Hosting.Lifetime[0]
      Now listening on: http://localhost:5000
info: Microsoft.Hosting.Lifetime[0]
      Application started. Press Ctrl+C to shut down.
info: Microsoft.Hosting.Lifetime[0]
      Hosting environment: Development
info: Microsoft.Hosting.Lifetime[0]
      Content root path: /home/user/BestBikeApp

# Deploy with zipdeploy
dotnet publish -o pub
cd pub
zip -r site.zip *

# perform the deployment
az webapp deployment source config-zip \
    --src site.zip \
    --resource-group learn-6126217c-08a6-4509-a288-2941d4b96a27 \
    --name <your-unique-app-name>
background task in an App Service Web App with WebJobs
Automate a task for a Web App that should run in the background without affecting the performance of the Web App
small automated task, which executes automatically in response to some events
Scenario: Suppose you are a senior web developer in a research role for an online luxury watch dealer. You have a production website that uses Azure web apps. You’ve built a small script that checks stock levels and reports them to an external service. You consider this script to be part of the website, but it’s meant to run in the background, not in response to a user’s actions on the site.
You’d like the website and the script code to be closely associated. They should be stored together as part of the same project in the same source control repository. The script may grow and change as the site changes, so you’d like to always deploy them at the same time, to the same set of cloud resources.
WebJobs are a feature of Azure App Service
WebJobs can be used to run any script or console application that can be run on a Windows computer, with some functionality limitations
To run a WebJob, you’ll need an existing Azure App Service web app, web API, or mobile app
You can run multiple WebJobs in a single App Service plan along with multiple apps or APIs.
Your WebJobs can be written as scripts of several different kinds including Windows batch files, PowerShell scripts, or Bash shell scripts
You can upload such scripts and executables directly to the web app in the Azure portal
you can write WebJobs using a framework such as Python or Node.js
This approach enables you to use the WebJobs tools in Visual Studio to ease development.
Types of Webjob
Continuous
Triggered
it starts when it is deployed
only starts when scheduled or manually triggered
continues to run in an endless loop
for continuous the code must be written in loop (to poll a message queue for new items and process their contents)
use this kind of WebJob, for example, to create daily summaries of messages in a queue.
Webjob vs. Azure function (to know more about Azure Serverless Services/Architecture)
Scenario: Suppose you are a developer for a board game company. A product line produced by your company has recently become popular. The volume of requests from your retail partners to your inventory API is growing quickly: much faster than the rate that your inventory actually changes. You’d like your API to respond to requests rapidly without incurring load on your API. You use Azure API Management to host your API. You’re considering using an API Management policy to cache compiled responses to requests.
Api management for changing the behaviore of the api without changing the code
it exposes apis of a company for the api customers
it is used for api inventory
<policies>
    <inbound>
        <base />
 # it means first the policy of the higher level is applied
        <check-header name="Authorization" failed-check-httpcode="401" failed-check-error-message="Not authorized" ignore-case="false">
        </check-header>
    </inbound>
    <backend>
        <base />
    </backend>
    <outbound>
        <base />
        <json-to-xml apply="always" consider-accept-header="false" parse-date="false" />
    </outbound>
    <on-error>
        <base />
    </on-error>
</policies>
policies for
restricting access e.g. Check Http Header, Limit call rate by subscription, Limit call rate by key, Restrict caller Ips, Policies for Authentication, Cross domain policies, Transformation policies
Cross domain policies
Cross domain requests are considered a security threat and denied by browsers and APIs
Cross-Origin Resource Sharing (CORS), use the CORS policy
Some AJAX code, which runs on the browser, uses JSON with padding to make cross-domain calls securely. Use the JSONP policy to permit clients to use this technique
Caching policies
better performance for caching the compiled responses
Advanced policies
apply a policy only when the response passes a specific test, use the Control flow policy
Use the Forward request policy to forward a request to a backend server
To control what happens when an action fails, use the Retry policy
The Send one-way request policy can send a request to a URL without waiting for a response
If you want to store a value for use in a later calculation or test, use the Set variable policy to persist a value in a named variable
we can use vary-by tags/attributes in cache-lookup-value policy.
vary-by-query-parameter (tag): if all users have to see same price/result for a specific product, then we have to set vary-by-query-parameter to partnumber. APIM groups the requests based on partnumber.
vary-by-developer (attribute): becase vary-by-developer=”false”, APIM understands that different subscriptions key doesn’t alter the response. if this attribute is true, APIM serves a response from the cache only if it was originally requested with the same subscription key.
If a header can make a significant difference to a response, use the <vary-by-header> tag
you want to avoid the cache being cleared when the API Management service is updated.
you want to have greater control over the cache configuration than the internal cache allows
You want to cache more data than can be store in the internal cache.
if you use apim with consumption pricing tier, then you have to use external cache. because this pricing tier follows the serverless designprincipal and we should use it with serverless web apis, and it has no internal cache.
API keys / subscriptions (query string / header parameter)
The default header name is Ocp-Apim-Subscription-Key, and the default query string is subscription-key.
client certificate
Scenario: Suppose you work for a meteorological company, which has an API that customers use to access weather data for forecasts and research. There is proprietary information in this data, and you would like to ensure that only paying customers have access. You want to use Azure API Management to properly secure this API from unauthorized use.
Scenario: Businesses are extending their operations as a digital platform by creating new channels, finding new customers, and driving deeper engagement with existing ones. APIM provides the core competencies to ensure a successful API program through developer engagement, business insights, analytics, security, and protection. You can use APIM to take any backend and launch a full-fledged API program based on it.
Use Subscription key to secure access to an API
Azure api management service helps to expose the apis
developers musr subscrib the api / product (these are two different scope)
used to secure the api / product with a subscription key / API key
preventing denial of service attacks (DoS) by using throttling
or using advanced security policies like JSON Web Token (JWT) validation
Enabling independent software vendor (ISV) partner ecosystems by offering fast partner onboarding through the developer portal
we can define who can access api through the api gateway (only customers who have subscribed to your service can access the API and use your forecast data, by issuing subscription keys)
# how you can pass a key in the request header using curl
curl --header "Ocp-Apim-Subscription-Key: <key string>" https://<apim gateway>.azure-api.net/api/path

# example curl command that passes a key in the URL as a query string
curl https://<apim gateway>.azure-api.net/api/path?subscription-key=<key string>

# If the key is not passed in the header, or as a query string in the URL, you'll get a 401 Access Denied response from the API gateway.

# call without subscription key
curl -X GET https://[Name Of Gateway].azure-api.net/api/Weather/53/-1
# output
{ "statusCode": 401, "message": "Access denied due to missing subscription key. Make sure to include subscription key when making requests to an API." }

# call with subscription key as header
curl -X GET https://[Name Of Gateway].azure-api.net/api/Weather/53/-1 \
  -H 'Ocp-Apim-Subscription-Key: [Subscription Key]'

# output : {"mainOutlook":{"temperature":32,"humidity":34},"wind":{"speed":11,"direction":239.0},"date":"2019-05-16T00:00:00+00:00","latitude":53.0,"longitude":-1.0}
Use client certificates to secure access to an API
used to provide TLS mutual authentication between the client and the API gateway
allow only requests with certificates containing a specific thumbprint (through inbound policies)
TLS client authentication, the API Management gateway can inspect the certificate contained within the client request for the following properties
Property
Reason
Certificate Authority (CA)
Only allow certificates signed by a particular CA
Thumbprint
Allow certificates containing a specified thumbprint
Subject
Only allow certificates with a specified subject
Expiration Date
Only allow certificates that have not expired
two common ways to verify a certificate
Check who issued the certificate. If the issuer was a certificate authority that you trust, you can use the certificate. You can configure the trusted certificate authorities in the Azure portal to automate this process.
If the certificate is issued by the partner, verify that it came from them. For example, if they deliver the certificate in person, you can be sure of its authenticity. These are known as self-signed certificates.
apim consumption tier
this tier is for serverless APIs e.g. azure functions
in this tier for using client certificate must explicitly enable it APIM Instance > custom domains > Request Client Certificate: Yes
check thumbnail of a client certificate in policies
# Every client certificate includes a thumbprint, which is a hash, calculated from other certificate properties

<choose>
    <when condition="@(context.Request.Certificate == null || context.Request.Certificate.Thumbprint != "desired-thumbprint")" >
        <return-response>
            <set-status code="403" reason="Invalid client certificate" />
        </return-response>
    </when>
</choose>
Check the thumbprint against certificates uploaded to API Management
n the previous example, only one thumbprint would work so only one certificate would be validated. Usually, each customer or partner company would pass a different certificate with a different thumbprint. To support this scenario, obtain the certificates from your partners and use the Client certificates page in the Azure portal to upload them to the API Management resource. Then add this code to your policy:
Create Self-Signed Certificate [Source] and use in APIM
# create a private key and certificate
pwd='Pa$$w0rd'
pfxFilePath='selfsigncert.pfx'
openssl req -x509 -sha256 -nodes -days 365 -newkey rsa:2048 -keyout privateKey.key -out selfsigncert.crt -subj /CN=localhost

# convert the certificate to PEM format
openssl pkcs12 -export -out $pfxFilePath -inkey privateKey.key -in selfsigncert.crt -password pass:$pwd
openssl pkcs12 -in selfsigncert.pfx -out selfsigncert.pem -nodes

# When you are prompted for a password, type Pa$$w0rd and then press Enter.

# Get the thumbprint for the certificate
Fingerprint="$(openssl x509 -in selfsigncert.pem -noout -fingerprint)"
Fingerprint="${Fingerprint//:}"
echo ${Fingerprint#*=}

# output is hexadecimal string without any accompanying text and no colons
curl -X GET https://[api-gateway-name].azure-api.net/api/Weather/53/-1 \
  -H 'Ocp-Apim-Subscription-Key: [Subscription Key]'

# output : return a 403 Client certificate error, and no data will be returned.
Expose multiple Azure Function apps as a consistent API by using APIM
Combine multiple Azure Functions apps into a unified interface by importing them into a single Azure API Management instance.
Scenario: Suppose you work for an online store with a successful and busy web site. Your developers have written the business logic for the site as microservices in the form of Azure Functions. Now, you want to enable partners to interact with your online store from their own code by creating a web API that they can call over HTTP. You want to find an easy way to assemble your functions into a single API.
In your online store, you have implemented each part of the application as a microservice – one for the product details, one for order details, and so on. A separate team manages each microservice and each team uses continuous development and delivery to update and deploy their code on a regular basis. You want to find a way to assemble these microservices into a single product and then manage that product centrally.
use Azure Functions and Azure API Management to build complete APIs with a microservices architecture
Microservices has become a popular approach to the architecture of distributed applications
we can develop distributed systems with serverless architecture e.g. azure function