Topics
- Keywords
- Manage VM
- Availability Set
- Scale Set
- Snapshot
- Image
- Deploy VM from VHD
- Generalize a server
- Azure Batch
- Automate business processes
Related topics
Keywords
- Virtual Machine (VM)
- CLI
- VM
- Availability Set
- Scale Set
- Snapshot (from disk)
- Image (from vm)
- Azure Batch: Azure Batch is an Azure service that enables you to run large-scale parallel and high-performance computing (HPC) applications efficiently in the cloud.
- High-performance computing (HPC)
- MPI: Message Passing Interface
- Workflow: Business processes modeled in software are often called workflows.
- Design-first approach: include user interfaces in which you can draw out the workflow
- Azure compute: is an on-demand computing service for running cloud-based applications
- Virtual machines
- Containers
- Azure App Service
- Serverless computing
Source
Manage VM
VM management roles (RBAC)
- Virtual Machine Contributor
- Network Contributor
- Storage Account Contributor
Note: The roles have to be assigned to an Azure AD Group instead of a user
To have a proper management on VMs, different management opptions have to be used
- Enough permission & access right (via role-based access control (RBAC))
- Policies to manage (reter to Onboarding : Azure Management Features)
- allowed vm size
- allowed region for resoureces
Available VM commands
az vm [subcommands]
| Sub-command | Description |
|---|---|
create | Create a new virtual machine |
deallocate | Deallocate a virtual machine |
delete | Delete a virtual machine |
list | List the created virtual machines in your subscription |
open-port | Open a specific network port for inbound traffic |
restart | Restart a virtual machine |
show | Get the details for a virtual machine |
start | Start a stopped virtual machine |
stop | Stop a running virtual machine |
update | Update a property of a virtual machine |
# Create a Linux virtual machine
az vm create \
  --resource-group [sandbox resource group name] \
  --location westus \
  --name SampleVM \
  --image UbuntuLTS \
  --admin-username azureuser \
  --generate-ssh-keys \
  --verbose # Azure CLI tool waits while the VM is being created.
    # Or
  --no-wait # option to tell the Azure CLI tool to return immediately and have Azure continue creating the VM in the background.

# output
{
  "fqdns": "",
  "id": "/subscriptions/<subscription-id>/resourceGroups/Learn-2568d0d0-efe3-4d04-a08f-df7f009f822a/providers/Microsoft.Compute/virtualMachines/SampleVM",
  "location": "westus",
  "macAddress": "00-0D-3A-58-F8-45",
  "powerState": "VM running",
  "privateIpAddress": "10.0.0.4",
  "publicIpAddress": "40.83.165.85",
  "resourceGroup": "2568d0d0-efe3-4d04-a08f-df7f009f822a",
  "zones": ""
}

  # generate-ssh-keys flag: This parameter is used for Linux distributions and creates
  # a pair of security keys so we can use the ssh tool to access the virtual machine remotely.
  # The two files are placed into the .ssh folder on your machine and in the VM. If you already
  # have an SSH key named id_rsa in the target folder, then it will be used rather than having a new key generated.

# Connecting to the VM with SSH
ssh azureuser@<public-ip-address>

# for exit
logout

# Listing images
az vm image list --output table

# Getting all images
az vm image list --sku WordPress --output table --all # t is helpful to filter the list with the --publisher, --sku or –-offer options.

# Location-specific images
az vm image list --location eastus --output table
Pre-defined VM sizes
Azure defines a set of pre-defined VM sizes for Linux and Windows to choose from based on the expected usage.
| Type | Sizes | Description |
|---|---|---|
| General purpose | Dsv3, Dv3, DSv2, Dv2, DS, D, Av2, A0-7 | Balanced CPU-to-memory. Ideal for dev/test and small to medium applications and data solutions. |
| Compute optimized | Fs, F | High CPU-to-memory. Good for medium-traffic applications, network appliances, and batch processes. |
| Memory optimized | Esv3, Ev3, M, GS, G, DSv2, DS, Dv2, D | High memory-to-core. Great for relational databases, medium to large caches, and in-memory analytics. |
| Storage optimized | Ls | High disk throughput and IO. Ideal for big data, SQL, and NoSQL databases. |
| GPU optimized | NV, NC | Specialized VMs targeted for heavy graphic rendering and video editing. |
| High performance | H, A8-11 | Our most powerful CPU VMs with optional high-throughput network interfaces (RDMA). |
# get a list of the available sizes
az vm list-sizes --location eastus --output table

# output
MaxDataDiskCount    MemoryInMb  Name                      NumberOfCores    OsDiskSizeInMb    ResourceDiskSizeInMb
------------------  ------------  ----------------------  ---------------  ----------------  ----------------------
                 2          2048  Standard_B1ms                         1           1047552                    4096
                 2          1024  Standard_B1s                          1           1047552                    2048
                 4          8192  Standard_B2ms                         2           1047552                   16384
                 4          4096  Standard_B2s                          2           1047552                    8192
                 8         16384  Standard_B4ms                         4           1047552                   32768
                16         32768  Standard_B8ms                         8           1047552                   65536
                 4          3584  Standard_DS1_v2 (default)             1           1047552                    7168
                 8          7168  Standard_DS2_v2                       2           1047552                   14336
                16         14336  Standard_DS3_v2                       4           1047552                   28672
                32         28672  Standard_DS4_v2                       8           1047552                   57344
                64         57344  Standard_DS5_v2                      16           1047552                  114688
        ....
                64       3891200  Standard_M128-32ms                  128           1047552                 4096000
                64       3891200  Standard_M128-64ms                  128           1047552                 4096000
                64       3891200  Standard_M128ms                     128           1047552                 4096000
                64       2048000  Standard_M128s                      128           1047552                 4096000
                64       1024000  Standard_M64                         64           1047552                 8192000
                64       1792000  Standard_M64m                        64           1047552                 8192000
                64       2048000  Standard_M128                       128           1047552                16384000
                64       3891200  Standard_M128m                      128           1047552                16384000

# Specify a size during VM creation
az vm create \
    --resource-group learn-5d4bcefe-17c2-4db6-aba8-3f25d2c54844 \
    --name SampleVM2 \
    --image UbuntuLTS \
    --admin-username azureuser \
    --generate-ssh-keys \
    --verbose \
    --size "Standard_DS5_v2"

# Get available VM Size
# Before a resize is requested, we must check to see if the desired size is available in the cluster our VM is part of.
az vm list-vm-resize-options \
    --resource-group learn-5d4bcefe-17c2-4db6-aba8-3f25d2c54844 \
    --name SampleVM \
    --output table

# Resize an existing VM
az vm resize \
    --resource-group learn-5d4bcefe-17c2-4db6-aba8-3f25d2c54844 \
    --name SampleVM \
    --size Standard_D2s_v3
This will return a list of all the possible size configurations available in the resource group. If the size we want isn’t available in our cluster, but is available in the region, we can deallocate the VM. This command will stop the running VM and remove it from the current cluster without losing any resources. Then we can resize it, which will re-create the VM in a new cluster where the size configuration is available.
# List VMs
az vm list

# Output types
az vm list --output table|json|jsonc|tsv

# Getting the IP address
az vm list-ip-addresses -n SampleVM -o table
# output
VirtualMachine    PublicIPAddresses    PrivateIPAddresses
----------------  -------------------  --------------------
SampleVM          168.61.54.62         10.0.0.4

# Getting VM details
az vm show --resource-group learn-5d4bcefe-17c2-4db6-aba8-3f25d2c54844 --name SampleVM
# we could change to a table format, but that omits almost all of the interesting data. Instead, we can turn to a built-in query language for JSON called JMESPath.
# https://jmespath.org/


# Adding filters to queries with JMESPath
{
  "people": [
    {
      "name": "Fred",
      "age": 28
    },
    {
      "name": "Barney",
      "age": 25
    },
    {
      "name": "Wilma",
      "age": 27
    }
  ]
}

# poeple is an array
people[1]
# output
{
    "name": "Barney",
    "age": 25
}


people[?age > '25']
# output
[
  {
    "name": "Fred",
    "age": 28
  },
  {
    "name": "Wilma",
    "age": 27
  }
]

people[?age > '25'].[name]
# output
[
  [
    "Fred"
  ],
  [
    "Wilma"
  ]
]

# Filtering our Azure CLI queries
az vm show \
    --resource-group learn-5d4bcefe-17c2-4db6-aba8-3f25d2c54844 \
    --name SampleVM \
    --query "osProfile.adminUsername"

az vm show \
    --resource-group learn-5d4bcefe-17c2-4db6-aba8-3f25d2c54844 \
    --name SampleVM \
    --query hardwareProfile.vmSize

az vm show \
    --resource-group learn-5d4bcefe-17c2-4db6-aba8-3f25d2c54844 \
    --name SampleVM \
    --query "networkProfile.networkInterfaces[].id"

az vm show \
    --resource-group learn-5d4bcefe-17c2-4db6-aba8-3f25d2c54844 \
    --name SampleVM \
    --query "networkProfile.networkInterfaces[].id" -o tsv

# Stopping a VM
az vm stop \
    --name SampleVM \
    --resource-group learn-5d4bcefe-17c2-4db6-aba8-3f25d2c54844

# We can verify it has stopped by attempting to ping the public IP address, using ssh, or through the vm get-instance-view command.
az vm get-instance-view \
    --name SampleVM \
    --resource-group learn-5d4bcefe-17c2-4db6-aba8-3f25d2c54844 \
    --query "instanceView.statuses[?starts_with(code, 'PowerState/')].displayStatus" -o tsv

# Starting a VM
az vm start \
    --name SampleVM \
    --resource-group learn-5d4bcefe-17c2-4db6-aba8-3f25d2c54844

# Restarting a VM
az vm start \
    --name SampleVM \
    --resource-group learn-5d4bcefe-17c2-4db6-aba8-3f25d2c54844
    --no-wait

# Install NGINX web server
# 1.
z vm list-ip-addresses --name SampleVM --output table

# 2.
ssh azureuser@<PublicIPAddress>

# 3.
sudo apt-get -y update && sudo apt-get -y install nginx

# 4.
exit

# Retrieve our default page
# Either
curl -m 10 <PublicIPAddress>
# Or
# in browser try the public ip address

# This command will fail because the Linux virtual machine doesn't expose
# port 80 (http) through the network security group that secures the network
# connectivity to the virtual machine. We can change this with the Azure CLI command vm open-port.

# open oprt
az vm open-port \
    --port 80 \
    --resource-group learn-5d4bcefe-17c2-4db6-aba8-3f25d2c54844 \
    --name SampleVM

# output of curl command
<!DOCTYPE html>
<html>
<head>
<title>Welcome to nginx!</title>
<style>
body {
    width: 35em;
    margin: 0 auto;
    font-family: Tahoma, Verdana, Arial, sans-serif;
}
</style>
</head>
<body>
<h1>Welcome to nginx!</h1>
<p>If you see this page, the nginx web server is successfully installed and
working. Further configuration is required.</p>

<p>For online documentation and support please refer to
<a href="http://nginx.org/">nginx.org</a>.<br/>
Commercial support is available at
<a href="http://nginx.com/">nginx.com</a>.</p>

<p><em>Thank you for using nginx.</em></p>
</body>
</html>
Source: https://docs.microsoft.com/en-us/learn/modules/manage-virtual-machines-with-azure-cli/
Availability Set
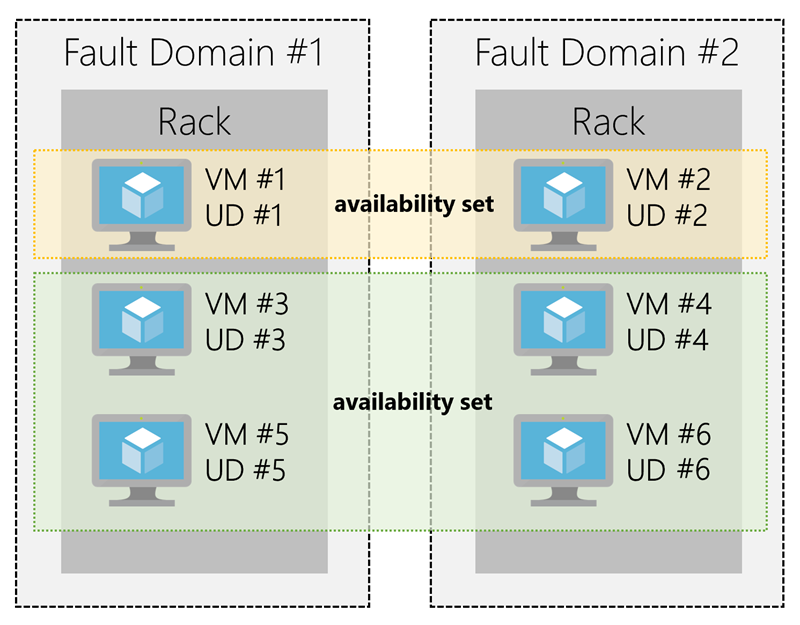
- An availability set is a logical grouping of two or more VMs
- keep your application available during planned or unplanned maintenance.
- A planned maintenance event is when the underlying Azure fabric that hosts VMs is updated by Microsoft.
- to patch security vulnerabilities,
- improve performance,
- and add or update features
- When the VM is part of an availability set, the Azure fabric updates are sequenced so not all of the associated VMs are rebooted at the same time.
- VMs are put into different update domains.
- Update domains indicate groups of VMs and underlying physical hardware that can be rebooted at the same time.
- Update domains are a logical part of each data center and are implemented with software and logic.
- Unplanned maintenance events involve a hardware failure in the data center,
- such as a server power outage
- or disk failure
- VMs that are part of an availability set automatically switch to a working physical server so the VM continues to run.
- The group of virtual machines that share common hardware are in the same fault domain.
- A fault domain is essentially a rack of servers.
- It provides the physical separation of your workload across different power, cooling, and network hardware that support the physical servers in the data center server racks.
- With an availability set, you get:
- Up to three fault domains that each have a server rack with dedicated power and network resources
- Five logical update domains which then can be increased to a maximum of 20
Source
Scale Set
Scenario: Imagine that you work for a domestic shipping company. Your customers use one of the company’s websites to manage and check the status of their shipments. This website is deployed to virtual machines and hosted on-premises. You’ve noticed that increased usage on the site is straining the virtual machines’ resources. However, you can’t adjust to load fluctuations without manually intervening and creating or deallocating virtual machines.
- Scale set is for scalable applications ( automatically adjust to changes in load while minimizing costs with virtual machine scale sets)
- adjust your virtual machine resources to match demands
- keep the virtual machine configuration consistent to ensure application stabilit
- VMs in this type of scale set all have the same configuration and run the same applications
- for scenarios that include compute workloads, big-data workloads, and container workloads
- to deploy and manage many load-balanced, identical VMs
- it scales up and down automatically
- it can even resize the vm
- A scale set uses a load balancer to distribute requests across the VM instances
- It uses a health probe to determine the availability of each instance (The health probe pings the instance)
- keep in mind that you’re limited to running 1,000 VMs on a single scale set
- support both Linux and Windows VMs
- are designed for cost-effectiveness
- scaling options
- horizontal: adding or removing several VMs, by using rules, The rules are based on metrics.
- vertical: adding resources such as memory, CPU power, or disk space to VMs, increasing the size of the VMs in the scale set, by using rules.
- How to scale
- Scheduled scaling: You can proactively schedule the scale set to deploy one or N number of additional instances to accommodate a spike in traffic and then scale back down when the spike ends.
- Autoscaling: If the workload is variable and can’t always be scheduled, you can use metric-based threshold scaling. Autoscaling horizontally scales out based on node usage. It then scales back in when the resources return to a baseline.
- Reducing costs by using low-priority
- allows you to use Azure compute resources at cost savings of up to 80 percent.
- A low-priority scale set provisions VMs through this underused compute capability.
- these VMs, keep in mind that they’re temporary. Availability depends on size, region, time of day, and so on. These VMs have no SLA.
- When Azure needs the computing power again, you’ll receive a notification about the VM that will be removed from your scale set
- you can use Azure Scheduled Events to react to the notification within the VM.
- low-priority scale set, you specify two kinds of removal
- Delete: The entire VM is removed, including all of the underlying disks.
- Deallocate: The VM is stopped. The processing and memory resources are deallocated. Disks are left intact and data is kept. You’re charged for the disk space while the VM isn’t running.
- if the workload increases in complexity rather than in volume, and this complexity demands more of your resources, you might prefer to scale vertically.
# create custom data to config scale set
code cloud-init.yaml

# custom data
#cloud-config
package_upgrade: true
packages:
  - nginx
write_files:
  - owner: www-data:www-data
  - path: /var/www/html/index.html
    content: |
        Hello world from Virtual Machine Scale Set !
runcmd:
  - service nginx restart

# create resource group
az group create \
  --location westus \
  --name scalesetrg

# create scale set
az vmss create \
  --resource-group scalesetrg \
  --name webServerScaleSet \
  --image UbuntuLTS \
  --upgrade-policy-mode automatic \
  --custom-data cloud-init.yaml \
  --admin-username azureuser \
  --generate-ssh-keys

# More about scaling : https://docs.microsoft.com/en-us/learn/modules/build-app-with-scale-sets/4-configure-virtual-machine-scale-set
By default, the new virtual machine scale set has two instances and a load balancer.
The custom-data flag specifies that the VM configuration should use the settings in the cloud-init.yaml file after the VM has been created. You can use a cloud-init file to install additional packages, configure security, and write to files when the machine is first installed.
Configure vm scale set
# add a health probe to the load balancer
az network lb probe create \
  --lb-name webServerScaleSetLB \
  --resource-group scalesetrg \
  --name webServerHealth \
  --port 80 \
  --protocol Http \
  --path /

The health probe pings the root of the website through port 80. If the website doesn't respond, the server is considered unavailable. The load balancer won't route traffic to the server.

# configure the load balancer to route HTTP traffic to the instances in the scale set
az network lb rule create \
  --resource-group scalesetrg \
  --name webServerLoadBalancerRuleWeb \
  --lb-name webServerScaleSetLB \
  --probe-name webServerHealth \
  --backend-pool-name webServerScaleSetLBBEPool \
  --backend-port 80 \
  --frontend-ip-name loadBalancerFrontEnd \
  --frontend-port 80 \
  --protocol tcp

# change the number of instances in a virtual machine scale set
az vmss scale \
    --name MyVMScaleSet \
    --resource-group MyResourceGroup \
    --new-capacity 6
- a mechanism that updates your application consistently, across all instances in the scale set
- Azure custom script extension downloads and runs a script on an Azure VM. It can automate the same tasks on all the VMs in a scale set.
- create a configuration file that defines the files to get and the commands to run. This file is in JSON format.
- to know more about custom script refer to Onboarding : Azure Infrastructure deployment.
# custom script configuration that downloads an application from a repository in GitHub and installs it on a host instance by running a script named custom_application_v1.sh
# yourConfigV1.json
{
  "fileUris": ["https://raw.githubusercontent.com/yourrepo/master/custom_application_v1.sh"],
  "commandToExecute": "./custom_application_v1.sh"
}


# To deploy this configuration on the scale set, you use a custom script extension
az vmss extension set \
  --publisher Microsoft.Azure.Extensions \
  --version 2.0 \
  --name CustomScript \
  --resource-group myResourceGroup \
  --vmss-name yourScaleSet \
  --settings @yourConfigV1.json

# view the current upgrade policy for the scale set
az vmss show \
    --name webServerScaleSet \
    --resource-group scalesetrg \
    --query upgradePolicy.mode

# apply the update script
az vmss extension set \
    --publisher Microsoft.Azure.Extensions \
    --version 2.0 \
    --name CustomScript \
    --vmss-name webServerScaleSet \
    --resource-group scalesetrg \
    --settings "{\"commandToExecute\": \"echo This is the updated app installed on the Virtual Machine Scale Set ! > /var/www/html/index.html\"}"

# retrieve the IP address
az network public-ip show \
    --name webServerScaleSetLBPublicIP \
    --resource-group scalesetrg \
    --output tsv \
    --query ipAddress
Source
Snapshot
Image
- Managed disk supports creating a managed Custome image
- We can create image from custom VHD in a storage account or directly from generalized VM (via sysprepped VM command)
- This process capture a single image
- this image contains all managed disks associated with a VM, including both OS, and Data.
Image vs. Snapshot
| Image | Snapshot |
|---|---|
| With managed disks, you can take an image of a generalized VM that has been deallocated. | It’s copy of disk in a specific point of time. |
| This image includes all managed disks attached to this VM. | it applies only to one disk. |
| This image can be used to create a Vm. | Sanpshot doesn’t have awareness of any disk except the one it contains. |
If a VM has only one OS disk, we can take a snapshot of the disk or take image of VM and create a VM from either snapshot or the image.
Deploy VM from VHD
- a vm can have some configurations like installed software -> we can create a new Virtual Hard Disk (VHD) from this vm.
- VHD
- is like physical hard disk
- A VHD can also hold databases and other user-defined folders, files, and data
- A virtual machine can contain multiple VHDs
- Typically, a virtual machine has an operating system VHD on which the operating system is installed.
- It also has one or more data VHDs that contain the applications and other user-specific data used by the virtual machine.
- VHD advantages
- high availability
- physical security
- Durability
- scalability
- cost and performance
- VM image
- vm image is an original image without preconfigured items
- VHD contains configurations
- vm image and vhds can be created via Microsoft Hyper-V -> then upload to cloud
- Generalized image
- it’s customized vm image
- and then some server-specific information must be remove and create a general image
- The host name of your virtual machine.
- The username and credentials that you provided when you installed the operating system on the virtual machine.
- Log files.
- Security identifiers for various operating system services.
- The process of resetting this data is called generalization, and the result is a generalized image.
- For Windows, use the Microsoft System Preparation (Sysprep) tool. For Linux, use the Windows Azure Linux Agent (waagent) tool.
- specialized virtual image
- use a specialized virtual image as a backup of your system at a particular point in time. If you need to recover after a catastrophic failure, or you need to roll back the virtual machine, you can restore your virtual machine from this image.
- is snapshot of vm at a point in time

Generalize a server
- use a generalized image to build pre-configured virtual machines (VMs)
- To generalize a Windows VM, follow these steps:
- Sign in to the Windows virtual machine.
- Open a command prompt as an administrator.
- Browse to the directory \windows\system32\sysprep.
- Run sysprep.exe.
- In the System Preparation Tool dialog box, select the following settings, and then select OK.TABLE 1PropertyValueSystem Cleanup ActionEnter System Out-of-Box Experience (OOBE)GeneralizeSelectShutdown OptionsShutdown

Running Sysprep is a destructive process, and you can’t easily reverse its effects. Back up your virtual machine first.
When you create a virtual machine image in this way, the original virtual machine becomes unusable. You can’t restart it. Instead, you must create a new virtual machine from the image, as described later in this unit.
Source
- https://docs.microsoft.com/en-us/learn/modules/deploy-vms-from-vhd-templates/
- https://docs.microsoft.com/en-us/learn/modules/deploy-vms-from-vhd-templates/4-exercise-create-image-provision-vm?pivots=windows-cloud
High-performance computing
Scenario: Suppose you work for an engineering organization that has an application that creates 3D models of the facilities they design. Your organization also has another system that stores a large amount of project-related statistical data. They want to use Azure to modernize the aging high-performance compute platforms that support these applications. Your organization needs to understand the solutions available on Azure, and how they fit into their plans.
- Azure HPC choices
- Azure batch
- Azure VM HPC Instances
- Microsoft HPC Pack
- they are for specialized tasks
- In genetic sciences, gene sequencing.
- In oil and gas exploration, reservoir simulations.
- In finance, market modeling.
- In engineering, physical system modeling.
- In meteorology, weather modeling.
- Azure batch
- for working with large-scale parallel and computationally intensive tasks
- batch is managed service
- The Batch scheduling and management service is free
- batch components
- batch account
- pools pf vms / notes
- batch job
- tasks / units of work
- batch account
- batch can associate with storage for input/ourput
- the scheduling and management engine determines the optimal plan for allocating and scheduling tasks across the specified compute capacity
- suggested for embarrassingly parallel tasks (https://www.youtube.com/watch?v=cadoD0aSQoM)

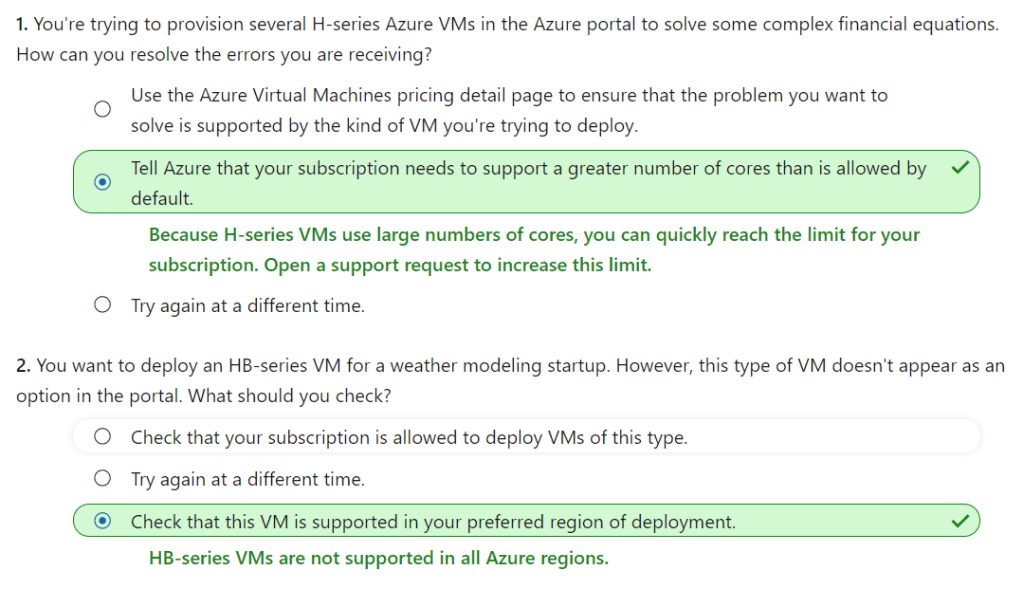
- Azure VM HPC
- H-series
- HB-Series
- HC-series
- N -> NVIDIA GPUs
- NC -> NVIDIA GPUs + CUDA
- ND -> optimized for AI and deep learning workloads for are fast at running single-precision floating point operations, which are used by AI frameworks including Microsoft Cognitive Toolkit, TensorFlow, and Caffe.
- Microsoft HPC Pack
- for migrate from on-prem to azure
- have full control of the management and scheduling of your clusters of VMs
- HPC Pack has the flexibility to deploy to on-premises and the cloud.
- HPC Pack offers a series of installers for Windows that allows you to configure your own control and management plane, and highly flexible deployments of on-premises and cloud nodes.
- Deployment of HPC Pack requires Windows Server 2012 or later, and takes careful consideration to implement.
- Prerequisites:
- You need SQL Server and an Active Directory controlle, and a topology
- specify the count of heads/controller nodes and workers
- pre-provision Azure nodes as part of the cluster
- The size of the main machines that make up the control plane (head and control nodes, SQL Server, and Active Directory domain controller) will depend on the projected cluster size
- install HPC PAck -> the you have job scheduler for both HPC and parallel jobs
- scheduler appears in the Microsoft Message Passing Interface
- HPC Pack is highly integrated with Windows
- can see all the application, networking, and operating system events from the compute nodes in the cluster in a single, debugger view.


Source
- https://docs.microsoft.com/en-us/learn/modules/intro-to-hpc/1-introduction
- https://docs.microsoft.com/en-us/learn/modules/intro-to-hpc/2-azure-batch
- https://docs.microsoft.com/en-us/learn/modules/intro-to-hpc/4-microsoft-hpc-pack
Azure Batch
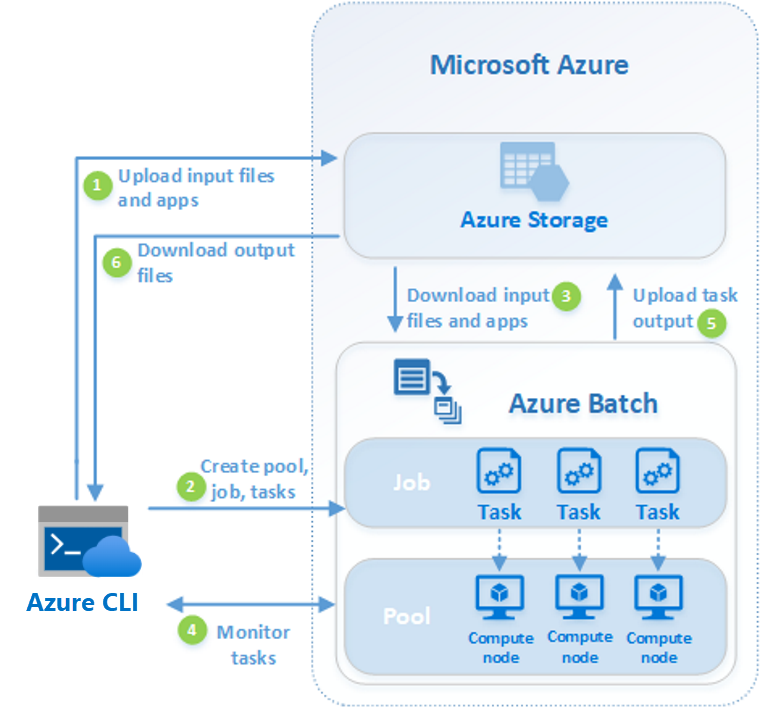
Scenario: Imagine you’re a software developer at a non-profit organization whose mission is to give every human on the planet access to clean water. To reach this goal, every citizen is asked to take a picture of their water purification meter and text it to you. Each day, you have to scan pictures from over 500,000 households, and record each reading against the sender phone number. The data is used to detect water quality trends and to dispatch the mobile water quality team to investigate the worst cases across each region. Time is of the essence, but processing each image with Optical Character Recognition (OCR) is time-intensive. With Azure Batch, you can scale out the amount of compute needed to handle this task on a daily basis, saving your non-profit the expense of fixed resources.
- Azure Batch is an Azure service that enables you to run large-scale parallel and high-performance computing (HPC) applications efficiently in the cloud.
- no need to manage infrastructure
- Azure Batch to execute large-scale, high-intensity computation jobs
- for running parallel tasks
- flexible and scalable compute solution, such as Azure Batch, to provide the computational power
- for compute-intensive tasks
- heavy workloads can be broken down into separate subtasks and run in parallel
- components
- azure batch account
- batch account is container for all batch resources
- batch account contains many batch pools
- azure batch workflow
# define variables
RESOURCE_GROUP=<your resource group>
BATCH_ACCOUNT=batchaccount$RANDOM
LOCATION=westeurope

# create azure batch account
az batch account create \
 --name $BATCH_ACCOUNT \
 --resource-group $RESOURCE_GROUP \
 --location <choose a location from the list above>

# login to azure batch account
az batch account login \
 --name $BATCH_ACCOUNT \
 --resource-group $RESOURCE_GROUP \
 --shared-key-auth

# create azure batch bool
az batch pool create \
 --id mypool --vm-size Standard_A1_v2 \
 --target-dedicated-nodes 3 \
 --image canonical:ubuntuserver:16.04-LTS \
 --node-agent-sku-id "batch.node.ubuntu 16.04"

# verify the nodes
az batch pool show --pool-id mypool \
 --query "allocationState"

# create a job
az batch job create \
 --id myjob \
 --pool-id mypool

# create tasks
for i in {1..10}
do
   az batch task create \
    --task-id mytask$i \
    --job-id myjob \
    --command-line "/bin/bash -c 'echo \$(printenv | grep \AZ_BATCH_TASK_ID) processed by; echo \$(printenv | grep \AZ_BATCH_NODE_ID)'"
done


# delete batch job
az batch job delete --job-id myjob -y
Source
- https://docs.microsoft.com/en-us/learn/modules/run-parallel-tasks-in-azure-batch-with-the-azure-cli/
- https://docs.microsoft.com/en-us/learn/modules/run-parallel-tasks-in-azure-batch-with-the-azure-cli/4-exercise-create-azure-batch-job-in-cli-to-run-parallel-task
Monitor Azure Batch job
- to monitor the progress ob the tasks
# create a job for monitoring
az batch job create \
 --id myjob2 \
 --pool-id mypool

# create tasks of the job
for i in {1..10}
do
   az batch task create \
    --task-id mytask$i \
    --job-id myjob2 \
    --command-line "/bin/bash -c 'echo \$(printenv | grep \AZ_BATCH_TASK_ID) processed by; echo \$(printenv | grep \AZ_BATCH_NODE_ID)'"
done

# check status
az batch task show \
 --job-id myjob2 \
 --task-id mytask1

# list tasks output
az batch task file list \
 --job-id myjob2 \
 --task-id mytask5 \
 --output table

# create a folder for output and change to this folder
mkdir taskoutputs && cd taskoutputs

# download tasks output
for i in {1..10}
do
az batch task file download \
    --job-id myjob2 \
    --task-id mytask$i \
    --file-path stdout.txt \
    --destination ./stdout$i.txt
done

# show content
cat stdout1.txt && cat stdout2.txt

# delte job
az batch job delete --job-id myjob2 -y
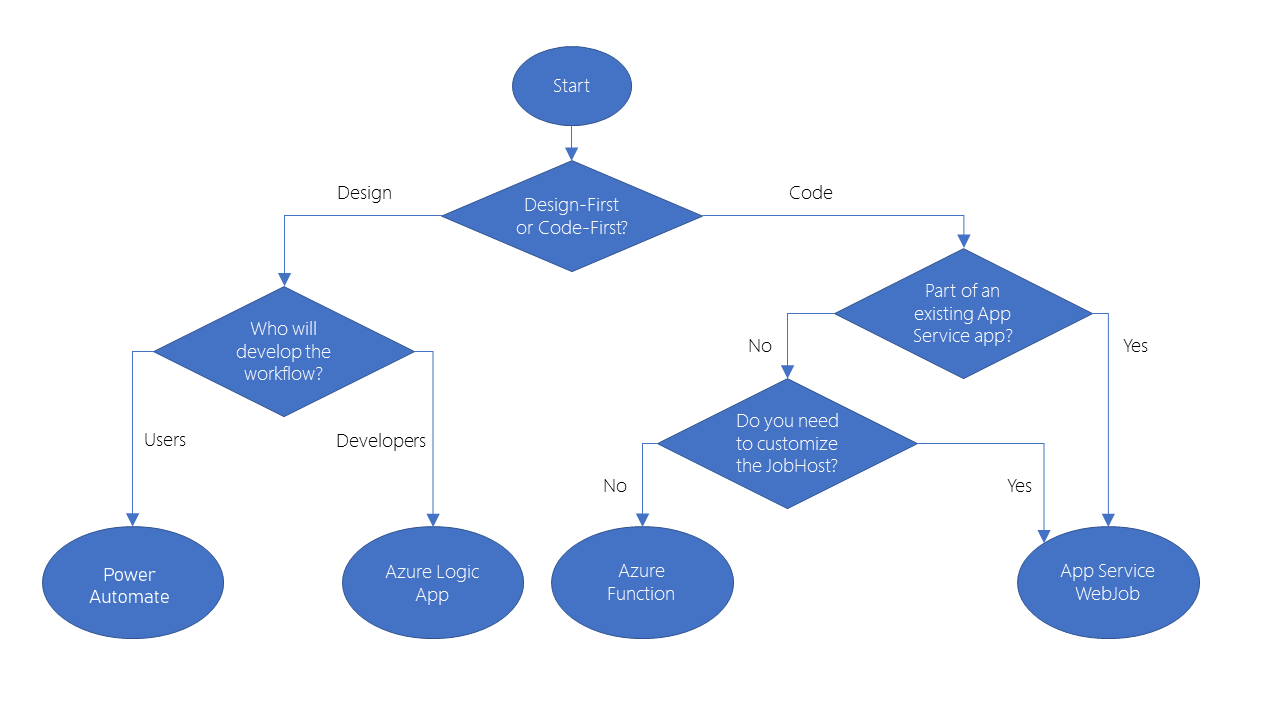
Automate business processes
- Modern businesses run on multiple applications and services
- send the right data to the rigth task impact the efficiency
- azure features to build and implement workflows that integrate multiple systems
- Logic Apps
- Microsoft Power Automate
- WebJobs
- Azure Functions
- similarities of them
- They can all accept inputs. An input is a piece of data or a file that is supplied to the workflow.
- They can all run actions. An action is a simple operation that the workflow executes and may often modify data or cause another action to be performed.
- They can all include conditions. A condition is a test, often run against an input, that may decide which action to execute next.
- They can all produce outputs. An output is a piece of data or a file that is created by the workflow.
- In addition, workflows created with these technologies can either start based on a schedule or they can be triggered by some external event.
- They have design-first approach
- Logic app
- Power automate
- They have code-first technology
- webjob
- Azure functions
Logic Apps
- to automate, orchestrate, and integrate disparate components of a distributed application.
- Visual designer / Json Code Editor
- over 200 connectors to external services
- If you have an unusual or unique system that you want to call from a Logic Apps, you can create your own connector if your system exposes a REST API.
Microsoft Power Automate
- create workflows even when you have no development or IT Pro experience
- support four different types of flow
- is built on Logic Apps
- support same connectors and custom connectors
Webjobs
- is a background tasks for app service
- Onboarding : Modern Applications
- kinds
- continous
- triggered
- webjob can be written in several languages.
- The WebJobs SDK only supports C# and the NuGet package manager.
Azure Functions
- small pieces of code
- pay for the time when the code runs
- Azure automatically scales the function
- has available template
- Microsoft Power Automate supported flows
- Automated: A flow that is started by a trigger from some event. For example, the event could be the arrival of a new tweet or a new file being uploaded.
- Button: Use a button flow to run a repetitive task with a single click from your mobile device.
- Scheduled: A flow that executes on a regular basis such as once a week, on a specific date, or after 10 hours.
- Business process: A flow that models a business process such as the stock ordering process or the complaints procedure.
- Azure function available templates
- HTTPTrigger. Use this template when you want the code to execute in response to a request sent through the HTTP protocol.
- TimerTrigger. Use this template when you want the code to execute according to a schedule.
- BlobTrigger. Use this template when you want the code to execute when a new blob is added to an Azure Storage account.
- CosmosDBTrigger. Use this template when you want the code to execute in response to new or updated documents in a NoSQL database.
- WebJobs for these reasons
- You want the code to be a part of an existing App Service application and to be managed as part of that application, for example in the same Azure DevOps environment.
- You need close control over the object that listens for events that trigger the code. This object in question is the
JobHostclass, and you have more flexibility to modify its behavior in WebJobs
design-first comparison
| Microsoft Power Automate | Logic Apps | |
|---|---|---|
| Intended users | Office workers and business analysts | Developers and IT pros |
| Intended scenarios | Self-service workflow creation | Advanced integration projects |
| Design tools | GUI only. Browser and mobile app | Browser and Visual Studio designer. Code editing is possible |
| Application Lifecycle Management | Power Automate includes testing and production environments | Logic Apps source code can be included in Azure DevOps and source code management systems |
code-first comparison
| Azure WebJobs | Azure Functions | |
|---|---|---|
| Supported languages | C# if you are using the WebJobs SDK | C#, Java, JavaScript, PowerShell, etc. |
| Automatic scaling | No | Yes |
| Development and testing in a browser | No | Yes |
| Pay-per-use pricing | No | Yes |
| Integration with Logic Apps | No | Yes |
| Package managers | NuGet if you are using the WebJobs SDK | Nuget and NPM |
| Can be part of an App Service application | Yes | No |
Provides close control of JobHost | Yes | No |
Source
You owe your dreams your courage.
Koleka Putuma