The following figure demonstrates, what we implement in the following code [Source].
# Define variable
rg=<resource group name>

# create a resource group
az group create --name $rg --location <location>

# Create a virtual network and subnet for application servers and database servers
az network vnet create \
    --resource-group $rg \
    --name ERP-servers \
    --address-prefix 10.0.0.0/16 \
    --subnet-name Applications \
    --subnet-prefix 10.0.0.0/24

az network vnet subnet create \
    --resource-group $rg \
    --vnet-name ERP-servers \
    --address-prefix 10.0.1.0/24 \
    --name Databases

# Create Network Security Group
az network nsg create \
    --resource-group $rg \
    --name ERP-SERVERS-NSG

# Create virtual machines running Ubuntu (build the AppServer virtual machine)
# NSG is assigned to NIC of the VM
wget -N https://raw.githubusercontent.com/MicrosoftDocs/mslearn-secure-and-isolate-with-nsg-and-service-endpoints/master/cloud-init.yml && \
az vm create \
    --resource-group $rg \
    --name AppServer \
    --vnet-name ERP-servers \
    --subnet Applications \
    --nsg ERP-SERVERS-NSG \
    --image UbuntuLTS \
    --size Standard_DS1_v2 \
    --admin-username azureuser \
    --custom-data cloud-init.yml \
    --no-wait \
    --admin-password <password>

# build the DataServer virtual machine
az vm create \
    --resource-group $rg \
    --name DataServer \
    --vnet-name ERP-servers \
    --subnet Databases \
    --nsg ERP-SERVERS-NSG \
    --size Standard_DS1_v2 \
    --image UbuntuLTS \
    --admin-username azureuser \
    --custom-data cloud-init.yml \
    --admin-password <password>

# To confirm that the virtual machines are running
az vm list \
    --resource-group $rg \
    --show-details \
    --query "[*].{Name:name, Provisioned:provisioningState, Power:powerState}" \
    --output table

# To connect to your virtual machines, use SSH directly from Cloud Shell. To do this, you need the public IP addresses that have been assigned to your virtual machines
az vm list \
    --resource-group $rg \
    --show-details \
    --query "[*].{Name:name, PrivateIP:privateIps, PublicIP:publicIps}" \
    --output table

# To make it easier to connect to your virtual machines during the rest of this exercise, assign the public IP addresses to variables
APPSERVERIP="$(az vm list-ip-addresses \
                 --resource-group $rg \
                 --name AppServer \
                 --query "[].virtualMachine.network.publicIpAddresses[*].ipAddress" \
                 --output tsv)"

DATASERVERIP="$(az vm list-ip-addresses \
                 --resource-group $rg \
                 --name DataServer \
                 --query "[].virtualMachine.network.publicIpAddresses[*].ipAddress" \
                 --output tsv)"

# to check whether you can connect to your AppServer virtual machine
ssh azureuser@$APPSERVERIP -o ConnectTimeout=5
# You'll get a Connection timed out message.

# to check whether you can connect to your DataServer virtual machine
ssh azureuser@$DATASERVERIP -o ConnectTimeout=5
# You'll get the same connection failure message.
Remember that the default rules deny all inbound traffic into a virtual network, unless this traffic is coming from another virtual network. The Deny All Inbound rule blocked the inbound SSH connections
Inbound
Name
Priority
Source IP
Destination IP
Access
Allow VNet Inbound
65000
VIRTUAL_NETWORK
VIRTUAL_NETWORK
Allow
Deny All Inbound
65500
*
*
Deny
Create a security rule for SSH
# Create a security rule for SSH
az network nsg rule create \
    --resource-group $rg \
    --nsg-name ERP-SERVERS-NSG \
    --name AllowSSHRule \
    --direction Inbound \
    --priority 100 \
    --source-address-prefixes '*' \
    --source-port-ranges '*' \
    --destination-address-prefixes '*' \
    --destination-port-ranges 22 \
    --access Allow \
    --protocol Tcp \
    --description "Allow inbound SSH"

# check whether you can now connect to your AppServer virtual machine
ssh azureuser@$APPSERVERIP -o ConnectTimeout=5

ssh azureuser@$DATASERVERIP -o ConnectTimeout=5

# You will be asked "are you sure to continue?", you answer with yes, and enter password
# for exit enter exit
Create a security rule to prevent web access
Server name
IP address
AppServer
10.0.0.4
DataServer
10.0.1.4
# Now add a rule so that AppServer can communicate with DataServer over HTTP, but DataServer can't communicate with AppServer over HTTP
az network nsg rule create \
    --resource-group $rg \
    --nsg-name ERP-SERVERS-NSG \
    --name httpRule \
    --direction Inbound \
    --priority 150 \
    --source-address-prefixes 10.0.1.4 \
    --source-port-ranges '*' \
    --destination-address-prefixes 10.0.0.4 \
    --destination-port-ranges 80 \
    --access Deny \
    --protocol Tcp \
    --description "Deny from DataServer to AppServer on port 80"

# to connect to your AppServer virtual machine, and check if AppServer can communicate with DataServer over HTTP.
ssh -t azureuser@$APPSERVERIP 'wget http://10.0.1.4; exit; bash'
# he response should include a 200 OK message.

# to connect to your DataServer virtual machine, and check if DataServer can communicate with AppServer over HTTP
ssh -t azureuser@$DATASERVERIP 'wget http://10.0.0.4; exit; bash'
# his shouldn't succeed, because you've blocked access over port 80. Press Ctrl+C to stop the command prior to the timeout.
Configure Application Security Group (ASG)
The following figure demonstrates, what we implement in this section.
Create an application security group for database servers, so that all servers in this group can be assigned the same settings. You’re planning to deploy more database servers, and want to prevent these servers from accessing application servers over HTTP. By assigning sources in the application security group, you don’t need to manually maintain a list of IP addresses in the network security group. Instead, you assign the network interfaces of the virtual machines you want to manage to the application security group.
# create a new application security group called ERP-DB-SERVERS-ASG
az network asg create \
    --resource-group $rg \
    --name ERP-DB-SERVERS-ASG

# to associate DataServer with the application security group
az network nic ip-config update \
    --resource-group $rg \
    --application-security-groups ERP-DB-SERVERS-ASG \
    --name ipconfigDataServer \
    --nic-name DataServerVMNic \
    --vnet-name ERP-servers \
    --subnet Databases

# to update the HTTP rule in the ERP-SERVERS-NSG network security group. It should reference the ERP-DB-Servers application security group
az network nsg rule update \
    --resource-group $rg \
    --nsg-name ERP-SERVERS-NSG \
    --name httpRule \
    --direction Inbound \
    --priority 150 \
    --source-address-prefixes "" \
    --source-port-ranges '*' \
    --source-asgs ERP-DB-SERVERS-ASG \
    --destination-address-prefixes 10.0.0.4 \
    --destination-port-ranges 80 \
    --access Deny \
    --protocol Tcp \
    --description "Deny from DataServer to AppServer on port 80 using application security group"

# to connect to your AppServer virtual machine, and check if AppServer can communicate with DataServer over HTTP.
ssh -t azureuser@$APPSERVERIP 'wget http://10.0.1.4; exit; bash'
# the response should include a 200 OK message.

# to connect to your DataServer virtual machine, and check if DataServer can communicate with AppServer over HTTP.
ssh -t azureuser@$DATASERVERIP 'wget http://10.0.0.4; exit; bash'
# you should get a Connection timed out message. Press Ctrl+C to stop the command prior to the timeout.
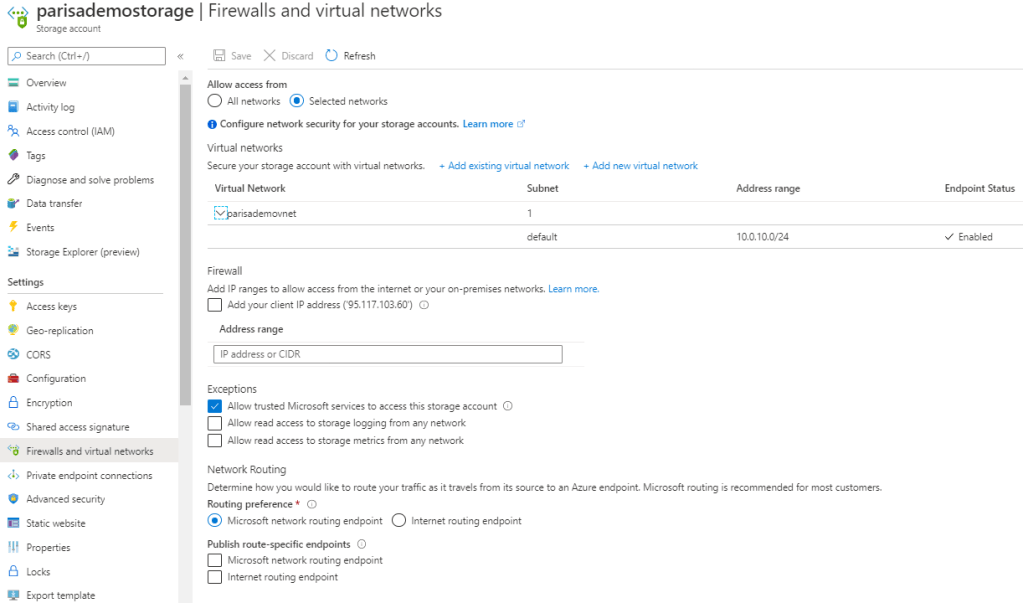
Configure Service Firewall
Storage
Storage has a layered security model
The layered model enables us to secure storage to a specific set of supported networks
To use network, the network rules must be configured.
Only applications requesting data from over specific networks can access storage.
The application request can go through the network rules, but this application must have an authorization on the storage as well
Authorization can be done via Storage Access Key (for blob & queue).
Or Authorization can be done via Share Access Signature (SAS) (for blob & queue).
In both case the authorization is done via Azure Active Directory.
Network rules are enforced are protocols e.g. REST and SMB
How network rules must be configured
Deny access to traffic from all networks (it will be done automatically after first config).
Grant access to the traffic of specific vnet (for secure application boundary).
Then if needed grant access to public internet IP/IP range or on-prem.
Configure network rules for Azure Portal, Storage Explorer, and AZCopy
VM disk traffic (mount, unmount, disk io) is not affected by network rules.
REST access is affected by network rules
Classic storage don’t support firewall and vnet.
Shared Access Signature (SAS)
This access token is not related to securing storage via vnet
The IP address that has some authorization on storage can work with storage again even after configuring network rules.
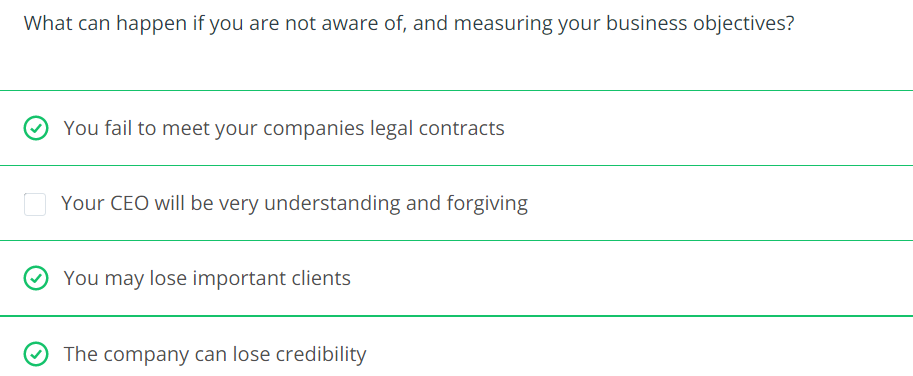
Business Objectives define how the business can market and sell its products and services. It is crucial for all parts of the business to agree and strive for the same business objectives in order to smoothly operate the business and work with customers.
Key concepts
Uptime:
Downtime
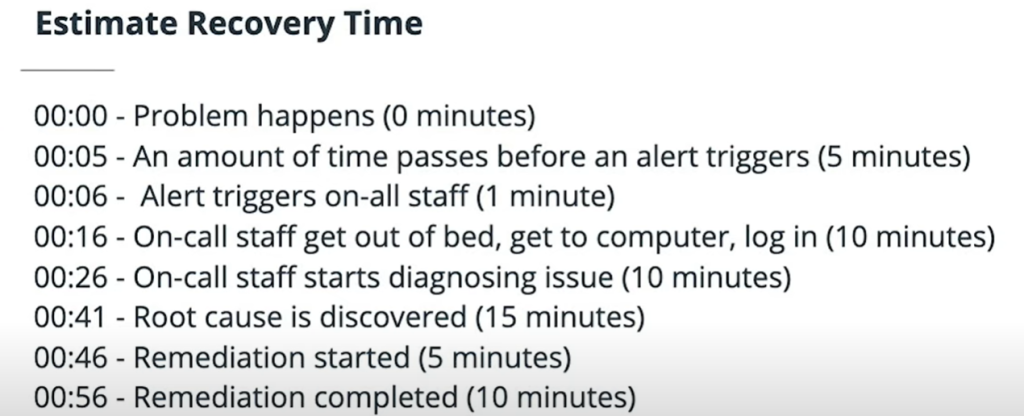
Recovery Time Objective (RTO): maximum amount of time that your service would be down.
Recovery Point Objective (RPO): maximum amount of time over which you would lose data.
Disaster Recovery: Bringing our system (major service) in another place in case of complete region outage.
They are the commitment that we do with customers
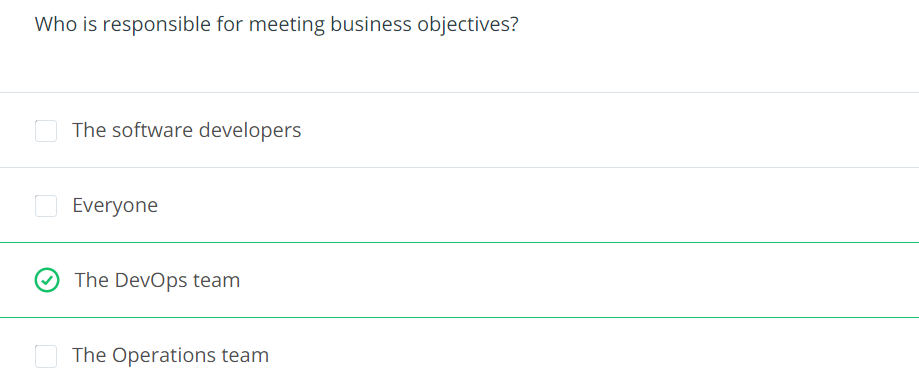
Big picture
Business objectives are where the other business functions of your company meet with the Engineering function. These other areas of the company focus on signing customers, managing finances, supporting customers, advertising your products, etc. Where all of these teams meet is in the realm of contracts, commitments and uptime. This is where other parts of a business have to collaborate with Engineering in order to come up with common goals and common language.
Developing your intuition
Develop regular communication: when working across departments within your business, it’s important to communicate regularly and clearly.
Be on the same page: using the same language is a good way to make sure that all teams are on the same page.
Push back where necessary: It’s imprerative to be well-prepared when dealing with business objectives. Other business units might wish to make more aggressive commitments to close more sales. Be cautious and transparent. Make sure that business understands what meeting higher commitments will cost in term of both time and dollers.
Be Prepared: Service disruptions can be rare enough that how to recover can be forgotten and can be tricky. Practicing recovery operations in key to doing them well. Which in turn is key to keep relationship and solid footing with your peers in other parts of the business.
It is important to gauge how much effort and cost will be involved in meeting different business objectives. Communicating these numbers will help keep the whole company centered around common and achievable goals. Setting unrealistic or unachievable goals can quickly lead to poor morale and missed deadlines. Before committing to a business objective, ensure that you have an idea of how to build, run, monitor and maintain a system that can achieve the desired metrics, and make sure that the rest of the business understands the resource that will be required to do so. In this fashion, it is key to get all parts of the company to work together to set these goals. These goals are so critical to success and potentially costly to achieve that they often must be set at the highest levels of the company.
Uptime
Percentage of time: the percentage of time that a service is available. 99,9% is a standard uptime by many service level agreements. This percentage is measured over the course of a month.
Part of every Service Level Agreement: if you likely face penalties for the SLA, it comes usually in the form of monetary or service credit that you would owe your customers.
Requires diligence: you need to tack your platform uptimes to demonstrate to your customers that you are measuring it and meeting commitments.
In order to maintain a high level of uptime, we must have redundancy throughout the services. Everything must be redundant: – Databases – Networking – Servers – Staff
Uptime is a measure of how much time an application or service is available and running normally. Uptime is often measured as a percentage, usually in the “number of 9s” vernacular. For example, “4 9s” refers to a service being available for 99.99% of a time period.
Services that offer Service Level Agreements (SLAs) typically start at 99% and get more stringent from there. 99.9% is a common SLA. The more “9s” an SLA offers, the more difficult and costly it is to achieve. You must ask yourself how much effort you are willing to put in and how much your company is willing to pay before proceeding into the territory of 4 9s or beyond.
Allowed downtime is calculated on monthly bases because some months have different length.
Allowed downtime = (30 days 24 hours 60 minutes) – (30 days 24 hours 60 minutes * SLA percentage)
For example a 99% = 7.3 hours of allowed downrime per month
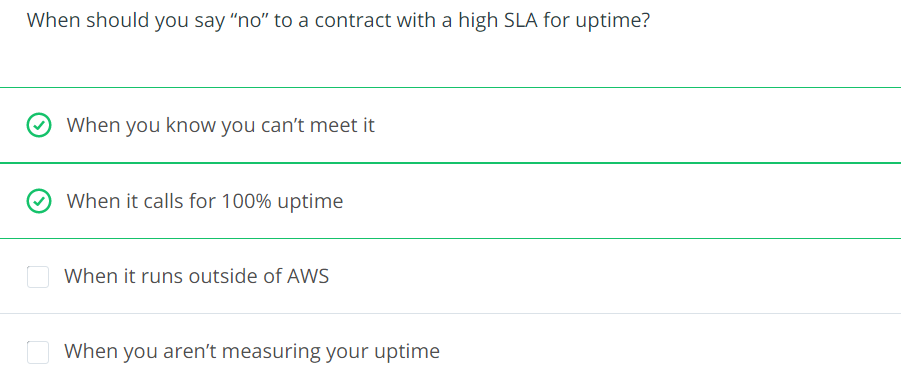
Drafting a Service Level Agreement (SLA)
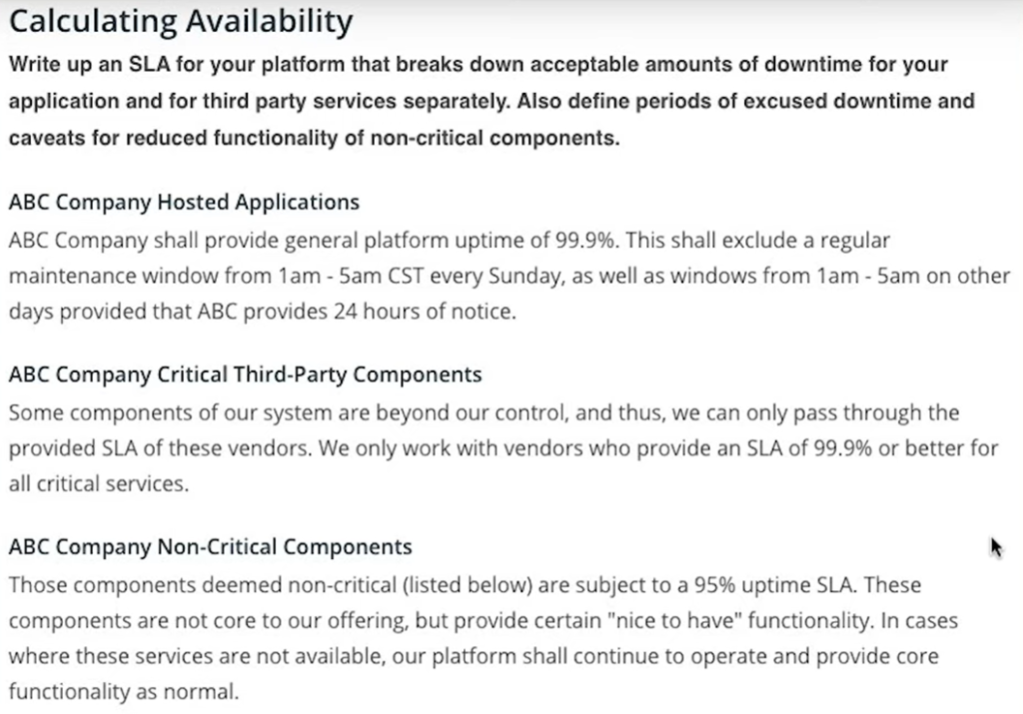
When drafting a Service Level Agreement (SLA) for your platform, there are many things to consider. You will need to ponder what you will need to implement in order to meet the SLA, and also understand what types of guarantees that you are providing to your customers that you will meet the SLA. Monetary compensation is common for SLA violations either in the form of service credits or outright refunds.
Often when considering what type of SLA a platform can provide, there is a tendency to forget to consider some of the components of the system. If the SLA isn’t carefully considered, it can quickly become very difficult and expensive to meet [Source].
Example: Your company would like to offer a 99.9% SLA on your entire platform. Consider the following services that are required for your service to operate normally:
Email service provider: 99.9%
DNS provider: 99.99%
Authentication service provider: 99.9%
AWS services: 99.9%
Twitter feed: 99%
Write an SLA for your platform that breaks down acceptable amounts of downtime for your application and for third-party services separately. Also, define periods of excused downtime and caveats for reduced functionality of non-critical components.
In time of happening an incident, if the whole system is getting down together, the RPO is zero. Because we lost no data.
RDS database
Creating a RDS database with backup enabled to prevent high RPO.
In creating steps this checkbox is important to point-in-time recovery.
After creating the RDS database, then we can execute a point in time recovery.
Restore point can be latest or custom
The the name of restored instance must be specified
Then we will have the original and the restored instance
Disaster Recovery
is about how fast we can restore services after major failure
RPO and RTO is applyed to any incident (consider the worst-case scenario)
RTO and RPO numbers apply to localized outages, but when setting your RTO and RPO, you must take into account worst case scenarios. The term Disaster Recover is used to describe a more widespread failure. In AWS, if you normally run your services in one region, a large enough failure to make you move your system to another region would be a Disaster Recovery (DR) event [Source].
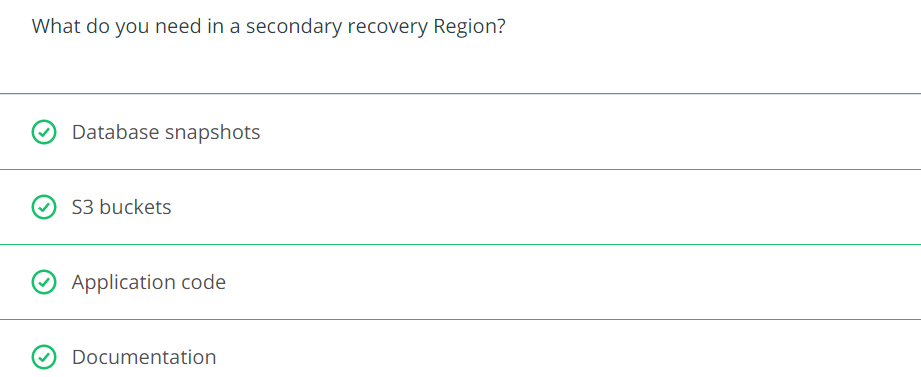
Disaster Recovery usually involves the wholesale moving of your platform from one place to another. Outside of AWS, you might have to move to a backup data center. Inside AWS, you can move to a different region. Disaster recovery is not something you can do after an incident occurs to take down your primary region. If you have not prepared in advance, you will have no choice but to wait for that region to recover. To be prepared ahead of time, consider all of the things you will need to restart your platform in a new home. What saved state do you need, what application software, what configuration information. Even your documentation cannot live solely in your primary region. All of these things must be considered ahead of time and replicated to your DR region [Source].
Which tools have help us in DR on AWS
Geographic Recovery / Multi-region Services (typical DR plan calls for re-establishing your platform)
AWS Service
Multi Region capability
DynamoDB
– Active/Active replica via Global Table
S3
– Active/Passive replica + Double costs for replica
IAM
– By default Global
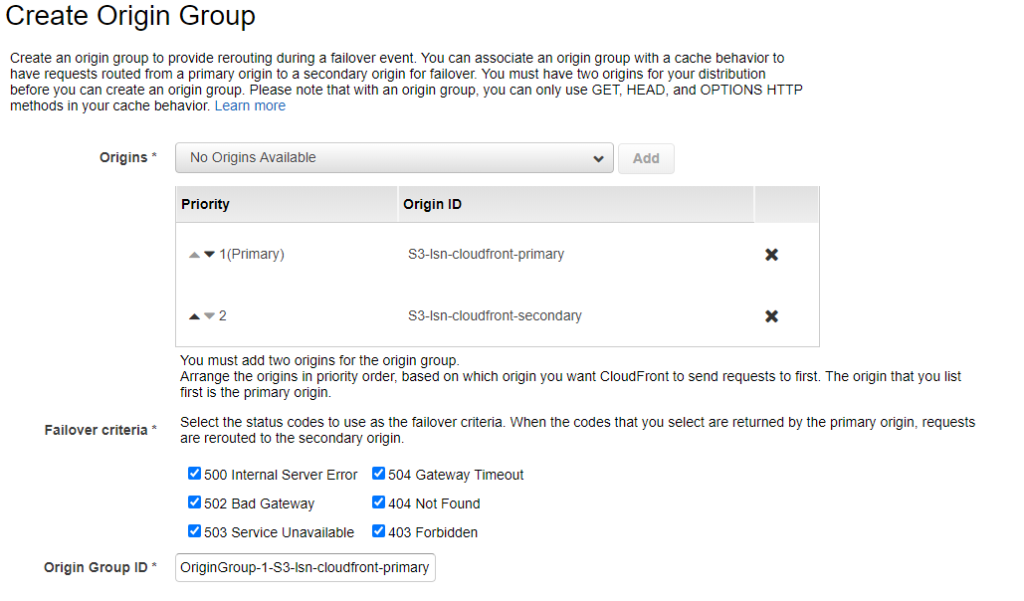
CloudFront
– Active/Passive replica via Origin Group, failover/failback automatically
AWS CloudFront is a content distribution network. It allows for edge location spread around the world to cache content so that the original source only needs to be consulted after a certain amount of time has expired. CloudFront is a global AWS service and has the ability to serve files from an S3 bucket. It also can be configured to have a primary bucket and a backup bucket in case the primary is not available.
Discover the services and tools available to automate the deployment and configuration of your Azure infrastructure
Scenario: A clothing manufacturer that’s moving several product design applications to Azure virtual machines. The company needs to scale out to many virtual machines now and in the future. Their current manual process is time consuming and error prone. They want to automate the scale-out process to improve operational abilities. They’re unsure about the tools that are available on Azure to provision compute resources, and where each fits into the overall provisioning process.
Available provisioing solutions are:
Custom scripts (VMs)
Desired State Configuration Extensions (VMs)
Chef Server
Terraform (all resources)
Azure Automation State Configuration
Azure Resource Manager templates (all resources)
Custom Script Extension (VMs)
custom script extension downloads and runs scripts on vms
useful for post deployment configuration, software installation
Note: Take care if your configuration or management task requires a restart. A custom script extension won’t continue after a restart.
How to extend a Resource Manager template
There are several ways
create multiple templates, each defining one piece of the system (then link or nest them together to build a more complete system)
modify an existing template ( that’s often the fastest way to get started writing your own templates)
Example
Create a VM.
Open port 80 through the network firewall.
Install and configure web server software on your VM.
# Requirements:
# Create a VM.
# Open port 80 through the network firewall.
# Install and configure web server software on your VM.

az vm extension set \
  --resource-group $RESOURCEGROUP \
  --vm-name SimpleWinVM \
  --name CustomScriptExtension \
  --publisher Microsoft.Compute \
  --version 1.9 \
  --settings '{"fileUris":["https://raw.githubusercontent.com/MicrosoftDocs/mslearn-welcome-to-azure/master/configure-iis.ps1"]}' \
  --protected-settings '{"commandToExecute": "powershell -ExecutionPolicy Unrestricted -File configure-iis.ps1"}' # the script to enable IIS


# This is the content of the configure-iis.ps1 file
#--------------------------------------------------------------
# Install IIS.
dism /online /enable-feature /featurename:IIS-WebServerRole

# Set the home page.
Set-Content `
  -Path "C:\\inetpub\\wwwroot\\Default.htm" `
  -Value "<html><body><h2>Welcome to Azure! My name is $($env:computername).</h2></body></html>"
#--------------------------------------------------------------
Use Chef’s knife tool to deploy virtual machines and simultaneously apply recipes to them. You install the knife tool on your admin workstation, which is the machine where you create policies and execute commands. Then run your knife commands from your admin workstation.
# The following example shows how a knife command can be used to create a virtual machine on Azure. The command
# simultaneously applies a recipe that installs a web server on the machine.

knife azurerm server create `
    --azure-resource-group-name rg-chefdeployment `
    --azure-storage-account store `
    --azure-vm-name chefvm `
    --azure-vm-size 'Standard_DS2_v2' `
    --azure-service-location 'eastus' `
    --azure-image-reference-offer 'WindowsServer' `
    --azure-image-reference-publisher 'MicrosoftWindowsServer' `
    --azure-image-reference-sku '2016-Datacenter' `
    --azure-image-reference-version 'latest' `
    -x myuser `
    -P yourPassword `
    --tcp-endpoints '80,3389' `
    --chef-daemon-interval 1 `
    -r "recipe[webserver]"
You can also use the Chef extension to apply recipes to the target machines. The following example defines a Chef extension for a virtual machine in an Azure Resource Manager template. It points to a Chef server by using the chef_server_url property. It points to a recipe to run on the virtual machine to put it in the desired state.
A recipe might look like the one that follows. The recipe installs an IIS web server.
#install IIS on the node.
powershell_script 'Install IIS' do
     action :run
     code 'add-windowsfeature Web-Server'
end

service 'w3svc' do
     action [ :enable, :start ]
end
Azure Desired State Configuration (DSC) extensions
Automation State Configuration
Resource Manager templates
Ease of setup
is built into the Azure portal, so setup is eas
are easy to read, update, and store. Configurations define what state you want to achieve. The author doesn’t need to know how that state is reached.
isn’t difficult to set up, but it requires the user to be familiar with the Azure portal.
create Resource Manager templates easily. You have many templates available from the GitHub community, which you can use or build upon. Alternatively, you can create your own templates from the Azure portal.
Management
can get tricky as your infrastructure grows and you accumulate different custom scripts for different resources
democratizes configuration management across servers.
The service manages all of the virtual machines for you automatically. Each virtual machine can send you detailed reports about its state, which you can use to draw insights from this data. Automation State Configuration also helps you to manage your DSC configurations more easily.
is straightforward because you manage JavaScript Object Notation (JSON) files.
Interoperability
can be added into an Azure Resource Manager template. can also deploy it through Azure PowerShell or the Azure CLI.
are used with Azure Automation State Configuration. They can be configured through the Azure portal, Azure PowerShell, or Azure Resource Manager templates.
requires DSC configurations. It works with your Azure virtual machines automatically, and any virtual machines that you have on-premises or on another cloud provider.
You can use other tools to provision Resource Manager templates, such as the Azure CLI, the Azure portal, PowerShell, and Terraform.
Configuration language
write scripts by using many types of commands. e.g. powershell, bash
Use PowerShell
powershell
JSON
Limitations and drawbacks
aren’t suitable for long run scripts or reboots needed scripts
only use PowerShell to define configurations. If you use DSC without Azure Automation State Configuration, you have to take care of your own orchestration and management.
use powershell
JSON has a strict syntax and grammar, and mistakes can easily render a template invalid. The requirement to know all of the resource providers in Azure and their options can be onerous.
Scenario for custom script: The organization you work for has been given a new contract to work for a new client. They have a handful of virtual machines that run on Azure. The development team decides they need to install a small application they’ve written to help increase their team’s productivity and make sure they can meet new deadlines. This application doesn’t require a restart.
Custom script advantages: The custom script extension is good for small configurations after provisioning. It’s also good if you need to add or update some applications on a target machine quickly. It’s imperative for ad-hoc cross-platform scripting.
Scenario for Azure Desired State Configuration State: The organization you work for is testing a new application, which requires new virtual machines to be identical so that the application can be accurately tested. The company wants to ensure that the virtual machines have the exact same configuration settings. You notice that some of these settings require multiple restarts of each virtual machine. Your company wants a singular state configuration for all machines at the point of provisioning. Any error handling to achieve the state should be abstracted as much as possible from the state configuration. Configurations should be easy to read.
Azure Desired State Configuration advantages: DSC is easy to read, update, and store. DSC configurations help you declare the state your machines should be in at the point they are provisioned, rather than having instructions that detail how to put the machines in a certain state. Without Azure Automation State Configuration, you have to manage your own DSC configurations and orchestration. DSC can achieve more when it’s coupled with Azure Automation State Configuration.
Scenario for Azure State Configuration: You learn that the company you work for wants to be able to create hundreds of virtual machines, with identical configurations. They want to report back on these configurations. They want to be able to see which machines accept which configurations without problems. They also want to see those problems when a machine doesn’t achieve a desired state. In addition, they want to be able to feed all of this data into a monitoring tool so they can analyze all of the data and learn from it.
Azure State Configuration advantages: The Azure Automation State Configuration service is good for automating your DSC configurations, along with the management of machines that need those configurations, and getting centralized reporting back from each machine. You can use DSC without Azure Automation State Configuration, particularly if you want to administer a smaller number of machines. For larger and more complicated scenarios that need orchestration, Azure Automation State Configuration is the solution you need. All of the configurations and features that you need can be pushed to all of the machines, and applied equally, with minimal effort.
Scenario for ARM Templates: Each developer should be able to automatically provision an entire group of virtual machines that are identical to what everyone else on the team creates. The developers want to be sure they’re all working in the same environment. The developers are familiar with JSON, but they don’t necessarily know how to administer infrastructure. They need to be able to provision all of the resources they need to run these virtual machines in an easy and rapid manner.
ARM Template advantages: Resource Manager templates can be used for small ad-hoc infrastructures. They’re also ideal for deploying larger infrastructures with multiple services along with their dependencies. Resource templates can fit well into developers’ workflows. You use the same template to deploy your application repeatedly during every stage of the application lifecycle.
third-party solution comparison
Chef
Terraform
Ease of setup
runs on the master machine, and Chef clients run as agents on each of your client machines. You can also use hosted Chef and get started much faster, instead of running your own server.
To get started with Terraform, download the version that corresponds with your operating system and install it.
Management
can be difficult because it uses a Ruby-based domain-specific language. You might need a Ruby developer to manage the configuration.
files are designed to be easy to manage.
Interoperability
only works under Linux and Unix, but the Chef client can run on Windows.
supports Azure, Amazon Web Services, and Google Cloud Platform.
Configuration language
uses a Ruby-based domain-specific language.
uses Hashicorp Configuration Language (HCL). You can also use JSON.
Limitations and drawbacks
The language can take time to learn, especially for developers who aren’t familiar with Ruby.
Because Terraform is managed separately from Azure, you might find that you can’t provision some types of services or resources.
Scenario for Chef Server: Your organization has decided to let the developers create some virtual machines for their own testing purposes. The development team knows various programming languages and recently started writing Ruby applications. They’d like to scale these applications and run them on test environments. They’re familiar with Linux. The developers run only Linux-based machines and destroy them after testing is finished.
Chef Server advantages: Chef is suitable for large-scale infrastructure deployment and configuration. Chef makes it easy for you to automate the deployment of an entire infrastructure, such as in the workflow of a development team.
Scenario for Terraform: Your organization has gained a new client who wants to create multiple virtual machines across several cloud providers. The client has asked you to create three new virtual machines in Azure and one other in the public cloud. The client wants the virtual machines to be similar. They should be created by using a script that works with both providers. This approach will help the client have a better idea of what they’ve provisioned across providers.
Terraform advantages: With Terraform, you can plan the infrastructure as code and see a preview of what the code will create. You can have that code peer reviewed to minimize errors in configuration. Terraform supports infrastructure configurations across different cloud service providers.
Example
# Source : https://docs.microsoft.com/en-us/learn/modules/choose-compute-provisioning/5-exercise-deploy-template
# Clone the configuration and template
git clone https://github.com/MicrosoftDocs/mslearn-choose-compute-provisioning.git

cd mslearn-choose-compute-provisioning
code Webserver.ps1

# file content
Configuration Webserver
{
    param ($MachineName)

    Node $MachineName
    {
        #Install the IIS Role
        WindowsFeature IIS
        {
            Ensure = "Present"
            Name = "Web-Server"
        }

        #Install ASP.NET 4.5
        WindowsFeature ASP
        {
            Ensure = "Present"
            Name = "Web-Asp-Net45"
        }

        WindowsFeature WebServerManagementConsole
        {
            Name = "Web-Mgmt-Console"
            Ensure = "Present"
        }
    }
}

# configure template
code template.json

# replace modulesUrl parameter in template
"modulesUrl": {
    "type": "string",
    "metadata": {
        "description": "URL for the DSC configuration module."
    }
},

# Validate your template
az deployment group validate \
    --resource-group learn-46d7acf0-e3c7-48c8-9416-bf9f3875659c \
    --template-file template.json \
    --parameters vmName=hostVM1 adminUsername=serveradmin

# Deploy your template
az deployment group create \
    --resource-group learn-46d7acf0-e3c7-48c8-9416-bf9f3875659c \
    --template-file template.json \
    --parameters vmName=hostVM1 adminUsername=serveradmin

az resource list \
    --resource-group learn-46d7acf0-e3c7-48c8-9416-bf9f3875659c \
    --output table \
    --query "[*].{Name:name, Type:type}"

echo http://$(az vm show \
    --show-details \
    --resource-group learn-46d7acf0-e3c7-48c8-9416-bf9f3875659c \
    --name hostVM1 \
    --query publicIps \
    --output tsv)
New-AzResourceGroup -Name <resource-group-name> -Location <resource-group-location> #use this command when you need to create a new resource group for your deployment
New-AzResourceGroupDeployment -ResourceGroupName <resource-group-name> -TemplateUri https://raw.githubusercontent.com/Azure/azure-quickstart-templates/master/101-vm-simple-windows/azuredeploy.json
CLI
az group create --name <resource-group-name> --location <resource-group-location> #use this command when you need to create a new resource group for your deployment
az group deployment create --resource-group <my-resource-group> --template-uri https://raw.githubusercontent.com/Azure/azure-quickstart-templates/master/101-vm-simple-windows/azuredeploy.json
Example
# define parameters for ARM template
RESOURCEGROUP=learn-quickstart-vm-rg
LOCATION=eastus
USERNAME=azureuser
PASSWORD=$(openssl rand -base64 32)

# create resource group
az group create --name $RESOURCEGROUP --location $LOCATION

# validate the template
az deployment group validate \
  --resource-group $RESOURCEGROUP \
  --template-uri "https://raw.githubusercontent.com/Azure/azure-quickstart-templates/master/101-vm-simple-windows/azuredeploy.json" \
  --parameters adminUsername=$USERNAME \
  --parameters adminPassword=$PASSWORD \
  --parameters dnsLabelPrefix=$DNS_LABEL_PREFIX

# deploy the template
az deployment group create \
  --name MyDeployment \
  --resource-group $RESOURCEGROUP \
  --template-uri "https://raw.githubusercontent.com/Azure/azure-quickstart-templates/master/101-vm-simple-windows/azuredeploy.json" \
  --parameters adminUsername=$USERNAME \
  --parameters adminPassword=$PASSWORD \
  --parameters dnsLabelPrefix=$DNS_LABEL_PREFIX

  # verify the deployment
  az deployment group show \
  --name MyDeployment \
  --resource-group $RESOURCEGROUP


  # list the vms
  az vm list \
  --resource-group $RESOURCEGROUP \
  --output table
This document presents the Azure Storage’s Best Practices.
Call Storage Rest API
The Storage’s REST API can be called as follows over HTTP/HTTPS. The output of this call is XML therefore the pre-built client libraries can help to work with XML output.
GET https://[url-for-service-account]/?comp=list&include=metadata

# Custom Domain can be used as well
# Https://[StorageName].blob.core.windows.net/
# Https://[StorageName].queue.core.windows.net/
# Https://[StorageName].table.core.windows.net/
# Https://[StorageName].file.core.windows.net/
Access Key & API Endpoint: Each storage has a unique access key.
Shared Access Signature (SAS): It can have grained permission
How to secure the authentication values
Using Key/value
Best Practice 1
Scenario
You’re building a photo-sharing application. Every day, thousands of users take pictures and rely on your application to keep them safe and make them accessible across all their devices. Storing these photos is critical to your business, and you would like to ensure that the system used in your application is fast, reliable, and secure. Ideally, this would be done without you having to build all these aspects into the app. [Source]
# Create an Azure Storage
az storage account create \
        --resource-group learn-242f907f-37b3-454d-a023-dae97958e5d9 \
        --kind StorageV2 \
        --sku Standard_LRS \
        --access-tier Cool \
        --name parisalsnstorage

# Get the ConnectionString of the Storage
az storage account show-connection-string \
    --resource-group learn-242f907f-37b3-454d-a023-dae97958e5d9 \
    --name parisalsnstorage \
    --query parisalsnstorage
2. Create an Application
# Create a DotNet Core Application
# Create the project in spesific folder with -o / --output <folder-name>
dotnet new console --name PhotoSharingApp

# Change to project folder
cd PhotoSharingApp

# Run the project
dotnet run

# Create a appsettings.json file. The Storage connection string is kept here.
# This is the simple version
touch appsettings.json
3. Configure Application
# Add Azure Storage NuGet Package
dotnet add package WindowsAzure.Storage

# Run to test the project
dotnet run

# Edit the appsettings.json
code .
After the appsettings.json file is opned in Editor change the content as follows
{
  "StorageAccountConnectionString": "The Storage Connection String must be placed here"
}
The next file is PhotoSharingApp.csproj. It have to be changed as follows
using System;
using Microsoft.Extensions.Configuration;
using System.IO;
using Microsoft.WindowsAzure.Storage;
using System.Threading.Tasks;

namespace PhotoSharingApp
{
    class Program
    {
        static async Task Main(string[] args)
        {
            var builder = new ConfigurationBuilder()
                .SetBasePath(Directory.GetCurrentDirectory())
                .AddJsonFile("appsettings.json");

            var configuration = builder.Build();
            var connectionString = configuration["StorageAccountConnectionString"];

            # Simplest way to initialize the object model via either .TryParse or .Parse
            if (!CloudStorageAccount.TryParse(connectionString, out CloudStorageAccount storageAccount))
            {
                Console.WriteLine("Unable to parse connection string");
                return;
            }

            var blobClient = storageAccount.CreateCloudBlobClient();
            var blobContainer = blobClient.GetContainerReference("photoblobs");
            bool created = await blobContainer.CreateIfNotExistsAsync();

            Console.WriteLine(created ? "Created the Blob container" : "Blob container already exists.");
        }
    }
}
Best Practice 2
Best Practice n
I’m working on the content..it will be published soon 🙂
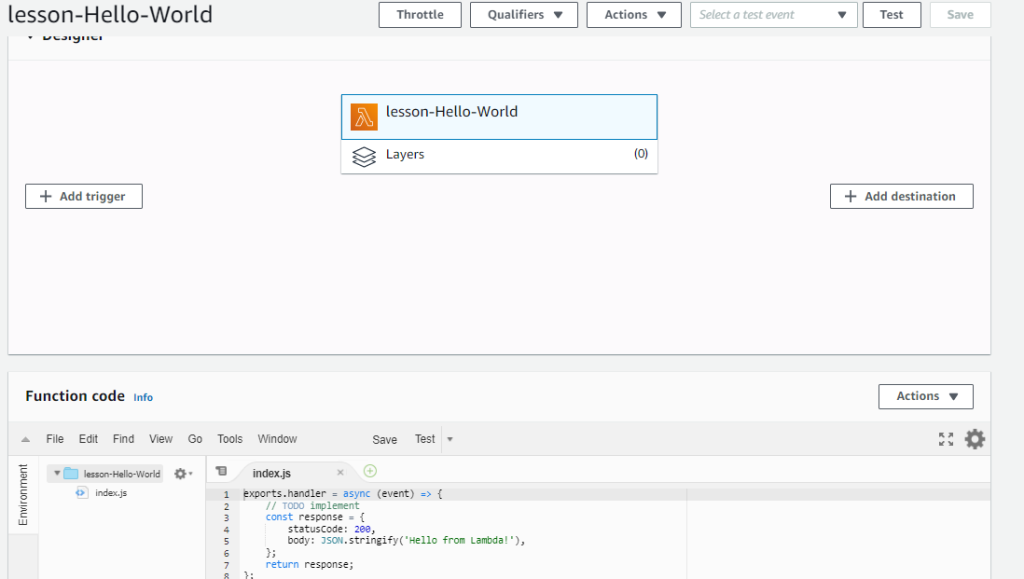
AWS Lambda is one of the Serverless possibilites, We can bring our code and have it run in response to an event.
Handler is the primary entry point and the whole code can follow the OOP standards.
Lambda function and object oriented design
This is the usual layer of the lambda function. The business logic must not be developed in handler.
The business logic must be developed in controller class.
Services is for interfaces with external services.
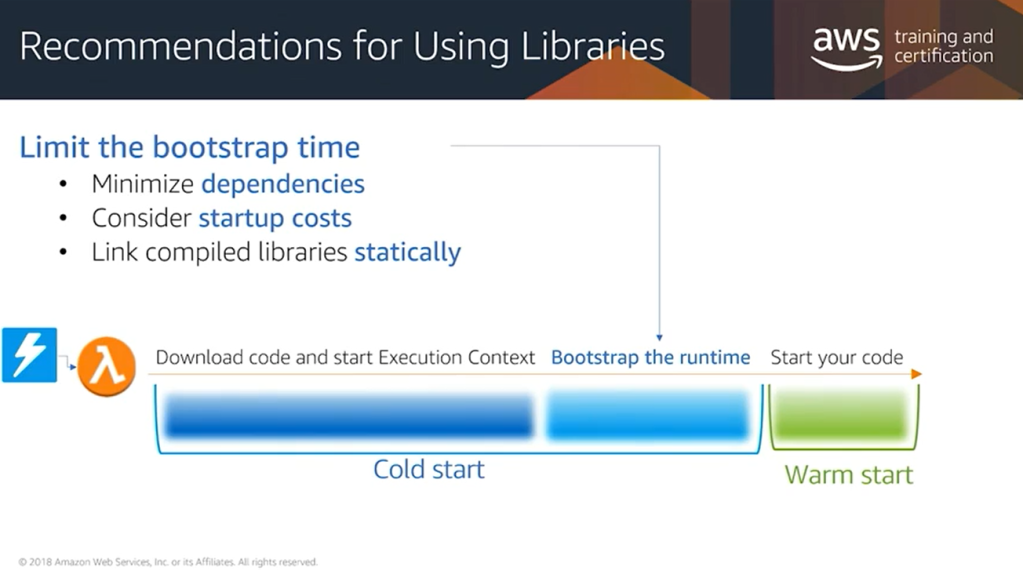
when a Lambda function runs, each time a new execution context is created, there’s a bootstrap component to that start up time for that function where the runtime itself needs to be bootstrapped, and all of the dependencies for that function have to be loaded from S3 and initialized. In order to optimize the cold starts for your function, you should consider reducing the overall size of your libraries.
So that means removing any unnecessary dependencies in your dependency graph, as well as being conscious of the overall start up time for the libraries you’re using. Certain libraries like Spring within the Java context take a long time to initialize, and that time is going to impact the cold start times for your function. Also, if you’re using any compiled libraries within your function, consider statically linking them instead of using dynamic link libraries.
Amazon DynamoDB is a fast NoSQL database service for all applications that need consistent, single-millisecond latency at any scale. It is a fully managed database and supports both document and key-value data models. Its flexible data model and reliable performance make it a great fit for mobile, web, gaming, ad-tech, IoT, and many other applications. [Source]
Create DynamoDB
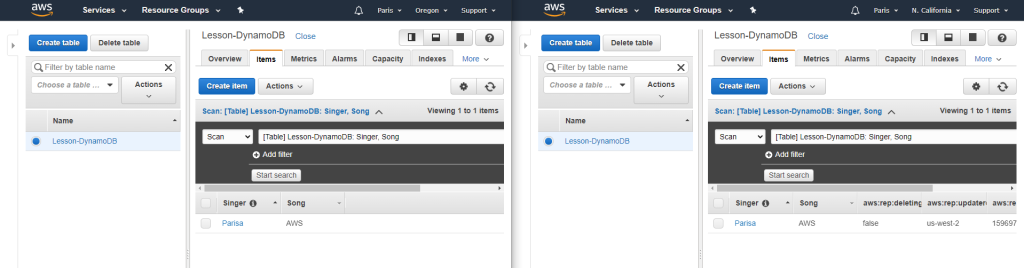
Create Global table
For creating Global table, the DynamoDb Stream must be enabled. The following figure demonstrates how to enable it.
Then we use the Global Tables tab and Add region.
After I added a new item to “Oregon” table, the values would be added to the “California” as well.
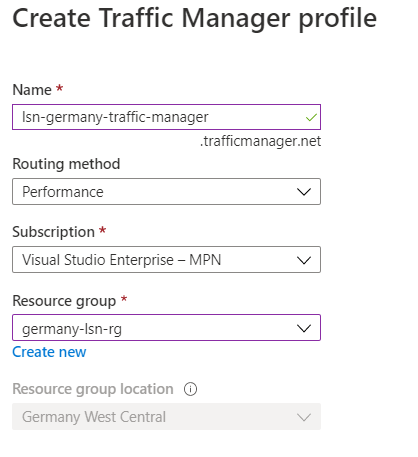
Traffic Manager: provides DNS load balancing to your application, so you improve your ability to distribute your application around the world. Use Traffic Manager to improve the performance and availability of your application.
Application Gateway vs. Traffic Manager: The traffic manager only directs the clients to the IP address of the service that they want to go to and the Traffic Manager cannot see the traffic. But Gateway sees the traffic.
Load balancing the web service with the application gateway
Improve application resilience by distributing the load across multiple servers and using path-based routing to direct web traffic.
Application gateway works based on Layer 7
Scenario: you work for the motor vehicle department of a governmental organization. The department runs several public websites that enable drivers to register their vehicles and renew their driver’s licenses online. The vehicle registration website has been running on a single server and has suffered multiple outages because of server failures.
Link to a sample code – Terraform implementation of Azure Application Gateway – Terraform implementation of Azure Application Gateway’ Backend pool with VM – Terraform implementation of Azure Application Gateway’s HTTPS with Keyvault as Ceritficate Store
Load balancing with Azure Load Balancer
Azure load balancer for resilient applications against failure and for easily scaling
Azure load balancer works in layer 4
LB spreads/distributes requests to multiple VMs and services (user gets service even when a VM is failed) automatically
LB provides high availability
LB uses a Hash-based distribution algorithm (5-tuple)
5-tuple hash map traffic to available services (Source IP, Source Port, Destination IP, Destination Port, Protocol Type)
supports an inbound, and outbound scenario
Low latency, high throughput, scale up to millions of flows for all TCP and UDP applications
Isn’t a physical instance but only an object for configuring infrastructure
For high availability, we can use LB with availability set (protect for hardware failure) and availability zones (for data center failure)
Scenario: You work for a healthcare organization that’s launching a new portal application in which patients can schedule appointments. The application has a patient portal and web application front end and a business-tier database. The database is used by the front end to retrieve and save patient information. The new portal needs to be available around the clock to handle failures. The portal must adjust to fluctuations in load by adding and removing resources to match the load. The organization needs a solution that distributes work to virtual machines across the system as virtual machines are added. The solution should detect failures and reroute jobs to virtual machines as needed. Improved resiliency and scalability help ensure that patients can schedule appointments from any location [Source].
Link to a sample code to deploy simple Nginx web servers with Availability Set and Public Load Balancer.
Load Balancer SKU
Basic Load Balancer
Port forwarding
Automatic reconfiguration
Health Probe
Outbound connections through source network address translation (SNAT)
Diagnostics through Azure log analytics for public-facing load balancers
Can be used only with availability set
Standard Load Balancer
Supports all the basic LB features
Https health probe
Availability zone
Diagnostics through Azure monitor, for multidimensional metrics
High availability (HA) ports
outbound rules
guaranteed SLA (99,99% for two or more VMs)
Load Balancer Types
Internal LB
distributes the load from internal Azure resources to other Azure resources
no traffic from the internet is allowed
External/Public LB
Distributes client traffic across multiple VMS.
Permits traffic from the internet (browser, module app, other resources)
public LB maps the public IP and port of incoming traffic to the private IP address and port number of the VM in the back-end pool.
Distribute traffic by applying the load-balancing rule
Distribution modes
Lb distributes traffic equally among vms
distribution modes are for creating different behavior
When you create the load balancer endpoint, you must specify the distribution mode in the load balancer rule
Prerequisites for load balancer rule
must have at least one backend
must have at least one health probe
Five tuple hash
default of LB
As the source port is included in the hash and can be changed for each session, the client might be directed to a different VM for each session.
source IP affinity / Session Affinity / Client IP affinity
this distribution is known as session affinity/client IP affinity
to map traffic to the server, the 2-tuple hash is used (Source IP, Destination IP) or the 3-tuple (Source IP, Destination IP, Protocol)
Hash ensures that requests from specific clients are always sent to the same VM.
Scenario: Remote Desktop Protocol is incompatible with 5-tuple hash
Scenario: for uploading media files this distribution must be used because for uploading a file the same TCP session is used to monitor the progress and a separate UDP session uploads the file.
Scenario: The requirement of the presentation tier is to use in-memory sessions to store the logged user’s profile as the user interacts with the portal. In this scenario, the load balancer must provide source IP affinity to maintain a user’s session. The profile is stored only on the virtual machine that the client first connects to because that IP address is directed to the same server.
Enhance service availability and data locality with Traffic Manager
Scenario: a company that provides a global music streaming web application. You want your customers, wherever they are in the world, to experience near-zero downtime. The application needs to be responsive. You know that poor performance might drive your customers to your competitors. You’d also like to have customized experiences for customers who are in specific regions for user interface, legal, and operational reasons. Your customers require 24×7 availability of your company’s streaming music application. Cloud services in one region might become unavailable because of technical issues, such as planned maintenance or scheduled security updates. In these scenarios, your company wants to have a failover endpoint so your customers can continue to access its services.
traffic manager is a DNS-based traffic load balancer
Traffic Manager distributes traffic to different regions for high availability, resilience, and responsiveness
it resolves the DNS name of the service as an IP address (directs to the service endpoint based on the rules of the traffic routing method)
it’s a proxy or gateway
it doesn’t see the traffic that a client sends to a server
it only gives the client the IP address of where they need to go
it’s created only Global.
The location cannot be specified because it’s Global
Traffic Manager Profile’s routing methods
each profile has only one routing method
Weighted routing
distribute traffic across a set of endpoints, either evently or based on different weights
weights between 1 to 1000
for each DNS query received, the traffic manager randomly chooses an available endpoint
probability of choosing an endpoint is based on the weights assigned to endpoints
with endpoints in different geographic locations, the best performance endpoint for the user is sent
it uses an internet latency table, which actively track network latencies to the endpoints
Geographic routing
based on where the DNS query originated, the specific endpoint of the region is sent to the user
it’s good for geo-fence content e.g. it’s good for countries with specific terms and conditions for regional compliance
Multivalue routing
to obtain multiple healthy endpoints in a single DNS query
caller can make client-side retries if endpoint is unresponsive
it can increase availability of service and reduce latency associated with a new DNS query
Subnet routing
maps a set of user ip addresses to specific endpoints e.g. can be used for testing an app before release (internal test), or to block users from specific ISPs.
Priority routing
traffic manager profile contains a prioritized list of services
Traffic Manager Profile’s endpoints
endpoint is the destination location that is returned to the client
Types are
Azure endpoints: for services hosted in azure
Azure App Service
public ip resources that are associated with load balancers, or vms
External endpoints
for ip v4/v6
FQDNs
services hosted outside azure either on-prem or other cloud
Nested endpoints: are used to combine Traffic Manager profiles to create more flexible traffic-routing schemes to support the needs of larger, more complex deployments.
Endpoints Types/Targets
Each traffic manager profile can have serveral endpoints with different types
To have a resilience platform all parts must be configured to befault tolerant. But first the level of redundancy and resilienc must be determined.
Fault Tolerant Server-based Services
Server bases services are those that are “instance” based. Services like RDS and ElastiCache are instanced based in that you can run one instance, but you will not have any fault tolerance. In order to gain high availability, you need to tell the service to provision a second instance for the primary instance to failover to, should there be an issue with it.
This model is similar to traditional data center environments. A good way to tell if a service is a server/instance based service or if the service is a pre-existing product that AWS has created a service with (MongoDB, Redis, MySQL, Postgres).
Most of the server based services have similar concepts for handling a hardware failover automatically. This functionality is the same that handles a single availability zone failure. By creating active/standby pairs of servers that replicate and by having each member of the pair in a different availability zone, you create the infrastructure that handles both of these failure modes.
ElastiCache
ElastiCache is one of these services. You will create an ElastiCache cluster that does not have a single point of failure, and that can handle an AZ outage.
First, create an ElastiCache subnet group in the default VPC using each available subnet and
then create a multi-AZ redis cluster.
Elasticache’s Subnet Groups
AWS > Elasticache page > Subnet Groups
The Subnet Groups option is availble on the service page
Then create a new Subnet Groups. Based on the region of the selected VPC the Availability Zone is listed.
We can have only one subnet in each availability zone. See the figure above, I tried to add more but it’s not possible.
As next we create the Redis Cluster. The created Subnet in the previous step, is selected in Subnet Groups.
DynamoDB
DynamoDB is a native AWS service for non-relational databases
It is Multi-AZ by default and can be made Multi-Region with DynamoDB Streams and by creating a Global DynamoDB table
Global table is multi-region and active/active (it means any changes to one table is propagated to sll other tables)
DynamoDB scales to extremely high loads with very fast response times
It also supports configuring a caching layer in front of the database.
DynamoDB Streams allow every change made to a DynamoDB table to be “streamed” into other services. These other services can then choose what actions to take on the different items or operations within the stream.
In DynamoDb each database cintains just one table
This table has just one primary key and optional sort keyby default
It’s possible to have multi primary key, sort key on the table.
Indeces as well
charge is based on operation in seconds
or pay on demand
Automatic scale up and down
DynamoDB Streams And Global Tables
DynamoDB Streams capture all changes made to a DynamoDB Table. This includes only actions that modify the table, not actions that only read from the table.
DynamoDB Global Tables take advantage of DynamoDB Streams the create Multi-Region active/active DynamoDB Tables. This allows you to modify a table in multiple regions and have those changes reflected in all regions.
Multi-Region, active/active data stores are a big deal and extremely useful for use cases that require it.
DynamoDB is a non-relational database. It is a fully managed service created by AWS. With DynamoDB you create tables, but unlike a relational database, each table is completely independent.
DynamoDB is not like the server-based services that AWS offers (RDS, ElastiCache, etc.), it is “serverless” in the sense that you do not have any control over the physical infrastructure that it runs on. You do not pay for the service when you are not using it (except used storage space). Because DynamoDB is different than server-based offerings, the mechanisms for redundancy are also different. DynamoDB offers multi-region, active/active service if you elect it. This is called DyanmoDB Global Tables.
Amazon DynamoDB is a fast NoSQL database service for all applications that need consistent, single-millisecond latency at any scale. It is a fully managed database and supports both document and key-value data models. Its flexible data model and reliable performance make it a great fit for mobile, web, gaming, ad-tech, IoT, and many other applications. [Source]
Fault Tolerant Operations
1- Subnet Groups
To get Multi-AZ availability, you need to configure a Subnet Group (contains subnets in different AZs) within the service. A subnet is attached to an AZ, and creating a grouping of subnets within the service and tells the service where it can place the primary and standby instances of a service.
Based on the service and data volumne, creating a new instance in secondary subnet, can takes diffrent duration.
2- Multiple instances
To reduce downtime to seconds, multi instances have to be created.
3- Multi-AZ checkbox
4- Multi Region Redundancy
Subnet Groups are key to creating Multi-AZ redundancy in server-based services. Subnet Groups define the different availability zones that your service will run in, and having multiple instances allow for fast failover if a single AZ were to go down.
Multi-Region redundancy is more tricky. Depending on the service, it is harder, or not possible to run a service with failover between regions.
Some services allow to have read replica in a second region, but later you have to activate it as primary e.g. Amazon RDS.
Some services don’t have multi region support e.g. Elastic Search.